Transfer SQL Server Objects Task in SSIS
The Transfer SQL Server Objects task in SQL Server Integration Services is used to transfer one or more SQL Server objects (such as Tables, View, Stored Procedures, User Defined Functions, Indexes, Users, Logins etc) from one Database to another Database. Transfer SQL Server Objects task allows us to use either same SQL Server instance for Source and Destination connections or you can use different instances.
Some of the important features of the Transfer SQL Server Objects task in SSIS are:
- Transfer SQL Server Objects task allows you to select either one type of SQL object or all the SQL Server objects. Tables, View, Stored Procedures, User Defined Functions etc are some of the SQL Server Objects.
- Transfer SQL Server Objects task allows you to select either all tables or it will transfer all the Tables. Please refer Transfer SQL Server Tables with Data in SSIS article to understand, How to Transfer SQL Server Tables from Source to Destination.
- This task allows you to transfer SQL Server Table structures means table without data. Please refer Transfer SQL Server Table Structures in SSIS article to understand, How to Transfer SQL Server Table Structures from Source to Destination.
- Transfer SQL Server Objects task allows you to select either all Stored Procedures or it will transfer all the Stored Procedures in the Source Database. Please refer Transfer SQL Server Stored Procedures in SSIS article to understand, How to Transfer User Defined Stored Procedures from Source to Destination.
- Transfer SQL Server Objects task allows you to select either all User Defined Functions or it will transfer all the User Defined Functions in the Source Database. Please referTransfer SQL Server User Defined Functions in SSIS article to understand, How to Transfer User Defined Functions from Source to Destination.
- Transfer SQL Server Objects task allows you to select either all Views or it will transfer all Views. Please refer Transfer SQL Server Views in SSIS article to understand, How to Transfer Views from Source to Destination.
Configuring Transfer SQL Server Objects Task in SSIS 2014
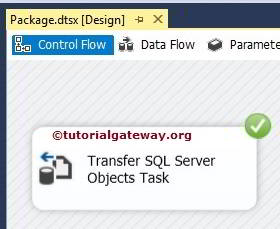
Drag the Transfer SQL Server Objects Task from the Toolbox to the Control Flow Region. Double click on the task will open the Transfer SQL Server Objects Task Editor as shown below to configure it.

General Tab
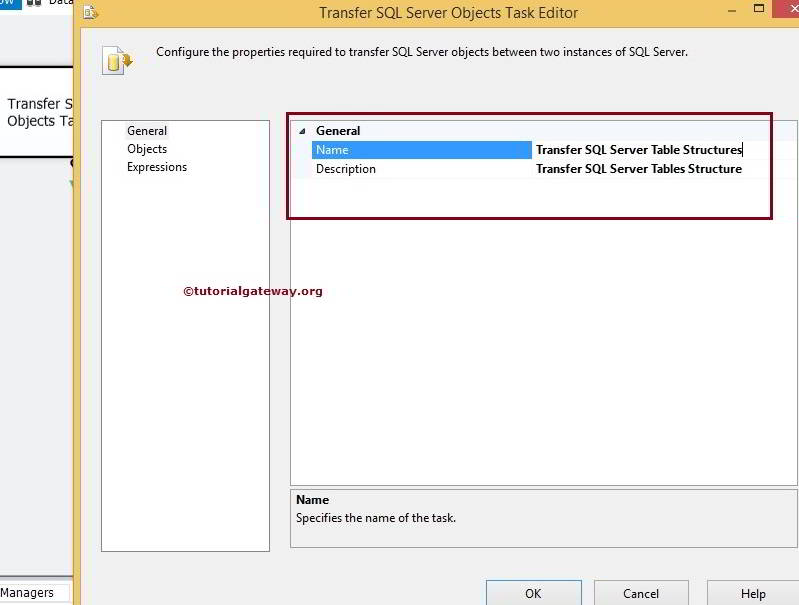
This tab is purely used to change the Transfer SQL Server Objects Task name and provide the description. In real-time please change the Task name to appropriate name and write the description to explain the task functionality because it will help other developers to understand the task better.

For instance if you are transferring tables then write something like:
Name: Transferring SQL Server Tables
Description: Transferring SQL Server Tables called Employees and Sales with data from [Adventure Works 2014] to [SSIS Tutorials] Database.
Objects Tab
In this tab we are going to perform all the Transfer SQL Server Objects Task operations. Lets explore them by sections.
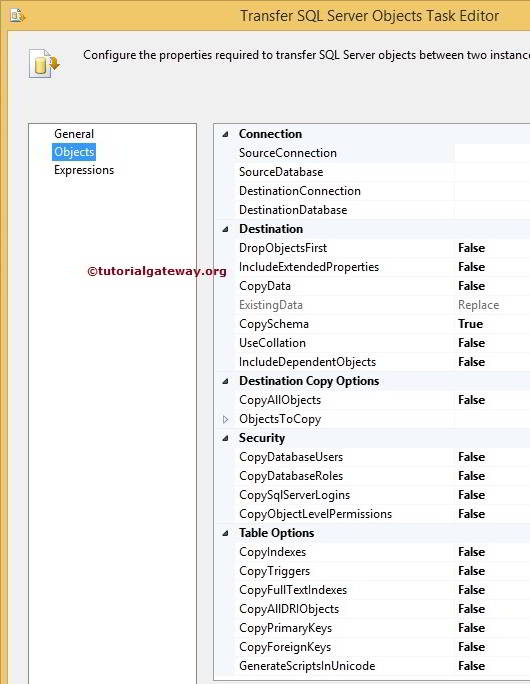
Connection
- SourceConnection: Configure the Connection Manager settings for the Source Database. If you already created then select from the list or else click <New connection…> to create New connection.
- SourceDatabase: It is the name of the database from where you want to copy the objects like tables, views and functions.
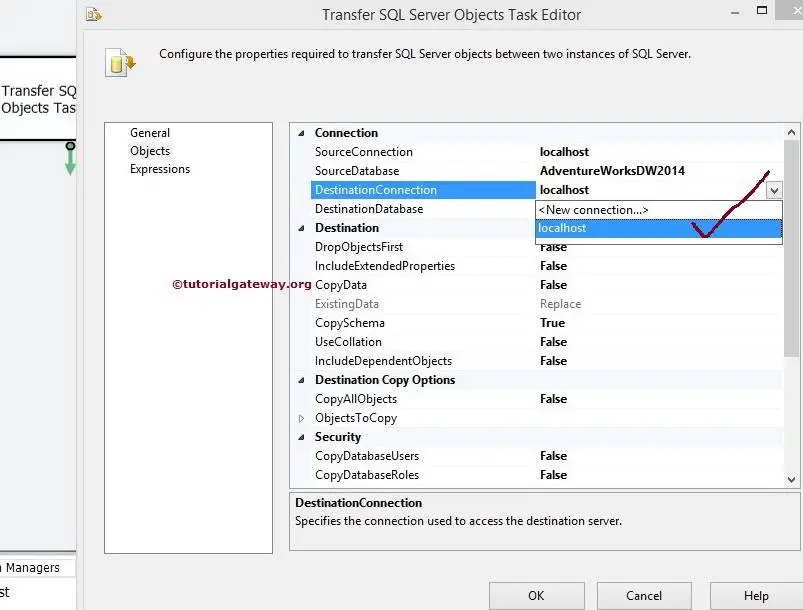
- DestinationConnection: Configure the Connection Manager settings for the Destination Database. If you already created then select from the list or else click <New connection…> to create New connection.
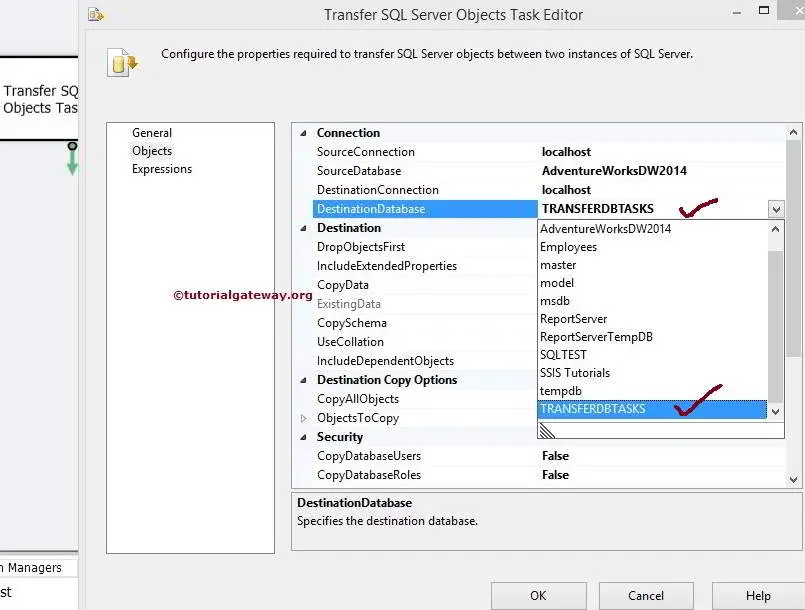
- DestinationDatabase: Select the name of a Database on the Destination Connection to which selected objects will be copied.
NOTE: Transfer SQL Server Objects Task supports SMO Connection Manager only so, For both Source and destination create SMO connection Manager.
Destination
- DropObjectsFirst: Specify whether you want to drop the selected objects on the destination Database before copy them.
- IncludeExtendedProperties: Specify whether you want to include extended properties of SQL objects while copying data.
- CopyData: While copying tables, Do you want to transfer the row data of the selected tables as well? If yes then select TRUE. If you select FALSE then empty tables with column names will be transferred.
- ExistingData: While copying data to the destination table, it gives you an option whether to append or replace data. If you select Append option then New data will be added to old data otherwise, new data will be replaced by old data.
- CopySchema: Copy the schema of the SQL objects from source to Destination.
- UseCollation: Each Database has its own Collation Settings. By setting this option to TRUE Transfer SQL Server Objects Task will use the collation setting of the Source database in the Destination Database.
- IncludeDependentObjects: If there are any dependent Objects then, by setting this option will copy those depended objects as well.
Destination Copy Objects
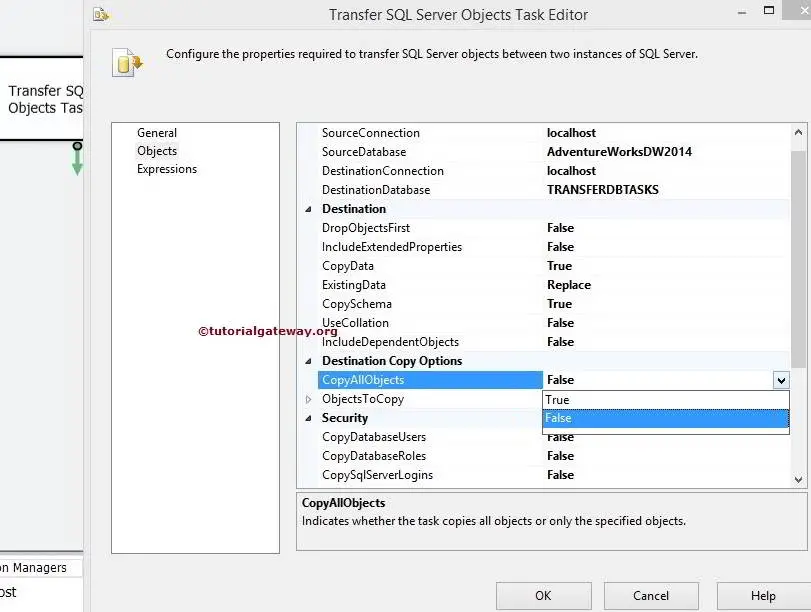
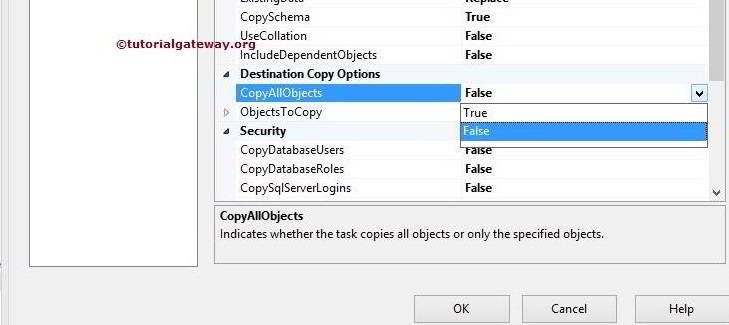
- CopyAllObjects: Do you want to copy all the SQL objects from the source database to Destination Database. If you set this to TRUE then all the SQL objects will be transferred at one Go. If set to False, next property ObjectsToCopy will get enabled.
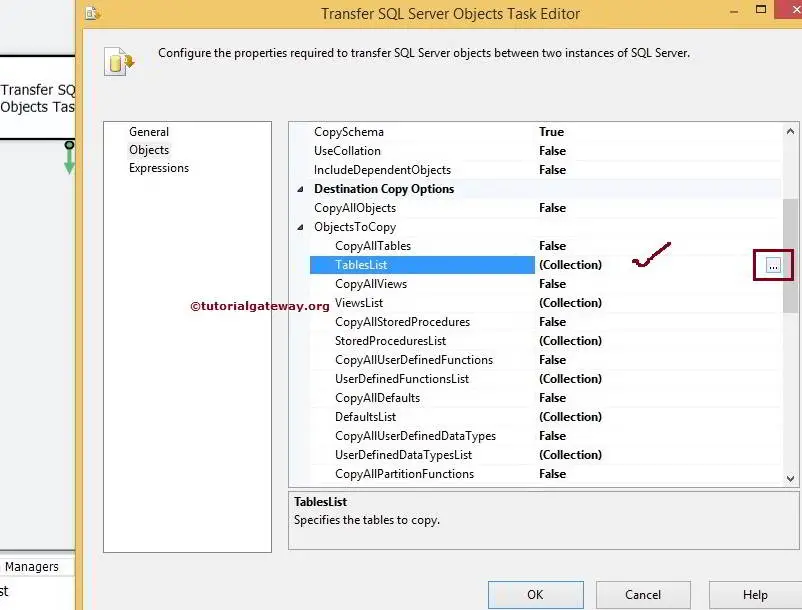
- ObjectsToCopy: By expanding this property you can select the individual SQL objects from the Source Database. These Object types may vary depending on the SQL Server version. Below screenshot will show you the ones

Here we are going to explain SQL Server 2014 Objects for you
- CopyAllTables: If you want to transfer all the tables from the Source database to Destination Database then set this option to TRUE. If you want to transfer one or few tables then set FALSE and select the required tables from TablesList
- TablesList: Besides this option there is a (…) button. Click on that button will show all the Tables present in the Source Database and your job is to select the required tables from the list. These selected tables will be Transferred to the Destination Database.
- CopyAllViews: If you want to transfer all the Views from the Source database to Destination Database then set this option to TRUE. If you want to transfer one or few Views then set FALSE and select the required Views from ViewsList
- ViewsList: Besides this option there is a (…) button. Click on that button will show all the Views present in the Source Database and your job is to select the required Views from the list. These selected Views will be Transferred to the Destination Database.
- CopyAllStoredProcedures: If you want to transfer all the User Defined Stored Procedures from the Source database to Destination Database then set this option to TRUE. If you want to transfer one or few Stored Procedures then set FALSE and select the required User Defined Stored Procedures from StoredProceduresList
- StoredProceduresList: Besides this option there is a (…) button. Click on that button will show all the User Defined Stored Procedures present in the Source Database and your job is to select the required Stored Procedures from the list. These selected User Defined Stored Procedures will be Transferred to the Destination Database.
- CopyAllUserDefinedFunctions: If you want to transfer all the User Defined Functions from the Source database to Destination Database then set this option to TRUE. If you want to transfer one or few User Defined Functions then set FALSE and select the required User Defined Functions from UserDefinedFunctionsList
- UserDefinedFunctionsList: Besides this option there is a (…) button. Click on that button will show all the User Defined Functions present in the Source Database and your job is to select the required User Defined Functions from the list. These selected User Defined Functions will be Transferred to the Destination Database.
- CopyAllDefaults: If you want to transfer all the Defaults from the Source database to Destination Database then set this option to TRUE. If you want to transfer one or few Defaults then set FALSE and select the required ones from DefaultsList
- DefaultsList: Besides this option there is a (…) button. Click on that button will show all the Defaults present in the Source Database and your job is to select the required Defaults from the list. These selected Defaults will be Transferred to the Destination Database.
- CopyAllUserDefinedDataTypes: If you want to transfer all the User Defined Data Types from the Source database to Destination Database then set this option to TRUE. If you want to transfer one or few Data Types then set FALSE and select the required User Defined Data Types from UserDefinedDataTypesList
- UserDefinedDataTypesList: Besides this option there is a (…) button. Click on that button will show all the User Defined Data Types present in the Source Database and your job is to select the required User Defined Data Types from the list. These selected Data Types will be Transferred to the Destination Database.
- CopyAllPartitionFunctions: If you want to transfer all the Partition Functions from the Source database to Destination Database then set this option to TRUE. If you want to transfer one or few Partition Functions then set FALSE and select the required Partition Functions from PartitionFunctionsList
- PartitionFunctionsList: Besides this option there is a (…) button. Click on that button will show all the Partition Functions present in the Source Database and your job is to select the required Partitions from the list. These selected ones will be Transferred to the Destination Database.
- CopyAllPartitionSchemes: If you want to transfer all the Partition Schemes from the Source database to Destination Database then set this option to TRUE. If you want to transfer one or few Partition Schemes then set FALSE and select the required Partition Schemes from PartitionSchemesList
- PartitionSchemesList: Besides this option there is a (…) button. Click on that button will show all the Partition Schemes present in the Source Database and your job is to select the required Partitions from the list. These selected ones will be Transferred to the Destination Database.
- CopyAllSchemas: If you want to transfer all the Database Schemas from the Source database to Destination Database then set this option to TRUE. If you want to transfer one or few Schemas then set FALSE and select the required Schemas from SchemasList
- SchemasList: Besides this option there is a (…) button. Click on that button will show all the Schemas present in the Source Database and your job is to select the required Schemas from the list. These selected ones will be Transferred to the Destination Database.
- CopyAllSqlAssemblies: If you want to transfer all the SQL Assemblies from the Source database to Destination Database then set this option to TRUE. If you want to transfer one or few Sql Assemblies then set FALSE and select the required SQL Assemblies fromSqlAssembliesList
- SqlAssembliesList: Besides this option there is a (…) button. Click on that button will show all the SQL Assemblies present in the Source Database and your job is to select the required Assemblies from the list. These selected ones will be Transferred to the Destination Database.
- CopyAllUserDefinedAggregates: If you want to transfer all the User Defined Aggregates from the Source database to Destination Database then set this option to TRUE. If you want to transfer one or few Aggregates then set FALSE and select the required ones from UserDefinedAggregatesList
- UserDefinedAggregatesList: Besides this option there is a (…) button. Click on that button will show all the User Defined Aggregates present in the Source Database and your job is to select the required Aggregates from the list. These selected ones will be Transferred to the Destination Database.
- CopyAllUserDefinedTypes: If you want to transfer all the User Defined Types from the Source database to Destination Database then set this option to TRUE. If you want to transfer one or few Types then set FALSE and select the required ones fromUserDefinedTypesList
- UserDefinedTypesList: Besides this option there is a (…) button. Click on that button will show all the User Defined Types present in the Source Database and your job is to select the required Types from the list. These selected ones will be Transferred to the Destination Database.
- CopyAllXmlSchemaCollections: If you want to transfer all the XML Schema Collections from the Source database to Destination Database then set this option to TRUE. If you want to transfer one or few XML Schema then set FALSE and select the required ones from XmlSchemaCollectionsList
- XmlSchemaCollectionsList: Besides this option there is a (…) button. Click on that button will show all the XML Schema Collections present in the Source Database and your job is to select the required XML Schemas from the list. These selected ones will be Transferred to the Destination Database.
Security
- CopyDatabaseUsers: Specify whether you want to transfer Database users from Source to Destination Database by toggling between True and False.
- CopyDatabaseRoles: Specify whether you want to transfer Roles from Source to Destination Database.
- CopySQLServerLogins: Specify whether you want to transfer SQL Server Logins from Source to Destination Database.
- CopyObjectLevelPermissions: Specify whether you want to transfer Object Level Permissions from Source to Destination Database.
Table Options
- CopyIndexes: Specify whether you want to Copy the Table Indexes from Source to Destination Database by toggling between True and False.
- CopyTriggers: Specify whether you want to Copy the Triggers on the tables from Source to Destination Database
- CopyFullTextIndexes: Specify whether you want to Copy the full text indexes from Source to Destination Database
- CopyAllDRIObjects: Specify whether you want to Copy the referral integrity on tables from Source to Destination Database
- CopyPrimaryKeys: Specify whether you want to Copy the Primary Keys on the Tables from Source to Destination Database
- CopyForeignKeys: Specify whether you want to Copy the Foreign Keys on tables from Source to Destination Database whether to include foreign keys
- GenerateScriptsInUnicode: Specify whether you want to Generate the Script in Unicode Format or not
NOTE: The person executing the package with this task must have permissions to drop and create objects.
Thank you for Visiting Our Blog
Transfer SQL Server Tables with Data in SSIS
In this article we will show you, How to transfer SQL Server tables with data from one Database to another Database using Transfer SQL Server Objects task. If you want to transfer SQL Server Table Structures (without data) then, Please refer Transfer SQL Server Table Structures in SSIS article
Transfer SQL Server Tables with Data Using Transfer SQL Server Objects Task in SSIS
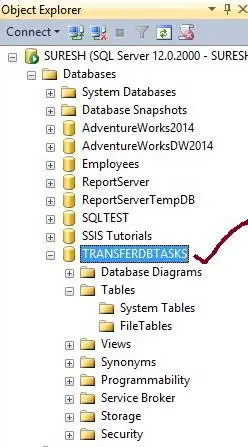
If you observe the below screenshot, We have one Empty Database (TRANSFERDBTASKS). In this example, we are going to transfer few tables along with data from [Adventure Works DW 2014] database to [TRANSFER DB TASKS] Database.
STEP 1: Open BIDS and Drag and drop the Transfer SQL Server Objects Task from the toolbox to control flow.
Double click on the Transfer SQL Server Objects will open the Transfer SQL Server Objects Task Editor to configure it.
General Tab
In this tab you can write your own Name and description as per the project requirements.

Here we haven’t changed the Name but we changed the description as Transfer SQL Server Table with Data.
Click on the Objects Tab
STEP 2: Select the SourceConnection property and click on it to create New connection. If you already created then select it.

Once you click on <New connection…> an SMO Connection Manager Editor window will be opened to configure the connection.
STEP 3: For this example, we are selecting our localhost instance and we are using Windows Authentication. If you are working for an organization then select the SQL Server Authentication and provide the credentials.
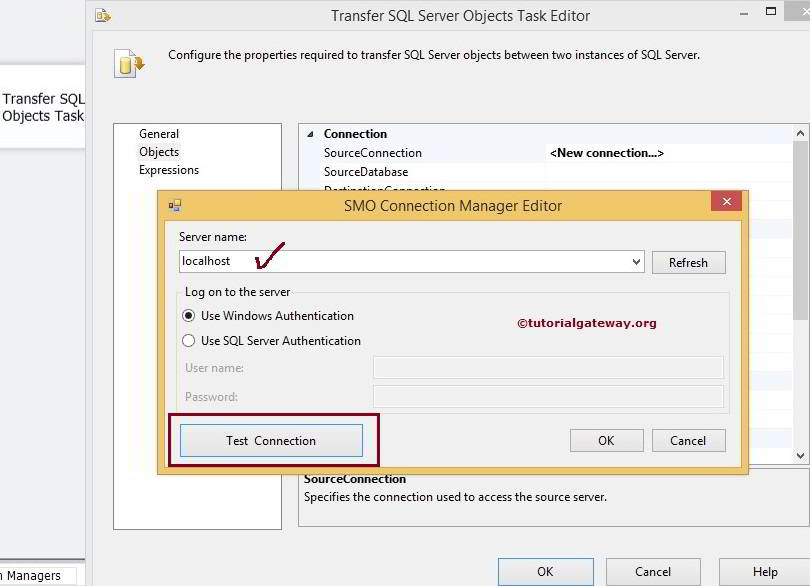
Click on the Test connection button to check whether the connection is throwing errors or not.
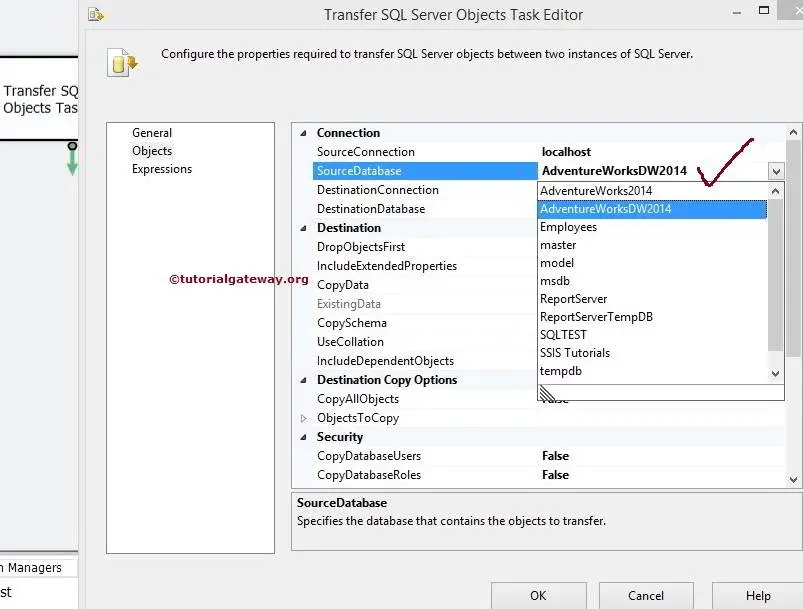
STEP 4: Click on the SourceDatabase option and select the database you want to use. For now we are selecting [Adventure works DW 2014] as shown below.
STEP 5: Select the DestinationConnection property and click on to create New connection. If you already created then select it.
We already mentioned localhost instance in SourceConnection and here also we are going to use the same instance. If you want to create new one then click on will open SMO Connection Manager Editor window to configure the connection.
STEP 6: Click on the DestinationDatabase option and select the database you want to use. For now we are selecting [TRANSFER DB TASKS] as shown below.
STEP 7: Click on the CopyData property and change the option from default False to Truebecause, In this example we are willing to transfer SQL Server Database tables along with Data from source to destination.
By changing CopyData property option from False to True Transfer SQL Server Objects Task will copy the tables and also data inside the tables.

STEP 8: If your requirement is to copy all the objects (views, function, stored procedures, tables) from the source database then set CopyAllObjects option to True. In this example, We are going to send few tables so we leave it to default False.
If we set CopyAllObjects option to False, next property ObjectsToCopy will get enabled.
STEP 9: Click on the ObjectsToCopy property to configure it. ObjectsToCopy property will explore many options of the Transfer SQL Server Objects Task. Let us concentrate on options that belong or related to this example. In this example, Our requirement is transferring the tables so we have to understand first two options only such as CopyAllTables and TableList.
If your requirement is to copy all the tables from the source database then set CopyAllTablesoption to True. In this example, We are going to send few tables so we leave it to default False.
NOTE: If you set CopyAllTables option to True then there is no point in select the tables fromTableList option.
STEP 10: Click on the TableList option and click on the collections. Once you click on the (…) button besides Collections, it will open the Select Tables window to select the available tables from the source connection.

For this example we are selecting 3 tables ([Dim Customer], [Dim Employee], [Dim Product] and [Dim Geography]) only but you can try with some more tables.
STEP 11: Click ok to close the Select Tables window and then click ok to finish configuring the Transfer SQL Server Objects Task.
Let us run the package to see whether we successfully transferred the SQL Server table with Data from source to destination.
Let’s open the SQL Server Management Studio and check for the tables.
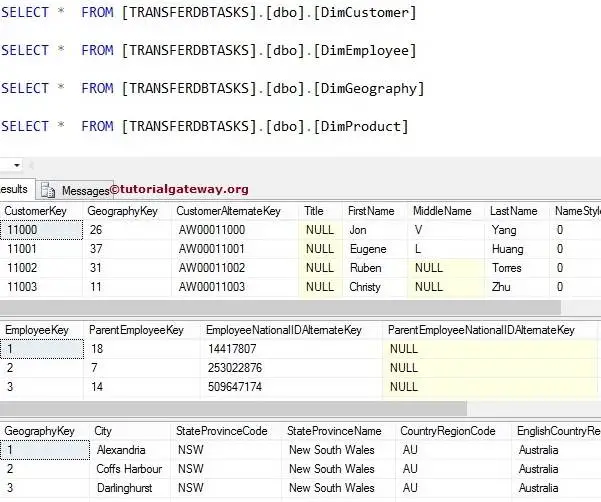
From the above screenshot you can observe that, We successfully transferred the SQL Server tables and their Data.
Thank you for Visiting Our Blog
Transfer SQL Server Table Structures in SSIS
In this article we will show you, How to transfer SQL Server table Structures without data from one Database to another Database using Transfer SQL Server Objects task. If you want to transfer SQL Server tables with data then, Please refer Transfer SQL Server Tables with Data in SSIS article.
Transfer SQL Server Table Structures Using Transfer SQL Server Objects Task in SSIS
If you observe the below screenshot, We have one Empty Database (TRANSFERDBTASKS). In this example, we are going to transfer few tables without data from [Adventure Works DW 2014] database to [TRANSFER DB TASKS] Database.
STEP 1: Open BIDS and Drag and drop the Transfer SQL Server Objects Task from the toolbox to control flow.
Double click on the Transfer SQL Server Objects will open the Transfer SQL Server Objects Task Editor to configure it.
General Tab
In this tab you can write your own Name and description as per the project requirements.
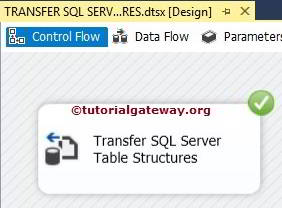
Here we changed the Name as Transfer SQL Server Table Structures and description as Transfer SQL Server Table Structure.
Click on the Objects Tab
STEP 2: Select the SourceConnection property and click on it to create New connection. If you already created then select it.
Once you click on <New connection…> an SMO Connection Manager Editor window will be opened to configure the connection.
STEP 3: For this example, we are selecting our localhost instance and we are using Windows Authentication. If you are working for an organization then select the SQL Server Authentication and provide the credentials.
Click on the Test connection button to check whether the connection is throwing errors or not.
STEP 4: Click on the SourceDatabase option and select the database you want to use. For now we are selecting [Adventure works DW 2014] as shown below.
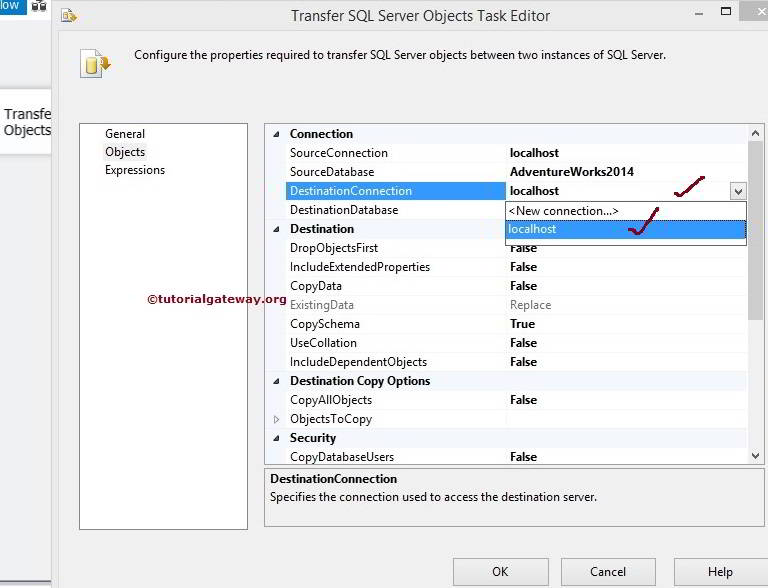
STEP 5: Select the DestinationConnection property and click on to create New connection. If you already created then select it.
We already mentioned localhost instance in SourceConnection and here also we are going to use the same instance. If you want to create new one then click on will open SMO Connection Manager Editor window to configure the connection.
STEP 6: Click on the DestinationDatabase option and select the database you want to use. For now we are selecting [TRANSFER DB TASKS] as shown below.
STEP 7: Click on the CopyData property and check whether the option is False or not because, In this example we are willing to transfer SQL Server Database tables without Data from source to destination.
By keeping CopyData property option to False Transfer SQL Server Objects Task will copy the tables without data.
STEP 8: If your requirement is to copy all the objects (views, function, stored procedures, tables) from the source database then set CopyAllObjects option to True. In this example, We are going to send few tables so we leave it to default False.
If we set CopyAllObjects option to False, next property ObjectsToCopy will get enabled.
STEP 9: Click on the ObjectsToCopy property to configure it. ObjectsToCopy property will explore many options of the Transfer SQL Server Objects Task. Let us concentrate on options that belong or related to this example. In this example, Our requirement is transferring the tables so we have to understand first two options only such as CopyAllTables and TableList.
If your requirement is to copy all the tables from the source database then set CopyAllTables option to True. In this example, We are going to send few tables so we leave it to default False.
NOTE: If you set CopyAllTables option to True then there is no point in select the tables from TableList option.
STEP 10: Click on the TableList option and click on the collections. Once you click on the (…) button besides Collections, it will open the Select Tables window to select the available tables from the source connection.
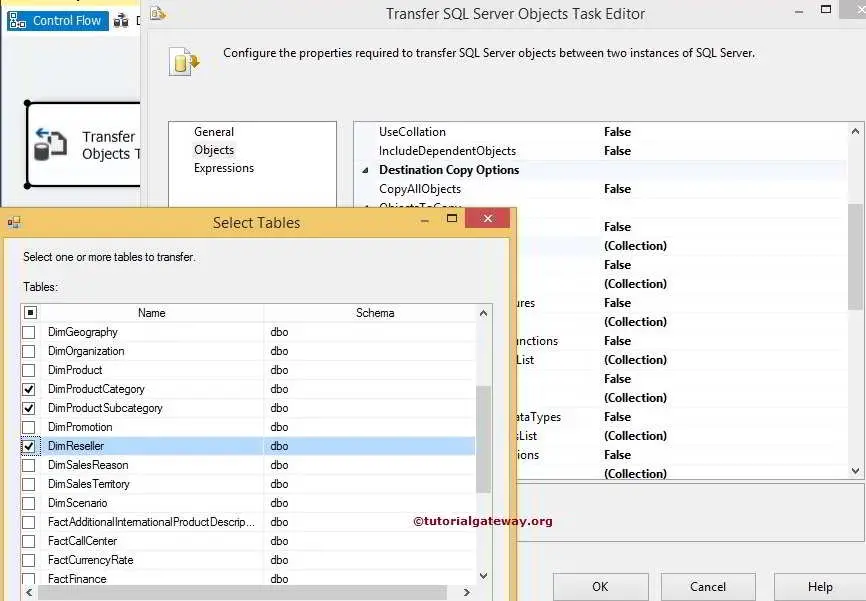
For this example we are selecting 3 tables ([Dim Product Category],[Dim Product Subcategory] and [Dim Reseller]) only but you can try with some more tables.
STEP 11: Click ok to close the Select Tables window and then click ok to finish configuring the Transfer SQL Server Objects Task.
Let us run the package to see whether we successfully transferred the SQL Server table structures without Data from source to destination.
Let’s open the SQL Server Management Studio and check for the tables.
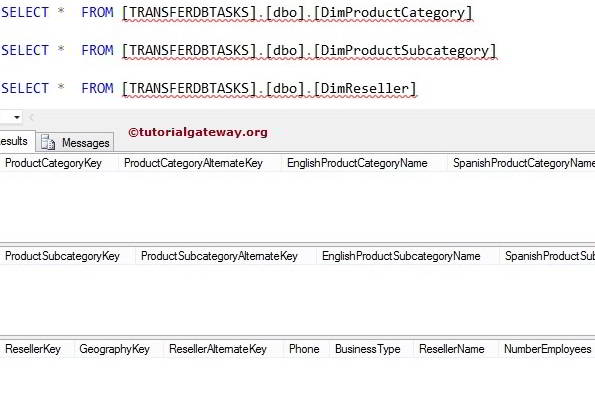
From the above screenshot you can observe that, We just transferred the table structures but not the data.
Thank you for Visiting Our Blog
Transfer SQL Server Stored Procedures in SSIS
In this article we will show you, How to transfer SQL Server Stored Procedures from one Database to another Database using Transfer SQL Server Objects task. Please refer Transfer SQL Server Objects task in SSIS article to understand the functionality of each and every property
Transfer SQL Server Stored Procedures Using Transfer SQL Server Objects Task in SSIS
If you observe the below screenshot there is one Database called [Duplicate AdventureWorks2014]. We already Transfered the tables from [AdventureWorks2014] using Transfer SQL Server Objects task. Please refer Transfer SQL Server Tables with Data in SSIS article to understand, How to Transfer SQL server tables.
In this example, we are going to transfer all the stored procedures from [AdventureWorks2014] to [Duplicate AdventureWorks2014] using Transfer SQL Server Objects task. If you want to Transfer User Defined Functions then Please refer Transfer SQL Server User Defined Functions in SSIS article.

STEP 1: Open BIDS and Drag and drop the Transfer SQL Server Objects Task from the toolbox to control flow.
Double click on the Transfer SQL Server Objects will open the Transfer SQL Server Objects Task Editor to configure it.
General Tab
In this tab you can write your own Name and description as per the project requirements.
Here we haven’t changed any. Click on the Objects Tab
STEP 2: Select the SourceConnection property and click on it to create New connection. If you already created then select it.
Once you click on <New connection…> an SMO Connection Manager Editor window will be opened to configure the connection.
STEP 3: For this example, we are selecting our localhost instance and we are using Windows Authentication. If you are working for an organization then select the SQL Server Authentication and provide the credentials.
Click on the Test connection button to check whether the connection is throwing errors or not.
STEP 4: Click on the SourceDatabase option and select the database you want to use. For now we are selecting [Adventureworks2014] as shown below.

STEP 5: Select the DestinationConnection property and click on to create New connection. If you already created then select it.
We already mentioned localhost instance in SourceConnection and here also we are going to use the same instance. If you want to create new one then click on will open SMO Connection Manager Editor window to configure the connection.
STEP 6: Click on the DestinationDatabase option and select the database you want to use. For now we are selecting [Duplicate AdventureWorks2014] as shown below.
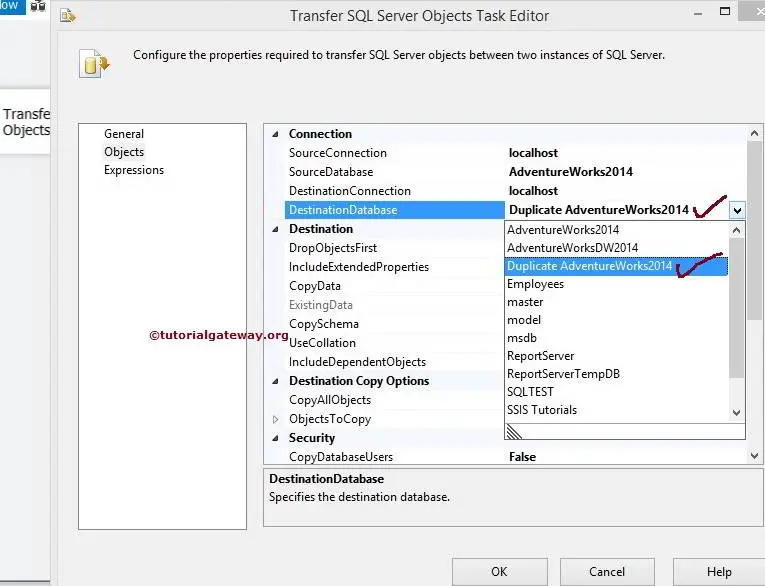
STEP 7: If your requirement is to copy all the objects (views, function, stored procedures, tables) from the source database then set CopyAllObjects option to True. In this example, We are going to send Stored Procedures only so we leave it to default False.
If we set CopyAllObjects option to False, next property ObjectsToCopy will get enabled.
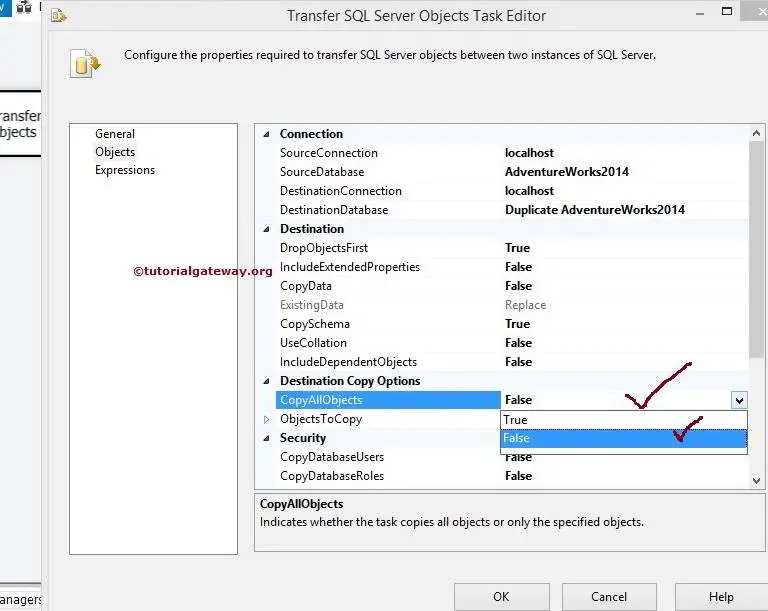
STEP 8: Click on the ObjectsToCopy property to configure it. ObjectsToCopy property will explore many options of the Transfer SQL Server Objects Task. Let us concentrate on options that belong or related to this example. In this example, Our requirement is transferring the Stored Procedures so we have to understand options such as CopyAllStoredProcedures and StoredProceduresList.
If your requirement is to copy all the Stored Procedures from the source database then setCopyAllStoredProcedures option to True. Although we are sending all the Stored Procedures just to show you, We leave it to default False and later we will select them in the StoredProceduresList
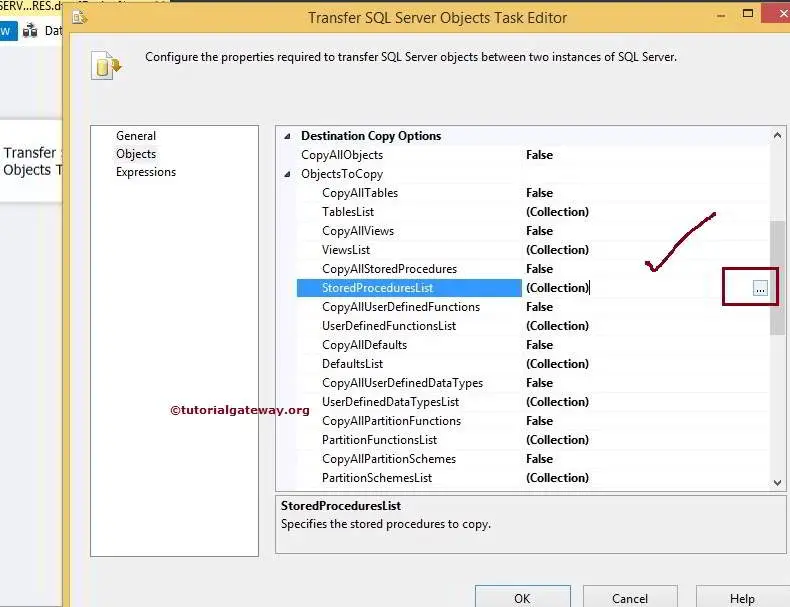
STEP 9: Click on the StoredProceduresList option and click on the collections. Once you click on the (…) button besides Collections, it will open the Select Stored Procedures window to select the available Stored Procedures from the source connection.
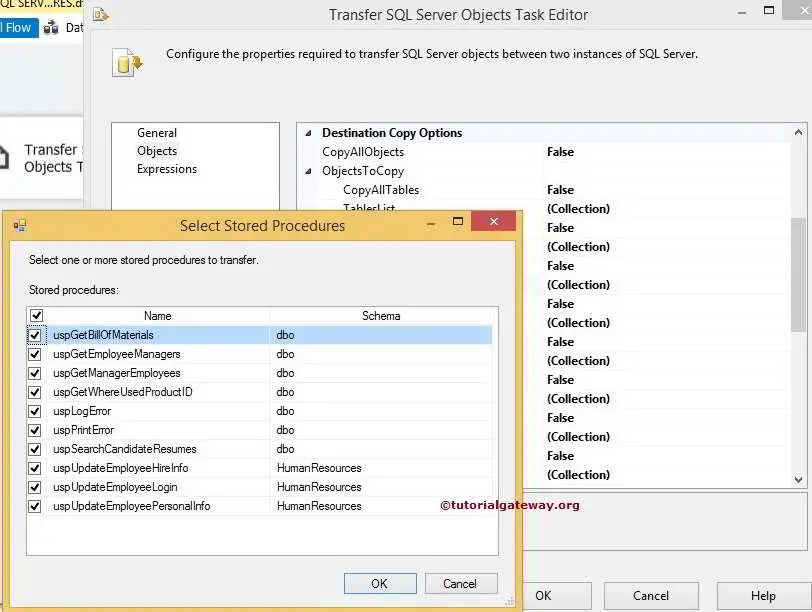
For this example we are selecting all of them but you can try with different options.
STEP 10: Click ok to close the Select Stored Procedures window and then click ok to finish configuring the Transfer SQL Server Objects Task.
Let us run the package to see whether we successfully transferred the SQL Server Stored Procedures from source to destination.
Let’s open the SQL Server Management Studio and check for the Stored Procedures.

From the above screenshot you can observe that, We successfully transferred the SQL Server Stored Procedures.
Thank you for Visiting Our Blog
Transfer SQL Server User Defined Functions in SSIS
In this article we will show you, How to transfer SQL Server User Defined Functions from one Database to another Database using Transfer SQL Server Objects task. If you want to transfer the Stored Procedures then please refer Transfer SQL Server Stored Procedures in SSISarticle.
Transfer SQL Server User Defined Functions Using Transfer SQL Server Objects Task in SSIS
If you observe the below screenshot there is one Database called [Duplicate AdventureWorks2014]. We already Transfered the tables from [AdventureWorks2014] using Transfer SQL Server Objects task. Please refer Transfer SQL Server Tables with Data in SSIS article to understand, How to Transfer SQL server tables.
In this example, we are going to transfer the User Defined Functions (Both Table Valued Functions and Scalar Valued Functions) from [AdventureWorks2014] to [Duplicate AdventureWorks2014] using Transfer SQL Server Objects task.
Before we start creating the package, Let us see the User Defined Function in [AdventureWorks2014]
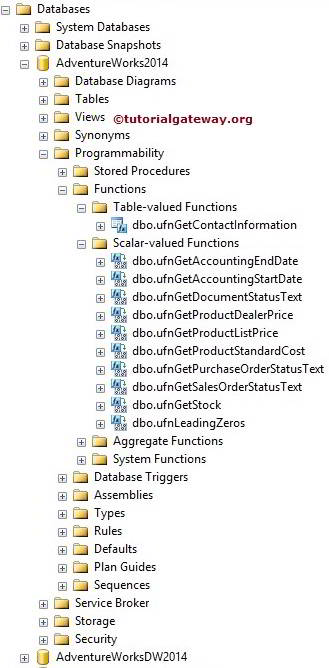
From the above screenshot you can observe that, [AdventureWorks2014] Database holds one Table Valued Functions and 10 Scalar Valued Functions. Our job is to transfer one Table Valued Functions and 9 Scalar Valued Functions (except ufnLeadingZeros Functions) from [AdventureWorks2014] to [Duplicate AdventureWorks2014] using Transfer SQL Server Objects task.
Now let us see the Destination Database
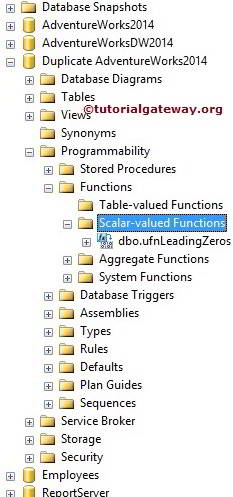
From the above screenshot you can observe that, [Duplicate AdventureWorks2014] Database holds one Scalar Valued Functions.
STEP 1: Open BIDS and Drag and drop the Transfer SQL Server Objects Task from the toolbox to control flow.
Double click on the Transfer SQL Server Objects will open the Transfer SQL Server Objects Task Editor to configure it.
General Tab
In this tab you can write your own Name and description as per the project requirements.
Here we haven’t changed any. Click on the Objects Tab
STEP 2: Select the SourceConnection property and click on it to create New connection. If you already created then select it.
Once you click on <New connection…> an SMO Connection Manager Editor window will be opened to configure the connection.
STEP 3: For this example, we are selecting our localhost instance and we are using Windows Authentication. If you are working for an organization then select the SQL Server Authentication and provide the credentials.
Click on the Test connection button to check whether the connection is throwing errors or not.
STEP 4: Click on the SourceDatabase option and select the database you want to use. For now we are selecting [Adventureworks2014] as shown below.
STEP 5: Select the DestinationConnection property and click on to create New connection. If you already created then select it.
We already mentioned localhost instance in SourceConnection and here also we are going to use the same instance. If you want to create new one then click on will open SMO Connection Manager Editor window to configure the connection.
STEP 6: Click on the DestinationDatabase option and select the database you want to use. For now we are selecting [Duplicate AdventureWorks2014] as shown below.
STEP 7: If your requirement is to copy all the objects (views, function, stored procedures, tables) from the source database then set CopyAllObjects option to True. In this example, We are going to send User Defined Functions only so we leave it to default False.
If we set CopyAllObjects option to False, next property ObjectsToCopy will get enabled.
STEP 8: Click on the ObjectsToCopy property to configure it. ObjectsToCopy property will explore many options of the Transfer SQL Server Objects Task. Let us concentrate on options that belong or related to this example. In this example, Our requirement is transferring the User Defined Functions so we have to understand options such as CopyAllUserDefinedFunctions and UserDefinedFunctionsList.
If your requirement is to copy all the User Defined Functions from the source database then set CopyAllUserDefinedFunctions option to True.

STEP 9: Click on the UserDefinedFunctionsList option and click on the collections. Once you click on the (…) button besides Collections, it will open the Select User Defined Functionswindow to select the available User Defined Functions from the source connection.

For this example we are selecting all of them except ufnLeadingZeros Functions but you can try with different options.
STEP 10: Click ok to close the Select User Defined Functions window and then click ok to finish configuring the Transfer SQL Server Objects Task.
Let us run the package to see whether we successfully transferred the SQL Server User Defined Functions from source to destination.
Let’s open the SQL Server Management Studio and check for the USer Defined Functions.
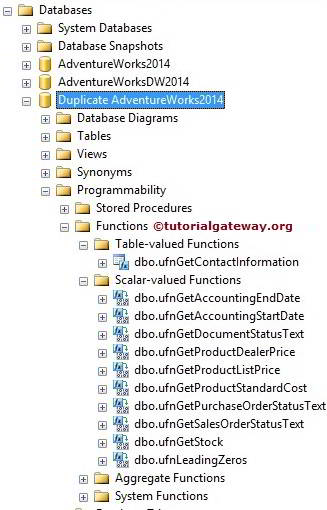
From the above screenshot you can observe that, We successfully transferred the SQL Server User Defined Functions such as one Table Valued Functions and 9 Scalar Valued Functions.
Thank you for Visiting Our Blog
Transfer SQL Server Views in SSIS 2014
In this article we will show you, How to transfer SQL Server Views from one Database to another Database using Transfer SQL Server Objects task. If you want to transfer the Stored Procedures then please refer Transfer SQL Server Stored Procedures in SSIS article.
Transfer Views Using Transfer SQL Server Objects Task in SSIS
If you observe the below screenshot there is one Database called [Duplicate AdventureWorks2014]. We already Transfered the tables from [AdventureWorks2014] using Transfer SQL Server Objects task. Please refer Transfer SQL Server Tables with Data in SSIS article to understand, How to Transfer SQL server tables.
In this example, we are going to transfer the User Defined Views from [AdventureWorks2014] to [Duplicate AdventureWorks2014] using Transfer SQL Server Objects task.
Before we start creating the package, Let us see the available Views in [AdventureWorks2014]

From the above screenshot you can observe that, [AdventureWorks2014] Database holds many User Defined Views. Our job is to transfer the Views from [AdventureWorks2014] to [Duplicate AdventureWorks2014] using Transfer SQL Server Objects task.
Now let us see the Destination Database
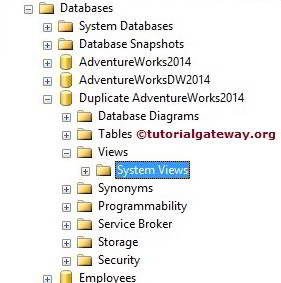
From the above screenshot you can observe that, [Duplicate AdventureWorks2014] Database does not have any Views apart from system Views.
STEP 1: Open BIDS and Drag and drop the Transfer SQL Server Objects Task from the toolbox to control flow.
Double click on the Transfer SQL Server Objects will open the Transfer SQL Server Objects Task Editor to configure it.
General Tab
In this tab you can write your own Name and description as per the project requirements.
Here we haven’t changed any. Click on the Objects Tab
STEP 2: Select the SourceConnection property and click on it to create New connection. If you already created then select it.
Once you click on <New connection…> an SMO Connection Manager Editor window will be opened to configure the connection.
STEP 3: For this example, we are selecting our localhost instance and we are using Windows Authentication. If you are working for an organization then select the SQL Server Authentication and provide the credentials.
Click on the Test connection button to check whether the connection is throwing errors or not.
STEP 4: Click on the SourceDatabase option and select the database you want to use. For now we are selecting [Adventureworks2014] as shown below.
STEP 5: Select the DestinationConnection property and click on to create New connection. If you already created then select it.
We already mentioned localhost instance in SourceConnection and here also we are going to use the same instance. If you want to create new one then click on will open SMO Connection Manager Editor window to configure the connection.
STEP 6: Click on the DestinationDatabase option and select the database you want to use. For now we are selecting [Duplicate AdventureWorks2014] as shown below.
STEP 7: If your requirement is to copy all the objects (views, function, stored procedures, tables) from the source database then set CopyAllObjects option to True. In this example, We are going to send Views only so we leave it to default False.
If we set CopyAllObjects option to False, next property ObjectsToCopy will get enabled.
STEP 8: Click on the ObjectsToCopy property to configure it. ObjectsToCopy property will explore many options of the Transfer SQL Server Objects Task. Let us concentrate on options that belong or related to this example. In this example, Our requirement is transferring the Views so we have to understand options such as CopyAllViews and ViewsList.
If your requirement is to copy all the User Defined Views from the source database then set CopyAllViews option to True.
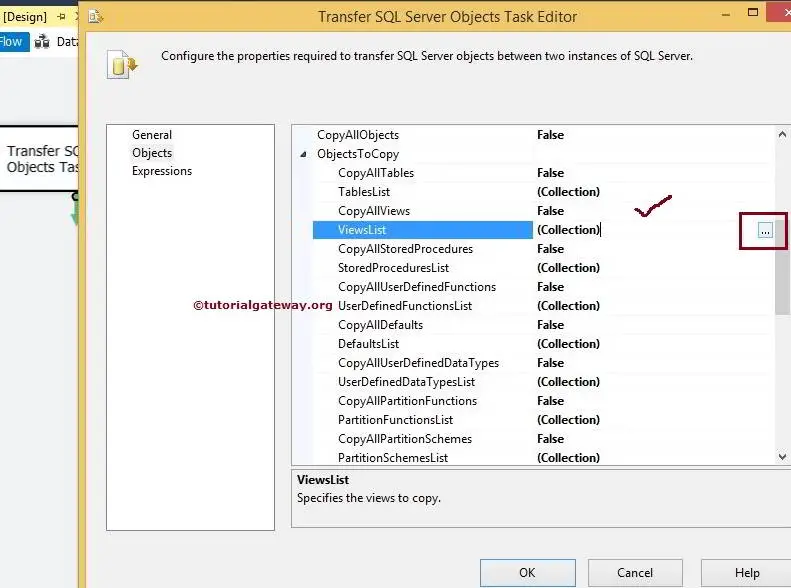
STEP 9: Select the ViewsList option and click on the collections. Once you click on the (…) button besides Collections, it will open the Select Views window to select the available User Defined Views from the source connection.

For this example we are selecting First three Views but you can try with different options.
STEP 10: Click ok to close the Select Views window and then click ok to finish configuring the Transfer SQL Server Objects Task.
Let us run the package to see whether we successfully transferred the SQL Server User Defined Views from source to destination.
Let’s open the SQL Server Management Studio and check for the User Defined Views.
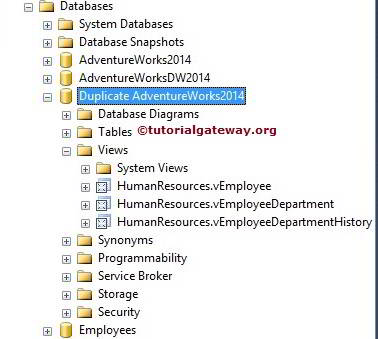
From the above screenshot you can observe that, We successfully transferred the SQL Server User Defined Views such as vEmployee, vEmployeeDepartment and vEmployeeDepartmentHistory views.
Thank you for Visiting Our Blog