Sunday, October 11, 2015

Calendar Date Picker for MDX based Reports in SSRS

Generally any SSRS report contains one date parameter. User never prefers list of values for date parameter, they always want to choose the date value from the Calendar Date Picker. It is very easy to use Calendar Date Picker when we create report against any relational database, but when we create SSRS report against SQL Server Analysis Services then we can’t directly feed Calendar Date Picker value into the MDX query. 


This article will answer for these questions: 

How to feed calendar date picker value into MDX query?
How to use Calendar Date Picker parameter for MDX based reports? 
What are the advantages of Calendar date picker over list of values parameter?

Problem
Most SSRS reports contain at least one date parameter and users prefer to use a Calendar Date Picker. It is very easy to use a calendar date picker when we create a report against a relational database, but when we create a SSRS report against SQL Server Analysis Services then we can't directly feed the Calendar Date Picker value into a MDX query. This tip will demonstrate how to feed a calendar date picker value into a MDX query, how to use a calendar date picker for MDX based reports and the advantages of a calendar date picker over a list of values.
Solution
This tip assumes that you have previous experience building a simple SSRS report against an Analysis Services Data Source. In this tip we will first look at the problem with a simple example and later I will demonstrate the steps to solve the problem.

Lets understand the problem with a simple example

Step 1

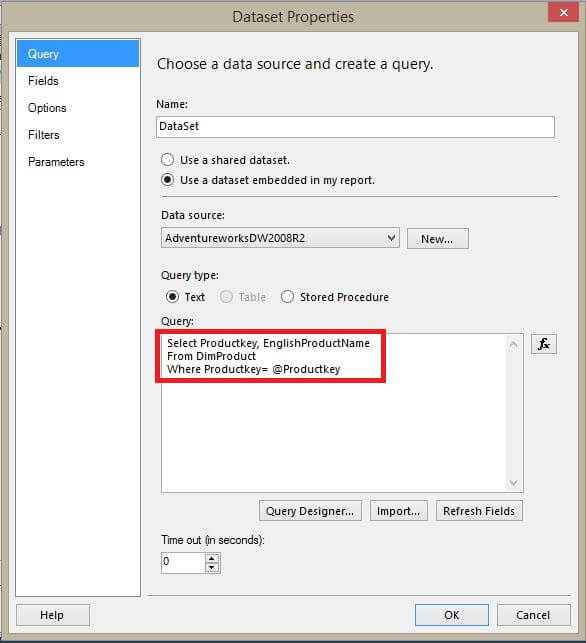
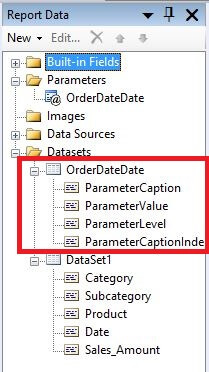
I am creating a simple SSRS report against MDXStepByStep SQL Server Analysis Services database. I have already created the data source connection for the MDXStepByStep database. After creating the data source connection I am creating my dataset which gives product Sales Amount information at the day level. My dataset contains one Date Parameter; you can refer to the below image.
Report DataSet

Step 2

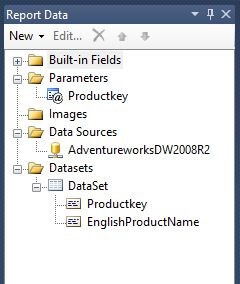
At the time of the dataset creation if you declare a query parameter then SSRS automatically creates the report parameter along with its parameter dataset. As you can see from the below image @OrderDateDate report parameter has been created automatically. By default all Parameter datasets are hidden, if you want to see Hidden Datasets then right click on Datasets and click on "Show Hidden Datasets".
Report Parameter
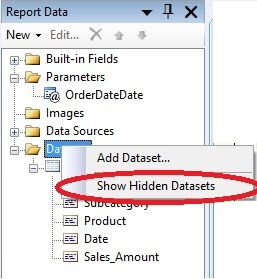
Once you click on "Show Hidden Datasets", all hidden datasets will be visible. As you can see from the below image dataset OrderDateDate is now visible.
Report Parameter Hidden Dataset

Step 3

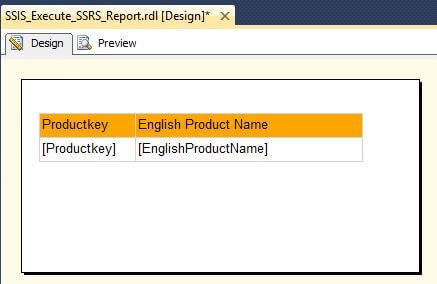
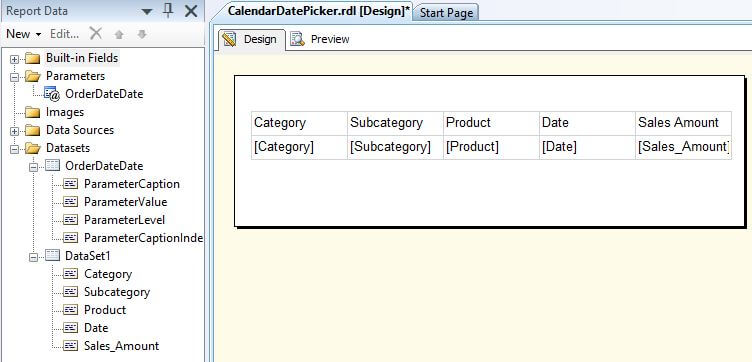
I am inserting a Tablix for data viewing. I have chosen all the data fields from DataSet1 in the Tablix. After this modification my report looks like the below image.
Tablix in Report
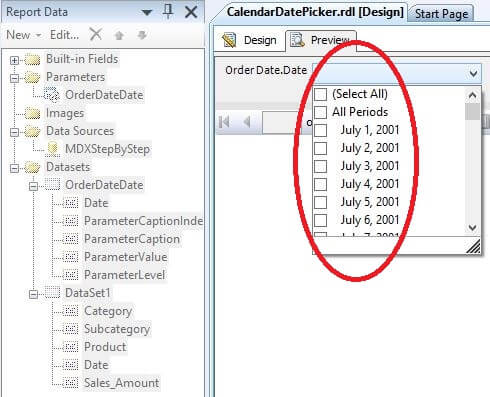
Now if I preview the report, I get all the date values in a parameter dropdown as a list of values. All these date values are coming from the OrderDateDate dataset. You can refer to the below image.
List Of Values For Date Parameter
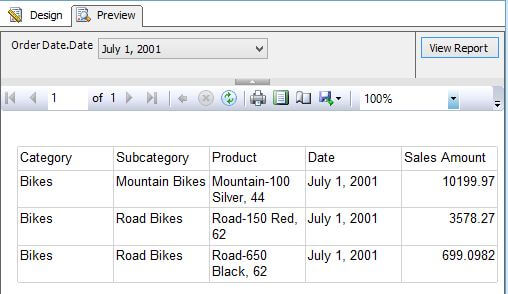
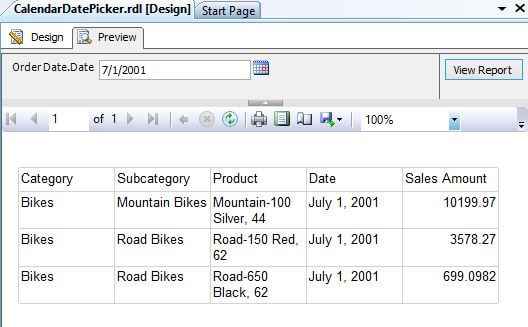
If I choose July 1, 2001 from the parameter list and click on "View Report". The image shown below is the output of the report for July 1, 2001 parameter value.
Report Output using List Of Values Parameter

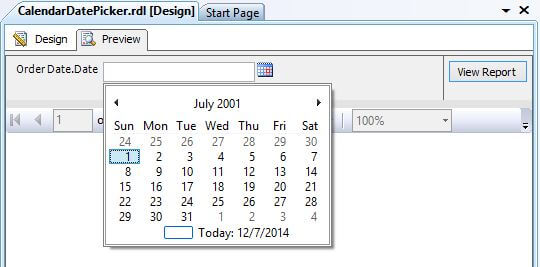
Using a Calendar Date Picker for the Parameter Value

Now I want to use a Calendar Date Picker in place of this list of values. You might be thinking why do I need a Calendar Date Picker if a list of values already fills the requirement. Actually there are couples of advantages of using calendar date picker:
  • Report execution time will be faster; this is because the Calendar Date Picker parameter doesn't need a separate dataset to get date values from the database. Executing a separate query to get all date values from the database is an extra burden on SSRS. The Calendar Date Picker is a SSRS built-in feature which gives all date values without hitting your database.
  • Navigation will be very easy. You can easily select any date from the calendar date picker, but you struggle to find a particular date from the list of values.
  • It can save a lot of time for the user.
The following steps will show how you can set this up.

Step 1

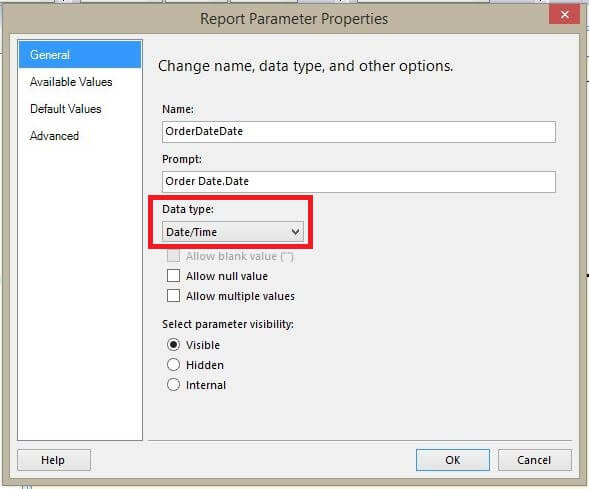
Right click on @OrderDateDate report parameter and click on "Parameter Properties", it will open a Report Parameter Properties window. In the General tab change the parameter Data Type to Date/Time from Text and make sure "Allow Null Value" and "Allow Multiple Values" check boxes are unchecked. Your changes should look like the below image.
Report Parameter Properties General Tab

Step 2

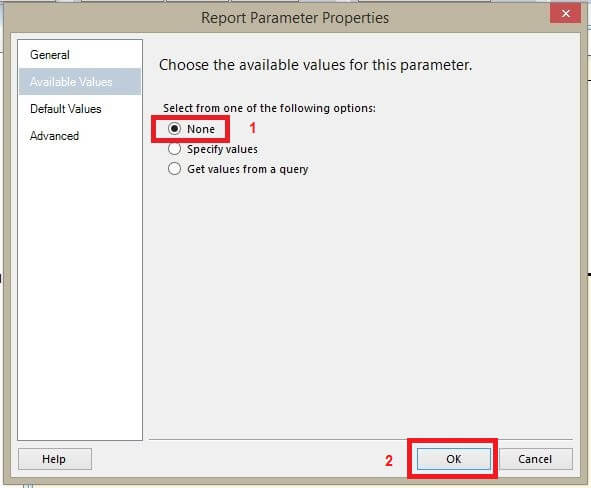
Now click on the Available Values tab; here you can find that for the @OrderDateDate parameter, values are coming from the OrderDateDate dataset. You can refer to the below image.
Report Parameter Properties Available Values Tab
Choose None as shown below and click OK.
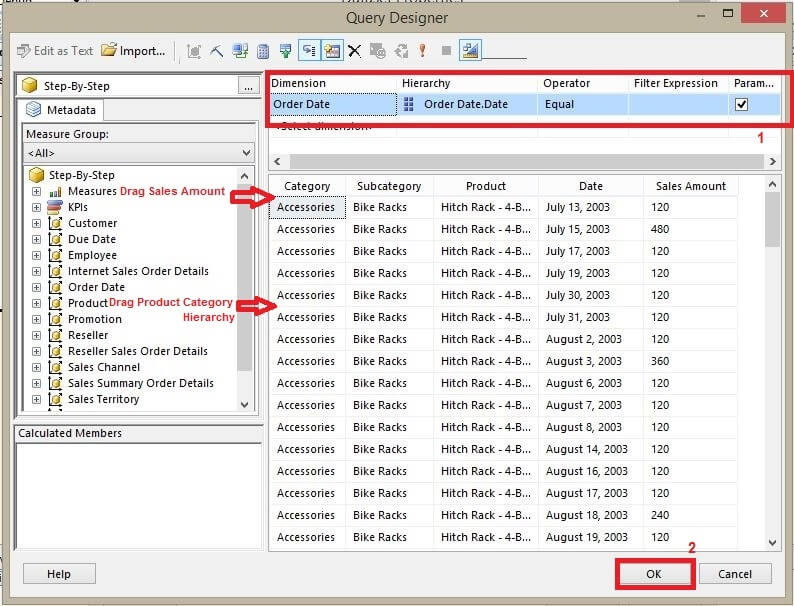
Report Parameter Properties Available Values Tab After Changes

Step 3

Right click on the OrderDateDate dataset and click on "Query". It will open the query designer window. We need to examine the OrderDateDate dataset MDX query. Let's execute the MDX query by clicking on the Execute button. On successful execution your MDX Query will return 4 columns. You can refer to the below image.
Query Designer Window For OrderDateDate Dataset
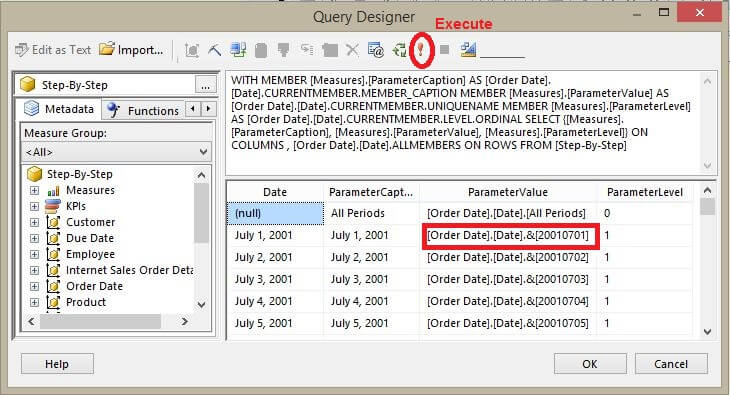
If you look at the Query execution result then you will notice that the ParameterCaption column data was used as a Label Field for the @OrderDateDate parameter and the ParameterValue column data was used as the Value Field for the @OrderDateDate parameter. You can confirm this from Step 2. When I selected July 1, 2001 as the parameter value behind the scenes the [Order Date].[Date].&[20010701] was passed into the MDX Query.
At this stage if you preview the report for July 1, 2001 parameter value then it will throw an error. This is because the parameter value 7/1/2001 12:00:20 AM will be passed into the MDX query. If we convert the parameter value in this[Order Date].[Date].&[20010701] format then the MDX query will accept the parameter value and the report will execute successfully. So our ultimate task is to generate the parameter value in MDX format. In the next step I will build the expression which will generate the parameter value in MDX format.

Step 4

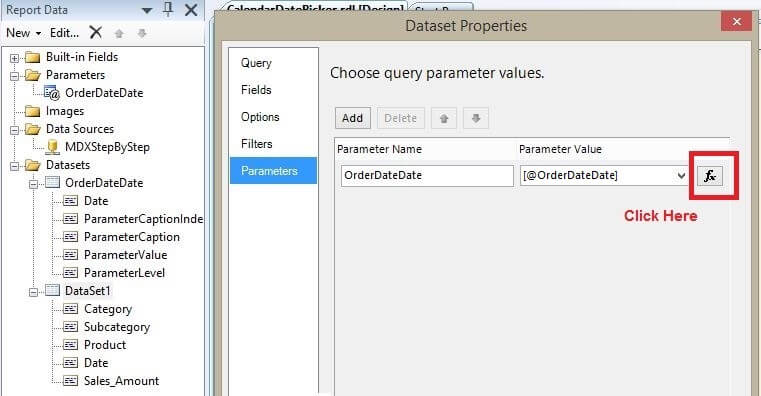
Right click on Dataset1 and click on "Dataset Properties". It will open the Dataset Properties window. Click on the Parameters tab and click on the Parameter Value Expression button. You can refer to the below image.
Dataset Properties Window
Once you click on the Parameter Value Expression button, it will open an Expression window. Here we have to build an expression that will be generate the parameter value in MDX format, so my ultimate task is to get the parameter value in this format [Order Date].[Date].&[20010701].
The below Expression will return the parameter value in the required MDX format. In the below expression I am usingformat(Parameters!OrderDateDate.Value,"yyyyMMdd") which will return a value like 20010701. This expression may differ in your case, so make the appropriate changes in your expression.
="[Order Date].[Date].&["+format(Parameters!OrderDateDate.Value,"yyyyMMdd")+"]"
My Expression window looks like the below image.
Expression Window

Step 5

We have done all required changes, let's preview the report. I will select July 1, 2001 from the calendar date picker and click on "View Report". You can refer to the below image.
Report with Calendar Date Picker Parameter
Congratulations! Now the report is using a Calendar Date Picker parameter. You can verify the results from the below image.
Report Output using Calendar Date Picker

Step 6

You can now delete the OrderDateDate dataset because it is not required anymore.

Execute a SQL Server Reporting Services report from Integration Services Package

You have a requirement where a user does not want to use the SQL Server Reporting Services (SSRS) report subscription service, but wants to execute the SSRS report from a SQL Server Integration Services Package. In this case, whenever the user executes the package, a particular SSRS report will be executed and exported into Excel.  The exported Excel file will be saved in a shared folder. In this tip I will demonstrate how to solve this problem.


Problem
You have a requirement where a user does not want to use the SQL Server Reporting Services (SSRS) report subscription service, but wants to execute the SSRS report from a SQL Server Integration Services Package. In this case, whenever the user executes the package, a particular SSRS report will be executed and exported into Excel.  The exported Excel file will be saved in a shared folder. In this tip I will demonstrate how to solve this problem.
Solution
This tip assumes that you have previous real world work experience building a simple SSRS Report and SSIS package. I will use AdventureworksDW2008R2 sample database and SQL Server 2012 to demonstrate the problem and solution.
I have divided this tip in two parts.

Part 1: I will create a sample SSRS report and deploy it to the Report Server.
Part 2: I will create a SSIS Package which will execute the SSRS report created in Part1.

Part 1: Create SSRS Report and deploy it to Report Server

Step 1: Add Report item in SSRS

I have added a report item in my report project. My report name is SSIS_Execute_SSRS_REPORT. Refer to the image below.
If you are new to SQL Server Reporting Services, check out this tutorial and these tips.
Adding new SSRS Report

Step 2: Add Data Sources in Reporting Services

I have already created an embedded data source connection to AdventureworksDW2008R2 database. Refer to the image below.
Adding new Data Source

Step 3: Add a Dataset in SSRS

I am creating a new Dataset, this dataset returns two data fields (Productkey and EnglishProductName) and it has one@Productkey Query Parameter. Refer to the image below.
Adding new DataSet

Dataset Query
Select Productkey, EnglishProductName
From DimProduct
Where Productkey= @Productkey
As you can see from the image below, the Dataset has been created with one Report parameter - @Productkey.
Report Data Pane after adding Data Source and Dataset

Step 4: Add Tablix in SSRS

For data viewing purposes, I am adding a Tablix into my report. This Tablix will show the Productkey and EnglishProductName. Refer to the image below.
Adding Tablix in Report body

Step 5: Report Deployment

Please follow the steps below to deploy the report on Report Server.
  • Right click on Report Project which contains your report and then click on Properties. Refer to the image below.

Report Project Property

Once you clicked on Properties; it will open a new Property Pages window. Here you have to enter theTargetReportFolder name and TargetServerURLTargetServerURL is the URL for the Report Server andTargetReportFolder is a folder on the Report Server where the report will be deployed. If the TargetReportFolderfolder is not present on the Report Server then it will be created in the deployment process. As you can see from the image below I have already filled the required information. TargetReportFolder and TargetServerURL may differ in your case, make the changes accordingly and click OK.

Report Project Page Property Window

  • Right click on the report which you want to deploy on Report Server and click on deploy. It will deploy the report on the Report Server. Refer to the image below.

Report Deployment

I am deploying my report; on successful deployment you will get a similar message as shown below.
Report Deployment Message
The above message tells that SSIS_Execute_SSRS_REPORT report was deployed to "http://localhost:8080/ReportServer" Report Server under MyReports folder.

Part2: Create SSIS Package to Execute an SSRS Report

In this part of the tip, I will be demonstrate how to create an SSIS Package to execute an SSRS report. Please follow all the steps listed below.

Step 1: Create an SSIS Package

I have already created a new package name as SSRS_Report_Execute. 
If you are new to SQL Server Integration Services, check out this tutorial and these tips.

Step 2: Creates Variables in SSIS

Create two variables with package scope.
  • Folder_Destination - Data Type for this variable is String. Please assign the variable value asC:\SSRS_Report_Execute. This variable holds the folder path where the exported file will be saved. You have to make sure that this folder is present at the defined location, otherwise the SSIS Package will fail.
  • ReportParameter - Data Type for this variable is String. Please assign the variable value as 1. This variable holds the parameter value which needs to be passed into the SSRS report.
I have assigned values for both the variables; refer to the image below.
Creating Variables at package scope

Step 3: Create a Windows Folder

Create a folder named SSRS_Report_Execute on the root of the C drive. This folder name and location depends onFolder_Destination variable value. I have assigned the C:\SSRS_Report_Execute value to a Folder_Destinationvariable in the previous step.

Step 4: Drag the SSIS Script Task

Drag the Script Task component from the toolbox into the control flow and then right click on the script task and click on edit.  Refer to the image below.
Adding Script task in control flow
Once you click on edit button it will open the Script task editor window. Choose Microsoft Visual Basics 2010 as the Script language and select Folder_Destination and ReportParameter variables as Read only variables. Once the above two selections are done then click on Edit Script.  Refer to the image below.
Script Task Editor Window
Once you click on Edit Script task, it will open Script Task editor window. Please replace all auto generated VB code with the below VB Code below and save it.
Script Task VB Code
Imports System
Imports System.Data
Imports System.Math
Imports Microsoft.SqlServer.Dts.Runtime
Imports System.ComponentModel
Imports System.Diagnostics
<Microsoft.SqlServer.Dts.Tasks.ScriptTask.SSISScriptTaskEntryPointAttribute()> _
<System.CLSCompliantAttribute(False)> _
Partial Public Class ScriptMain
    Inherits Microsoft.SqlServer.Dts.Tasks.ScriptTask.VSTARTScriptObjectModelBase
    Enum ScriptResults
        Success = Microsoft.SqlServer.Dts.Runtime.DTSExecResult.Success
        Failure = Microsoft.SqlServer.Dts.Runtime.DTSExecResult.Failure
    End Enum
    Protected Sub SaveFile(ByVal url As String, ByVal localpath As String)
        Dim loRequest As System.Net.HttpWebRequest
        Dim loResponse As System.Net.HttpWebResponse
        Dim loResponseStream As System.IO.Stream
        Dim loFileStream As New System.IO.FileStream(localpath, System.IO.FileMode.Create, System.IO.FileAccess.Write)
        Dim laBytes(256) As Byte
        Dim liCount As Integer = 1
        Try
            loRequest = CType(System.Net.WebRequest.Create(url), System.Net.HttpWebRequest)
            loRequest.Credentials = System.Net.CredentialCache.DefaultCredentials
            loRequest.Timeout = 600000
            loRequest.Method = "GET"
            loResponse = CType(loRequest.GetResponse, System.Net.HttpWebResponse)
            loResponseStream = loResponse.GetResponseStream
            Do While liCount > 0
                liCount = loResponseStream.Read(laBytes, 0, 256)
                loFileStream.Write(laBytes, 0, liCount)
            Loop
            loFileStream.Flush()
            loFileStream.Close()
        Catch ex As Exception
        End Try
    End Sub
    Public Sub Main()
        Dim url, destination As String
        destination = Dts.Variables("Folder_Destination").Value.ToString + "\" + "Report_" + Dts.Variables("ReportParameter").Value.ToString + "_" + Format(Now, "yyyyMMdd") + ".xls"
        url = "http://localhost:8080/ReportServer?/MyReports/SSIS_Execute_SSRS_Report&rs:Command=Render&Productkey=" + Dts.Variables("ReportParameter").Value.ToString + "&rs:Format=EXCEL"
        SaveFile(url, destination)
        Dts.TaskResult = ScriptResults.Success
    End Sub
End Class
Your script task VB code must look like as below image.
Script Task Script Editor Window
Based on the requirement the user has to modify the URL and Destination variables in the Public Sub Main() function (highlighted in the code with the rectangle box). The URL variable contains the path of the report for the report server and the Destination variable contains the folder path where the file needs to be saved with a dynamic file name.
The URL is a combination of ReportServerurl + TargetReportFolder + ReportName + ReportParameter + ReportRenderingformat.
In my case:
ReportServerurl is http://localhost:8080/ReportServer
TargetReportFolder is MyReports
ReportName is SSIS_Execute_SSRS_Report
ReportParameter is Productkey
ReportRenderingformat is rs:Format=EXCEL
So the URL is "http://localhost:8080/ReportServer?/MyReports/SSIS_Execute_SSRS_Report&rs:Command=Render&Productkey=" + Dts.Variables("ReportParameter").Value.ToString + "&rs:Format=EXCEL"

Step 5: Execute Script Task

Please assign the ReportParameter variable value.  The value assigned in the ReportParameter variable value will be passed into the SSRS report as report parameter value. Let's execute the script task; on a successful execution it will export the file to specified folder location.
Script Task Execution Window

Install SSRS Report builder 3.0


SQL Server Reporting Services allows to design Reports using two applications:
  • Business Intelligence Development Studio (Shortly called as BIDS)
  • Report Builder
Developers who prefer to work in the Microsoft Office environment will prefer Report Builder as their best bet to design, edit and publish SSRS Reports. In early years, Report Builder is fixed to design simple report but using Report Builder 3.0 we can design most complex reports.
In this article we will show you, How to install Report Builder from Report Manager. To do this, Please open your report manager and click on the Report Builder as shown in below screenshot
SSRS Report Builder Installation 1
Once you click on the Report Builder, it will check whether the Report Builder application is installed or not.
SSRS Report Builder Installation 1
If it is found then Report Builder will be opened else Downloading Report Builder window will be opened to download the application
SSRS Report Builder Installation
Once it is 100% downloaded, Microsoft SQL Server Report Builder will be opened with a starting page as shown in below screenshot. Using Report Builder, we can design Tables, matrix, Chart, Spark lines, Data Bars, Charts, Gauges and Map reports ranging from simple reports to complex reports.
SSRS Report Builder Installation
For now, we selected the Blank Report
SSRS Report Builder Installation
Thank You for Visiting Our Blog

SQL Server Reporting Service Configuration


Please go through following steps:
1. In the start menu go to Microsoft Sql Server 2008 R2 -> Configuration Tools, then click Reporting Service Configuration Manger.


2. In Reporting Service Configuration Connection, Select or Enter Server Name and Report Server Instance, then click on Connect.
3. In Report Server Status verify that the Service Status is set to Running. If it is not started, click on Start, and then click on Apply.
4. In Service Account Pane, you can set service account like Local System, if you want it to run only in local system or Network Service, if you want it to run on your Network.
5. In Web Service URL Pane, specify the name which you want to call the virtual directory created by Reporting Services or you can use the default Report Server or you can select the IP-address, the port and SSL setting you want to use. When done click on Apply.
6. In Database Pane, select existing Report Server Database or You can also create a new Report Server Database.
7. In Report Manager URL Pane, specify the name which you want to call the virtual directory created by Reporting Services or you can use the default Report Server or you can select the IP-address, the port and SSL setting you want to use. When done click on Apply.
8. Email settings are not mandatory but you can configure if it is necessary for you.
9. Execution Account is necessary to configure if you will be running unattended reports. Optionally apply credentials and Click Apply.
Congratulations! We have successfully configured Sql Server 2008 Reporting Services.


Configuring SQL Server Reporting Services in SQL Server 2012


In yesterday’s blog I showed the error when I tried to login to SSRS through Management Studio. I recollected that while installing SQL Server, I chose the option Install only, and I did not configure Reporting Services until now.
So, I decided to write a blog with step by step explanation of how to configure SQL Server Reporting Services. This blog explains the steps to perform on a SQL Server 2012 (as of RC0) and the steps are similar to the steps to configure SQL Server 2008 R2 Reporting Services.
Before configuring SQL Server Reporting Services, ensure that your login has administrator permissions on which the Reporting Services is being configured and also ensure that you have required permissions to create databases (ReportServer databases) on the SQL Server when ReportServer databases will reside.
Go to Start, SQL Server 2012 (RC0 in this case), for other versions of SQL Server choose the appropriate program menu. Go to Configuration Tools and click on Reporting Services Configuration Manager (pic below).
In the next dialog, choose the Server Name and Instance (if more than 1 instance is installed, select the instance from the drop down) and click connect.
Once the Configuration Manager is connected successfully, the Report Server Status is displayed as shown below…. You can see the current status of the Reporting Service and Stop or Start depending on the current status.
Click on Service Account, in the left side pane. The current Service Account setting is displayed. Be default, this would be a service account that was chosen at the point of SQL Server Installation. You can change the service account to another account by choosing Use another account option and enter the username password for that account. I chose to let the Reporting Service run under the service account created during Installation. Once you are done with your choice click Apply button in the bottom of the window.
As soon as you choose apply, few steps are run and the results are displayed as shown in this screen below.
Next, click on web Service URL. The default values are already assigned, and if we decide those vales are good enough, choose Apply to configure with the default values. Instead you can choose a virtual directory of your choose and click Apply when your changes are final.
Note: I am choosing a basic configuration, so I am continuing with default values…
Once the configuration tool configures the virtual directory, the Report Server Web Service URLs are now active and you should be able to click on the URL (in blue font) to open the URL.
Next, click Database. This is the configuration step in which you configure what SQL Instance is hosting the Reporting Services Report databases. Since the databases are not configured, note that the values are blank. Click Database to start configuring databases.
Once you click change database, a new wizard Report Server Database Configuration is displayed as below. In the first screen, there are 2 options, if you would like to create new databases for this reporting service, choose the first option. If you would like to point to an existing report server database, choose the 2nd option. In this case I am going to create new databases for the report server, so I chose that option, click Next to continue…
The next step in the wizard will display the SQL Instance name (if the server has database engine installed), choose the authentication type and click Next.
Enter the database name for the report Server database and click Next.
In the next step, choose the Credentials you would like the report server to use while connecting to the report server database. By default Service Credentials is provided, choose Next to use the Service Credentials.
In the next summary screen verify that all settings, selections are as per your plan and click Next to begin the database creation and configuration step.
Once all the steps are successful, the wizard will display the below screen, click Finish to complete the database configuration.
As the database configuration is completed, you should now see Server Name, database name and other details (as below).
Next click Report Manager URL, This is the step where you can configure the URL for Report Manager. Again this is completely optional, I chose to go with default values, so click Apply.
Once the Report Manager URL is configured, the results section should be displaying the success messages as shown below..
The Next step to configure is E-mail Settings. In this step, you must provide sender email address to be used by the Report Server and provide the SMTP Server information in your case. In this case I do not have SMTP Server configures on my personal Server. I choose to skip this step and not configure any email settings. 
In the next step, Execution Account, you will have to provide a domain account (preferably)  to be used in case of any credentials are required. The domain account has to have sufficient permissions to access the report items / files. I am not planning to configure this as of this point, so I am skipping this step.
In the next step, Encryption Keys, you have choice to Backup your Reporting Server’s Encryption key to a file, in order to use, in case of migration to another server.  In addition to this, if you have create a new Encryption Key or delete the existing Encryption Key ( as and when the situations arise).
The final step in the configuration tool is Scale-out Deployment. This is the step where more than 1 Reporting Services will be utilizing the same Report Databases. You will have to use this step after you finish installing other Reporting Instances and join those instances into the scale-out deployment.


SQL Server Reporting Services Configuration Manager 2014


In SSRS, SQL Server Reporting Services Configuration Manager is used to configure the Reporting Services Native Mode installation. For instance,
  • If we used the files only installation option to install the Report Server, We must use this Configuration Manager to configure the Reporting Server before we intended to use.
  • If we used the Default settings to install the Report Server, We can use this Configuration Manager to modify the default setting of a Reporting Server.
In this article we will show you, How to set up SQL Server Reporting Services Configuration Manager 2014 with screenshots. Reporting Services Configuration Manager is very useful to perform the following tasks:
  • Configuring the Report Server Service Account: By default we provide default account details while we initially setup the reporting server, but using the SQL Server Reporting Services Configuration Manager we can add new account or we can change the password.
  • Create or Configure the Report Server Database: By default, Reporting server generates two Databases (ReportServer and ReportServerTempDB) for internal storage. We can use the SQL Server Reporting Services Configuration Manager to create New Database or to manage the existing Database
  • Symmetric Keys: We can use the SQL Server Reporting Services Configuration Manager to Backup or restore or replace the symmetric key that is used to encrypt stored connection strings and credentials.
  • Configure Web server URLs: We can use the SQL Server Reporting Services Configuration Manager to configure the Web server URLs for each application. This is the URL we are going to use for, Deploying SSRS Projects or Reports
  • Configure Report URLs: We can use the SQL Server Reporting Services Configuration Manager to configure the Report URLs for each application. This is the URL we are going to use for, Viewing or Securing SSRS Projects or Reports.
  • Configuring E-mail: We can use the SQL Server Reporting Services Configuration Manager to configure the SMTP Server, which is used to send Emails about report processing or report delivery so on.

Steps to Configure SQL Server Reporting Services Configuration Manager 2014

If you are using Windows 7 then goto All Program or If you are Windows 8 user then goto to installed applications and Click on the SQL Server 2014 Reporting Services Configuration Manager as shown below
 Reporting Services Configuration in SSRS 2014
Once click on it, It will open Reporting Services Configuration Manager window along with Reporting Services Configuration Connection window to select the Server Name andReporting Server Instance Name. Here, Wer are selecting our Default Instance Name and Suresh as Server Name as shown below.
 Reporting Services Configuration in SSRS 2014
Report Server Status
This will display the Current Report Server information such as Database Name, SQL Server Instance Name, Id, Version and the Server Status. We can use this page to Start or Stop the Reporting Server using those two buttons.
 Reporting Services Configuration in SSRS 2014
TIP: We can use the Service Account tab to change the existing account or to create new account for the reporting server.
Web Service URL
In Reporting Services, Web service URLs and Report Manager URLs are used to access the Report Server Web service and Report Manager. By default, Reporting Services provides default URLs as shown below but you can change them as per your requirement.
NOTE: This is the URL we are going to use for Deploying Reports or SSRS Projects
 Reporting Services Configuration in SSRS 2014
By clicking the advanced button, you can change the TCP Port from default 80 to other and IP address to network name by clicking Add, Remove and Edit buttons.
 Reporting Services Configuration in SSRS 2014
Report manager URL
In Reporting Services, Report Manager URLs are used to access the Report Server Web service and Report Manager. By default, Reporting Services provides default URLs but you can change them as per your requirement by clicking the Advanced button.
 Reporting Services Configuration in SSRS 2014
If you click on the above URL then following Screenshot will be displayed. This is the place where, we can see the deployed reports, Shared Datasets and Shared Data Sources.
 Reporting Services Configuration in SSRS 2014
NOTE: Port number is optional in the Report Manger URL. Some systems may ask the port number and some may not
Database Configuration
If you goto Database tab, you can see the current Reporting server database name, modes and also the credentials used for that. From the below screenshot you can observe that,ReportServer is the default Database name. In this example, we will show you the steps to change the default database name so, click on the Change Database button
 Reporting Services Configuration in SSRS 2014
Once you click on the Change Database button, a new window called Report Server Database Configuration Wizard will be opened to create new database.
Within the Actions tab, you have to select the required option from the list:
  • Create a New Report Server Database: If you want to create a new underlying database for report server internal storage then, Please select this option. Here, we are selecting this option because we are creating new database.
  • Choose an Existing Report Server Database: If you want to modify the existing database of a report server then, Please select this option.
 Reporting Services Configuration in SSRS 2014
Database Server
In this tab we have to specify the Server Name, Authentication Type, User Name and Password required to connect with the Database.
 Reporting Services Configuration in SSRS 2014
Click on the Test Connection button to test the connection we provided.
 Reporting Services Configuration in SSRS 2014
From the above screenshot you can observe that, our connection is successful. Now, click on the Next button to go to Database tab
Here, we have to specify the new database name as per your requirement. For now, we named it as New Report Server as shown below
 Reporting Services Configuration in SSRS 2014
Click on the Next button to go to Credentials tab. Here we have to select the Authentication Type. Reporting Server provides following types of authentication:
  • Windows Credentials: Please select this option, If you are working on local computer and you have permission to access the Database.
  • SQL Server Credentials: Please select this option, If you want to connect to external Database. Here we have to provide the username and password required to connect with the server and these credentials should match the user data in SQL security.
  • Service Credentials: Please select this option, If you want the reporting server to connect using the service account. Here, credentials are not encrypted or stored.
 Reporting Services Configuration in SSRS 2014
Click on the Next button to go to Summary tab. Here we can see the summary of the created database
 Reporting Services Configuration in SSRS 2014
Click on the next button to create the database.
 Reporting Services Configuration in SSRS 2014
Click finish button to finish creating new Reporting server Database
 Reporting Services Configuration in SSRS 2014
From the below screenshot, you can see the new database name
 Reporting Services Configuration in SSRS 2014
Thank You for visiting Our Blog