Wednesday, July 31, 2013

Error: 15517 – SQL Server could not disable publishing and distribution on ‘YourDBName’

Recently I had configured transactional replication and later I wanted to disable the publishing and distribution settings but I was getting Microsoft SQL Server Error: 15517 which states that SQL Server could not disable publishing and distribution on ‘YourDBName’. Below is the error detail.
TITLE: Microsoft.SqlServer.ConnectionInfo
------------------------------
SQL Server could not disable publishing and distribution on 'YourDBName'.
------------------------------
ADDITIONAL INFORMATION:
An exception occurred while executing a Transact-SQL statement or batch. (Microsoft.SqlServer.ConnectionInfo)
------------------------------
Cannot execute as the database principal because the principal "dbo" does not exist, this type of principal cannot be impersonated, or you do not have permission.
Changed database context to 'master'. (Microsoft SQL Server, Error: 15517)
For help, click: http://go.microsoft.com/fwlink?ProdName=Microsoft%20SQL%20Server&ProdVer=11.00.2218&EvtSrc=MSSQLServer&EvtID=15517&LinkId=20476
------------------------------
BUTTONS:
OK
------------------------------
Later I analysed the issue and used sp_changedbowner on the database and again tried to disable the publishing and distribution and this time I was successful. Insufficient privileges causes this error so I thought to share this information with you, if you will face this issue then you will be able to solve it.
When you get error 15517 – SQL Server could not disable publishing and distribution on ‘YourDBName’ then kindly solve it by.
USE <YourDBName>
GO
sp_changedbowner 'sa'
You can also solve this issue by executing:
ALTER AUTHORIZATION ON DATABASE::[YourDBName] TO [sa]
Reference: Manzoor Siddiqui [www.SQLServerLog.com]

SQL Server 2014 Upgrade Advisor Prerequisites, Download and Installation

What is SQL Server Upgrade Advisor?
Microsoft has provided a free tool to analyse existing SQL Server Instance, database, its components, features and configurations and generates a report where you can analyse required changes to upgrade from lower version of SQL Server to higher version of SQL Server so that deprecated features are highlighted and compatibility with the system and applications should not be affected and errors can be minimised to an extent.
If you want to upgrade SQL Server 2005, SQL Server 2008, SQL Server 2008 R2 or SQL Server 2012 to SQL Server 2014 then you can use Upgrade Advisor Download Version 12.0.2000.8.
Here I am going to list prerequisites, download links and installation steps in concise and easy way. You can also find supporting Microsoft links so that you can easily understand and follow the process.
Following are prerequisites for SQL Server 2014 Upgrade Advisor.
Prerequisites
  1. SQL Server Transact-SQL ScriptDom (ENU\x64\SqlDom.msi or  ENU\x86\SqlDom.msi as per your system)
  2. Windows Vista SP1, Windows 7, Windows Server 2008 SP2, Windows Server 2008 R2
  3. Windows Installer 4.5
  4. .NET Framework 4
Download Link for Microsoft SQL Server Transact-SQL ScriptDom:
Download Link for Windows Installer:
Download Link for .NET Framework:

Download Upgrade Advisor Installer
To download SQL Server 2014 Upgrade Advisor installer SqlUA.msi, go to Microsoft Link –http://www.microsoft.com/en-in/download/details.aspx?id=42295
1. You will find Microsoft SQL Server Feature Pack, select Language (e.g. English)
2. Click on Download button.
3. Choose the required File Name ENU\x64\SqlUA.msi  or ENU\x86\SqlUA.msi as per your system x64 or x86. [refer Fig-1]
4. Choose SQL Server Transact-SQL ScriptDom ENU\x64\SqlDom.msi or ENU\x86\SqlDom.msi as per your system x64 or x86. [refer Fig-1]
Select Files to Download
Figure 1: Select Files to Download
5. You can see download summary and total size of file on right side [refer Fig-1] then click Next.
6. Now it will prompt you to Run or Save the files. You can save the files on disk.
Installation
1. First run SqlDom.msi and continue till Finish [refer Figure-2]
T-SQL ScriptDom Installation
Figure 2: T-SQL ScriptDom Installation
2. Then run SqlUA.msi file to launch installation, it will check system prerequisites and if it requires any missing component it will prompt you otherwise it will continue installation. [refer Figure-3]
Upgrade Advisor Installation
Figure 3: Upgrade Advisor Installation
3. Accept the terms in license agreement and choose Feature Selection as in figure-4.
Feature Selection in Upgrade Advisor
Figure 4: Feature Selection in Upgrade Advisor
4. Continue the installation and click Finish.
Upgrade Advisor Installation Finished
Figure 5: Upgrade Advisor Installation Finished
5. Once Installation is completed you can go to Upgrade Advisor from windows  start menu and click SQL Server 2014 Upgrade Advisor to launch.

Encrypt Database with Transparent Data Encryption (TDE)

If you want to protect your valuable data from unauthorised access you normally use some technique like password protection or by key protection etc. Encryption is the process of protecting data with key or password from unauthorised access so that if data is stolen or hacked then also it is safe and secure. Today we will see how we can protect our valuable data and database with Transparent Data Encryption (TDE) feature available with SQL Server database.
As a database administrator you take database backups regularly and keep the backup copies on storage drive or tape but if those files are stolen or somebody tries to misuse data by restoring it then how will you protect it from cracking or decrypting, to handle such situation we use Transparent Data Encryption before our data is misused.
Basically in Transparent Data Encryption (TDE), it uses Database Encryption Key (DEK) which is secured by a certificate and kept in master database. Database Encryption Key is either protected by certificate or an asymmetric key secured by Extensible Key Management (EKM) handler with the help of Microsoft Cryptographic API (MSCAPI). In TDE data is encrypted using Advanced Encryption Standard (AES) and Triple Data Encryption Standard (3DES) encryption algorithms.
Transparent Data Encryption technique is used at data page level, database encrypts it before writing and it is decrypted at the time of reading. Hence you can observe I/O encryption and decryption of data file and log file, also you may face performance degrade because if you are using any database encryption on database instance with TDE then tempdb database will be encrypted automatically.
When you backup a database without encryption, you will be able to read it’s table content row by row and our main motto is to encrypt those readable contents inside backup and log files.
Now we will see step by step process of Transparent Data Encryption. We have ‘ClientInfo’database in SQL Server 2012 Enterprise Edition for demonstration purpose.
Step 1:
First of all we have to create a Master Key with some strong password in database as shown below.
--Create Master Key
USE master;
GO
CREATE MASTER KEY ENCRYPTION BY PASSWORD = 'T3stD@8@Pw6';
GO
Step 2:
We have to create a certificate with certificate name, here we have ‘ClientInfo_Cert’ as certificate.
--Create Certificate
CREATE CERTIFICATE ClientInfo_Cert WITH SUBJECT = 'Client Info Certificate';
GO
Step 3:
We need to create database encryption key (DEK) with AES_128 algorithm with respective certificate.
--Create Encryption Key, Encrypted by Server Certificate.
USE ClientInfo;
GO
CREATE DATABASE ENCRYPTION KEY
WITH ALGORITHM = AES_128
ENCRYPTION BY SERVER CERTIFICATE ClientInfo_Cert;
GO
Once you will execute above query, you will get warning message as given below which is specifying to keep a backup of certificate and private key which we have created.
Warning: 
The certificate used for encrypting the database encryption key has not been backed up. 
You should immediately back up the certificate and the private key associated with the certificate. 
If the certificate ever becomes unavailable or if you must restore or attach the database on another server, 
you must have backups of both the certificate and the private key or you will not be able to open the database.
Step 4:
So, It is very important to have a backup of Certificate and Private Key otherwise you won’t be able to restore your database. As per warning given, we will first take backup by below query and will keep both certificate and key at safe place to use in future.
Master Key and Certificate
Figure 1: Backup Master Key and Certificate
--Backup Certificate 
USE master 
GO 
BACKUP CERTIFICATE ClientInfo_Cert 
TO FILE = 'C:\Backup\ClientInfo_Cert.cer' 
WITH PRIVATE KEY (FILE = 'C:\Backup\ClientInfo_Cert_Key.pvk', ENCRYPTION BY PASSWORD = 'T3stD@8@Pw6' ) 
GO
Step 5:
Now we will enable encryption on the database ‘ClientInfo’.
--Enable Encryption
ALTER DATABASE ClientInfo
SET ENCRYPTION ON;
GO
Step 6:
You can verify certificate details and encryption key details with sys.certificatesand sys.dm_database_encryption_keys as given below.
Verify Certificate and Master Key
Figure 2: Verify Certificate and Master Key
--Check Certificate Details 
USE master 
GO 
SELECT *FROM sys.certificates WHERE pvt_key_encryption_type <> 'NA' 
GO

--Check Encryption Key Details
USE master
GO
SELECT encryptor_type, key_length, key_algorithm, encryption_state, create_date 
FROM sys.dm_database_encryption_keys
GO
Step 7:
Take full backup of ‘ClientInfo’ database. This database backup will be in encrypted format and secured.
--Full Database Backup with Recovery.
USE master 
GO 
BACKUP DATABASE [ClientInfo] TO DISK = N'C:\Backup\ClientInfo.bak' 
WITH NOFORMAT, NOINIT, NAME = N'ClientInfo-Full Database Backup', 
SKIP, NOREWIND, NOUNLOAD, STATS = 10
GO
Step 8:
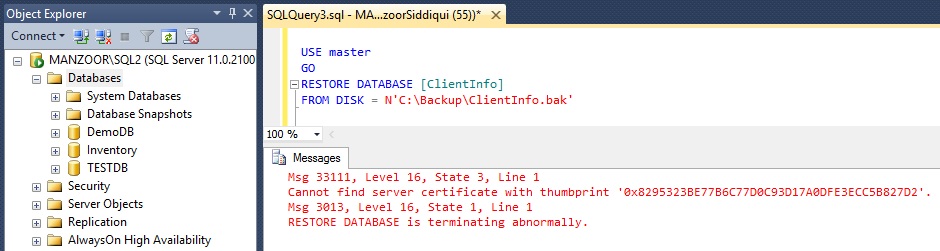
Try to restore this database backup file on other instance (MANZOOR\SQL2) and observe the message. You will get error message indicating to provide server certificate because our database backup is encrypted with TDE and to decrypt it you need server certificate and key.
Restore Database without passing Certificate and Key
Figure 3: Restore Encrypted Database without passing Certificate and Key
USE master 
GO
RESTORE DATABASE [ClientInfo]
FROM DISK = N'C:\Backup\ClientInfo.bak'
Error:
Msg 33111, Level 16, State 3, Line 1
Cannot find server certificate with thumbprint '0x8295323BE77B6C77D0C93D17A0DFE3ECC5B827D2'.
Msg 3013, Level 16, State 1, Line 1
RESTORE DATABASE is terminating abnormally.
Step 9:
To restore database on other instance we have to create master key with new password and new certificate with decryption by original password and after that we will again try to restore database. Kindly refer below.
--Create Master Key on other Instance
USE master 
GO 
CREATE MASTER KEY ENCRYPTION BY PASSWORD = 'B@dP@$$w0r6' 
GO

--Create new certificate with reference to earlier private key and decrypt it by same password.
CREATE CERTIFICATE ClientInfo_Cert2
FROM FILE = 'C:\Backup\ClientInfo_Cert.cer' 
WITH PRIVATE KEY (FILE = 'C:\Backup\ClientInfo_Cert_Key.pvk', DECRYPTION BY PASSWORD = 'T3stD@8@Pw6') ; 
GO
Step 10:
Now try to restore ‘ClientInfo’ database on other instance (MANZOOR\SQL2) and you will be able to restore database successfully as shown below.
Restored Encrypted Database on other Instance
Figure : Successfully Restored Encrypted Database on other Instance
USE master 
GO
RESTORE DATABASE [ClientInfo]
FROM DISK = N'C:\Backup\ClientInfo.bak'

CLICK HERE to watch live practical.

Reference: Manzoor Siddiqui [www.SQLServerLog.com]

SQL Server 2012: Pagination with Order By and Offset Fetch

Many times developers need to implement pagination on search results. Pagination is the process of dividing the results of a query into discrete numbered pages.
SQL Server 2012 has introduced a new and easy method to implement pagination using OFFSET and FETCH NEXT. This process is actually faster compared to previous complex methods like using row_number. This feature is somewhat similar to the MySQL Limit/Offset clause.
OFFSET: specifies the number of rows to skip before it starts returning rows
FETCH NEXT: the number of rows to display in the result
Let us explore Order By Offset fetch in SQL Server 2012 with examples.
Create a table called COMPANY, and populate it with some data.
IF OBJECT_ID('COMPANY') IS NOT NULL
DROP TABLE COMPANY
GO

CREATE TABLE COMPANY
(
ID        INT PRIMARY KEY,
NAME      VARCHAR(25),
LOCATION  VARCHAR(25)
)
GO

INSERT INTO COMPANY
VALUES (1,'HCL','London'),
       (2,'HP','Bangalore'),
       (3,'Microsoft','Bangalore'),
       (4,'Infosys','Pune'),
       (5,'Google','London'),
       (6,'GE', 'London'),
       (7,'AltiSource','New York'),
       (8,'Facebook','Palo alto'),
       (9,'IBM','New York'),
       (10,'TCS','Mumbai')
GO

SELECT * FROM COMPANY
GO

Problem 1.1 – Using only OFFSET

SELECT   ID, NAME, LOCATION
FROM     COMPANY
ORDER BY ID
OFFSET   3 ROWS

In the query above, we are using only OFFSET, so it will skip the first three rows and will return all remaining rows in a determined order.


Problem 1.2 – Skip zero rows, and fetch the first five rows.

SELECT     ID, NAME, LOCATION
FROM       COMPANY
ORDER BY   ID
OFFSET     0 ROWS
FETCH NEXT 5 ROWS ONLY

In the query above, OFFSET 0 ROWS means we have skipped zero and FETCH NEXT 5 intends to retrieve the next five rows.

Problem 1.3 – Skip the first five rows, and fetch the next five rows.

SELECT     ID, NAME, LOCATION
FROM       COMPANY
ORDER BY   ID
OFFSET     5 ROWS
FETCH NEXT 5 ROWS ONLY

Here, we are skipping the first five rows and fetching the next five rows.
The result above can be achieved using SQL Server 2005/2008 using row_number and derived table.
SELECT ID, NAME, LOCATION
FROM
(
SELECT ID, NAME, LOCATION, ROW_NUMBER() OVER(ORDER BY ID) as rownum
FROM   COMPANY c
) DT
WHERE  DT.rownum BETWEEN 6 AND 10

Performance comparison between OFFSET FETCH and ROW_NUMBER

The OFFSET FETCH approach took 0.003294, and the row_number approach took 0.0033038. This shows the newer approach OFFSET FETCH in SQL Server 2012 is faster.

Problem 1.4 – Using Variables with OFFSET and FETCH

DECLARE @OffSetRows AS INT = 5
DECLARE @FetchRows AS INT = 5

SELECT     ID, NAME, LOCATION
FROM       COMPANY
ORDER BY   ID
OFFSET     @OffSetRows ROWS
FETCH NEXT @FetchRows ROWS ONLY

This is the same as Problem 1.3, but here we are using variables to store OFFSET and FETCH values.