Aim : This post is specifically for those geeks who wants to learn about SSIS Aggregate Transformation. Microsoft provides a vast list of Data Flow transformations in SSIS, and this (aggregate transformation) is one of the most used transformations in SSIS.
Description : Aggregate transformation is a blocked and Asynchronous transformation. WithAsynchronous, I mean to say that Output rows will not be equal to the Input rows. Also, this is categorized as Blocked transformation because aggregation is performed on all the column values. So, it will not release any row until it processes all rows. For more information on Dataflow transformation categories and examples, visit this – Dataflow transformations in SSIS
It will work in the same way as the aggregate functions perform in the SQL server. Generally, we have different types of Aggregate functions (MIN, MAX, SUM, AVG, COUNT and COUNTDISTINCT). The aggregate transformation also provides GROUP BY clause, which you can use to specify groups to aggregate across.
Now we are going to learn the functionality of each function in detail. You can visit, Source – Microsoft’s website to learn more on this.
- SUM: Used as SUM(). This function Sums up the values present in a column. Only columns with numeric data types can be summed.
- AVG: Used as AVG(). This function Returns the average of all the column values present in a column. Only columns with numeric data types can be averaged.
- MAX: Used as MAX(). Returns the maximum value present in a group. In contrast to the Transact-SQL MAX function, this operation can be used only with numeric, date, and time data types.
- MIN: Used as MIN(). Returns the minimum value present in a group. In contrast to the Transact-SQL MIN function, this operation can be used only with numeric, date, and time data types.
- COUNT: Used as COUNT(). Returns the number of items present in a group.
- COUNT DISTINCT:Returns the number of unique nonnull values present in a group.
- GROUP BY: Used as GROUP BY(). Divides data sets into groups. Columns of any data type can be used for grouping.
The SSIS Aggregate transformation will handle null values in the same way as the SQL Server relational database engine handles. The behavior is defined in the SQL-92 standard. Following are the rules which are applied:
- In a GROUP BY clause, nulls are treated like other column values. If the grouping column contains more than one null value, the null values are put into a single group.
- In the COUNT (column name) and COUNT (DISTINCT column name) functions, nulls are ignored and the result excludes rows that contain null values in the named column.
- In the COUNT (*) function, all rows are counted, including rows with null values.
I am sure this information provided by Microsoft must have helped you to clear your basics. Let’s go ahead to my favorite session i.e. Step by Step Example to show working of Aggregate transformation in SSIS.
Step by Step example on SSIS Aggregate transformation
Step 1. SSIS Package Configuration.
- Create a SSIS package with name “Aggregate”.
- In your SQL Server Data tool (abbreviated as SSDT is known as BIDS of 2012), drag and drop Data Flow Task (DFT) to control flow window.
- Double click on Data Flow Task. It will take you to the Data flow tab where you can perform yourETL functions i.e. E – Extract data from heterogeneous source, T – Transform it with Data flow transformations and L – Load transformed data to Data warehouse.
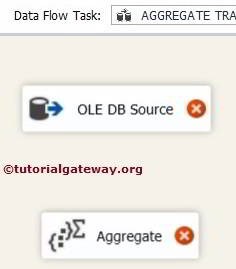
Step 2. OLEDB Source Configuration.
- Drag and drop OLEDB source to Data flow window.
- Now, configure OLEDB source as per your settings. For this example, I am creating a connection manager to OLEDB source. I have given server name as (local). I am choosing database as AdventureWorks2008. Add this connection manager to OLEDB source. I am selecting a table named [Sales].[SalesOrderDetail].
- Here, I have not shown you the configuration steps of OLEDB source. I hope you all are very familiar with it. Trust me it is as simple as shopping from flipkart.
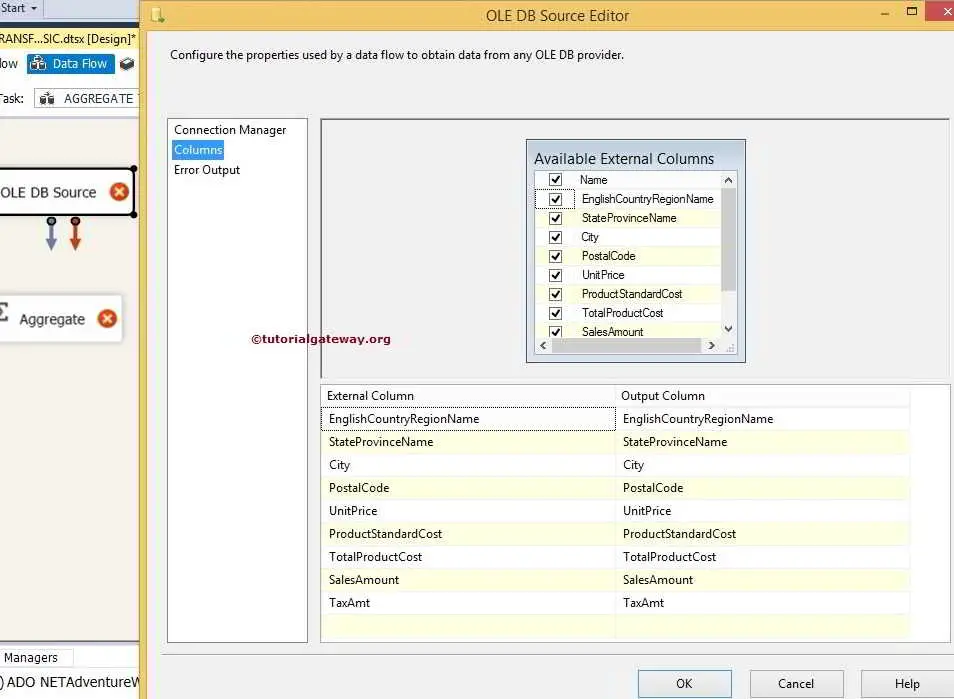
Step 3. Aggregate Dataflow Transformation Configuration.
- Drag and drop Aggregate transformation to Dataflow window.
- Create a connection between OLEDB source and Aggregate transformation. To create connection, hold path (green arrow) from OLEDB source and drag it onto Aggregate transformation.
- To configure Aggregate transformation, double click on it. An Aggregate transformation editor window will pop up asking for settings.
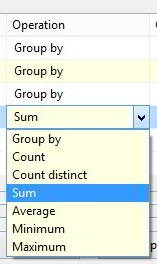
- Select the required Columns and choose appropriate Operation on that selected column.
- In this example, I am going to find total rows in the table by using COUNT function and maximummodified date by using MAX function, the sum of unit price by using SUM function and the minimumline total by using MIN function.
- Below screen shot states that I have implemented all the mentioned operations in my aggregate transformation.
- Finally click on OK button to confirm the end of configuration for “SSIS Aggregate Transformation”.

Step 4. OLEDB Destination Configuration.
- Drag and drop OLEDB destination to the Dataflow window.
- Create a connection between Aggregate transformation and OLEDB destination.
- Configure OLEDB destination as per your settings.
- I am attaching Data viewer to view the output while executing the SSI package.
- Finally it will look like picture shown below.
Note :- Create a “Data Viewer” between Aggregate transformation and OLEDB destination for observing the flow of data as well as Output data too.

Kudos!!! We are done with the creation of SSIS package which will perform aggregate transformation on data. Now, I am going to run our SSIS package to view the results.

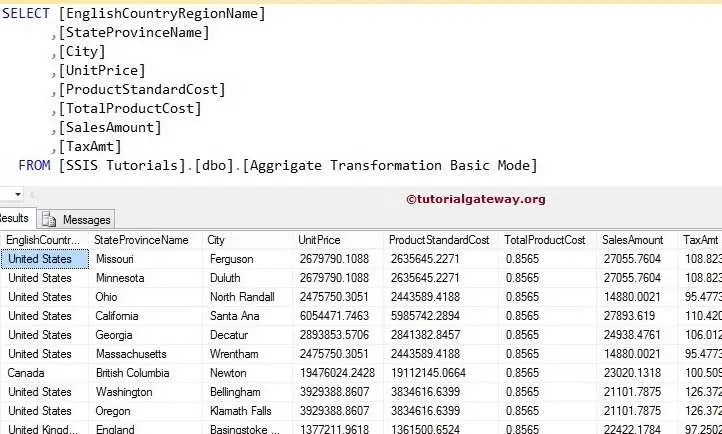
Conclusion – By observing about screen shot, we can conclude our SSIS aggregate transformationoperations on given table ([Sales].[SalesOrderDetails]) is performed successfully. Final output is – One single row with Four columns. Below is the complete analysis of this result.
- First column tells us the total count of rows in given table.
- Second column is showing the maximum Modified date.
- Third column is showing the sum of Unit price.
- Fourth column gives the minimum Line total.
With this we come to an end of article on Aggregate transformation in SSIS. I hope you all must have enjoyed this step by step example on aggregate transformation. Please drop/leave your valuable feedback below as comments. It is highly appreciated.
SORT Transformation:


SORT Transformation:
Aim :- In this, we will implement Sort Transformation in SSIS. In our earlier SSIS Tutorials, we discussed Control flow in SSIS. But, with this post we will now move forward to Data flow in SSIS. Sort Transformation is present in Data Flow tab. We will now learn the functionality of Sort transformation in SSIS.
Description :- Sort can be defined as any process of arranging items or data according to a certain sequence. Sort transformation in SSIS works on the same principle. Sort transformation in SSIS is used to “Sort” the data either ascending or descending order. Sort transformation in SSIS is mainly used with Merge or Merge Join Transformations. We can call Sort transformation as Asynchronous Transformation and Blocked Transformation. Are you wondering what is Asynchronous and Blocked transformations? We have a solution right below this.
What is a Blocked Transformation?
Blocked Transformation means – The next operation can’t start until & unless it completes theprevious operation. In this, rows will not be send to next transformations until all of the Input rows have been read. In simple words, they will process all rows first and than release them for further Transforamtions.
How it works?
- First it read the all the Data from Source.
- Once it read the all the data from Source then it performs Sort Transforamtion (Asc or Desc) based upon condition.
- Finally it loads the Data into destination.
I think this explanation is enough to understand the concept of Blocked transformations. Now we are good to learn Sort Transformation in SSIS. Let’s work on Sort transformation in SSIS with a simple example.
STEP 1. Source Data :-
Below is a file containing my source data. It contains data with few duplicate rows as well.
STEP 2. Business Intelligence Development Studio – BIDS :-
- Open BIDS, Create one SSIS project. Here my Project name is PHPRING.
- In this project, create one Package and name it as say “Sort”.
- Drag and drop one Data Flow Task (DFT) to Control Flow.
- Double click on Dataflow Task. Then drag and drop – Flatfile Source, Sort transformationand OLEDB Destination and connect them all.
- Here, my source is in File format- That’s why I am taking source as Flatfile. And I want to load my Source data into SQL table – That’s why I am taking destination as oledb.
Follow below screen shot if you have any doubt while taking Source, Sort transformation and Destination.

STEP 3. Configuring Flatfile Source :-
Double click on Flatfile source to set properties. Once you double click on Flat file source, the below wizard will appear. Click on New button
Once we click on “New” we will get another window. Finally click on “OK” button.

STEP 4. Configuring Sort Transformation in SSIS :-
It’s time to Configure Sort transformation in SSIS. Double clicking on Sort transformation will pop up the below window. Now, set the properties like done below.
- Check column “name” in the available columns.
- Give Sort order as Ascending.
- Check the box below ( If you want to Remove rows with duplicate sort values).
- Finally click on “OK” button.

So, till here we complete the configuration of Flatfile Source and Sort transformation in SSIS. Finally, we can complete this with the configuration of OLEDB Destination.
STEP 5. Configuring OLEDB Destination :-
Double click on OLEDB Destination. The below window will appear on our Screen.
Clicking on “New” button will get another window.
Once again click on “New” button. We will get another window. Follow the below screen shot.

Finally click on “OK” button. So guys I configured everything, it’s time to run our package and observe the output.
STEP 6. Executing our Sort Transformation in SSIS Package :-
In this screen shot we can clearly observe that 12 rows are coming from Source. But only 8 rowsare loaded into SQL table “Sort”.
Between Source and Destination, we have Sort Transformation. So it eliminates all the duplicate rows as we check the box above in STEP 4. That’s why we got only 8 rows as Output.
Now, I am switching to my MS Sql Server to check table (sort). My output data is stored in this SQL table. In the below screen shot, we can clearly observe the output (8 rows). Also, we can see the Sorted column “ename” in Ascending order.

STEP 7. Performance issues with Sort transformation in SSIS :-
- It is a blocked transformation. I already mentioned few points at the starting of this article.
- It always degrades the performance So it is very bad to Implement.
- When a blocking transformation is encountered in the Data flow, a new buffer is created for its output and a new thread is introduced into the Data flow.
- Instead of using Sort transformation in SSIS, It is better to Sort out data with Tsql (Order by clause).
With this we complete our article on Sort transformations in SSIS. I hope you like it. Please provide your feedback and comments below.


Aggregate Transformation in SSIS 2014 Basic Mode
The Aggregate Transformation in SSIS performs two main tasks:
- Applying Aggregate Operations on your input data
- Allows you to group your data based on values in your input columns.
Basically, it performs a function similar to the T-SQL aggregate functions. The operations include the following:
- GROUP BY: Just like the GROUP BY clause in SQL SELECT queries.
- COUNT: It will count the number of values in this column. Null values are included in the count if you select (*) as the input column. Otherwise, null values are ignored.
- COUNT DISTINCT: It will count the number of distinct values in this column.
- SUM: Calculate the Sum of the Column values.
- AVERAGE: Calculate the Average of the Column values.
- MINIMUM: Calculate the Minimum of Column values.
- MAXIMUM: Calculate the Maximum of Column values.
The Aggregate transformation can be configured in Basic mode or Advanced mode. In Basic mode, the Aggregate transformation has one output and in Advanced mode, it can have more than one output, each containing the result of a different aggregation. Please refer Aggregate Transformation in SSIS Advanced Mode article to know, How to Configure multiple outputs in Aggregate Transformation
IsBig Property
The Aggregation transformation in SSIS includes the IsBig property, which is used on the output columns to handle the big or high-precision numbers. If any of the column value may exceed 4 billion then IsBig should be set to 1. By setting the IsBig property to 1, Aggregation Transformation Will:
- Use DT_R8 data type instead of the DT_R4 data type.
- Use DT_UI8 data type to store the Count results.
- Use DT_UI4 data type to store the Distinct count results.
Aggregate Transformation in SSIS 2014 Basic Mode Example
For instance, If we want to find the sum of the sales amount for each Color then we can use this Aggregate Transformation.
In this example we are going to perform all the Aggregate Transformation operations on DimGeography and FactResellerSales tables present in AdventureworkDW2014.
STEP 1: Open BIDS and Drag and drop the data flow task from the toolbox to control flow and name it as Aggregate Transformation.

Double click on it will open the data flow tab.
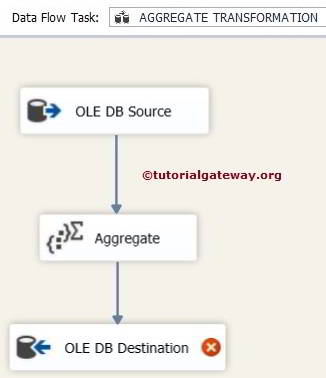
STEP 2: Drag and drop OLE DB Source, Aggregate Transformation from toolbox to data flow region
STEP 3: Double click on OLE DB source in the data flow region will open the connection manager settings and provides space to write our SQL statement. Here we are using DimGeography and [FactResellerSales] present in the AdventureworkDW2014
SQL command we are using to retrieve data is:

STEP 4: Click on columns tab to verify the columns. In this tab we can uncheck the unwanted columns also.
Drag and drop the blue arrow from OLE DB Source to Aggregate Transformation to connect the data.
STEP 5: Double-click the Aggregate transform to open the editor. Next in the lower pane we select the required columns to perform Aggregate Transformation operations by checking them in Available Input Columns.
Once you check the required columns then those column names will be appeared in theInput Column located in lower pane as shown in below figure.
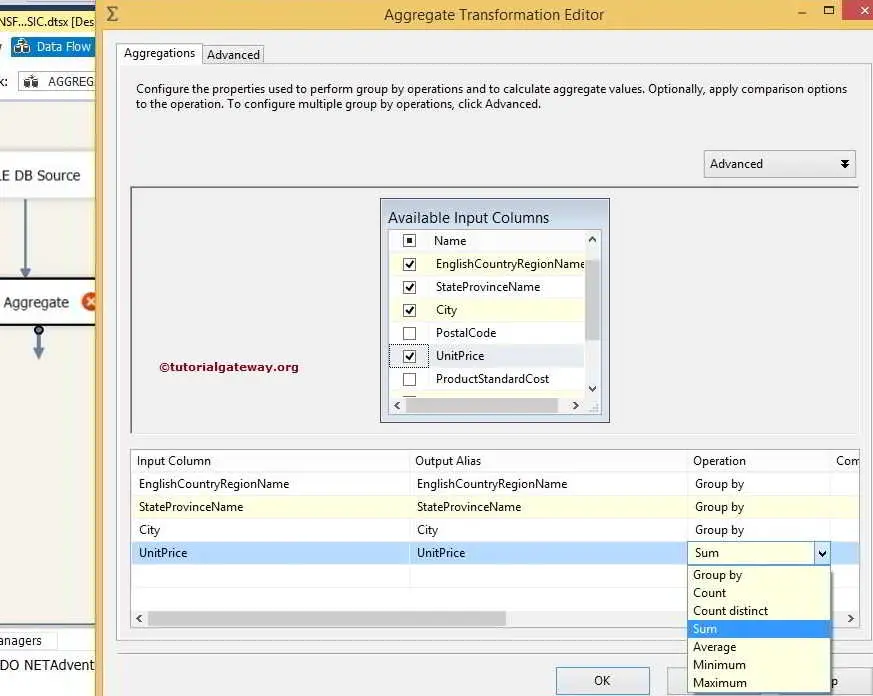
- Input Columns: Column we received from OLE DB source.
- Output Alias: Same like Alias in SQL. Here we can change the column name as per the project requirements.
- Operations: We already discussed above.
For this example we are going to use most of the Aggregate functions like below
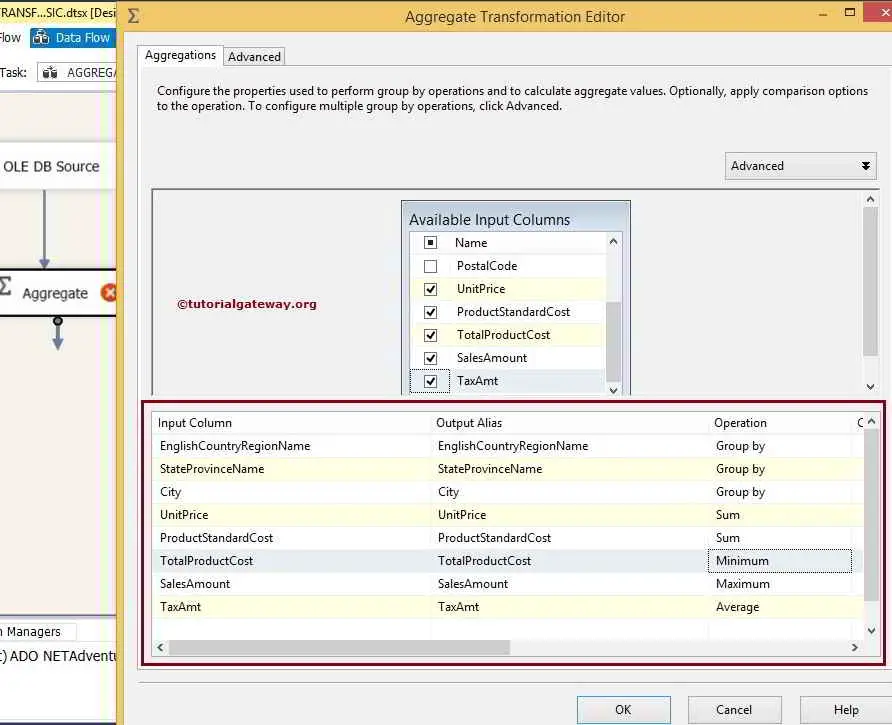
From the above screenshot you can observe that, We are calculating the Sum of Unit Price, Sum Product Standard Cost, Minimum of Total Product Cost, Maximum of Sales Amount and Average of Tax Amount and Group by English Country Region Then by State Province Name and Then by City.
NOTE: If your input column is string type, you will not see Sum, Average and other aggregate functions but only Group by. Always make sure to convert data type of column to proper data type before providing as input to Aggregate Transformation.
Click ok.
STEP 6: Drag and drop the OLE DB Destination into the data flow region and drag the blue arrow from Aggregate Transformation to OLE DB Destination
STEP 7: Now we have to provide Server, database and table details of the destination. So double-click on the OLE DB Destination and provide the required information.
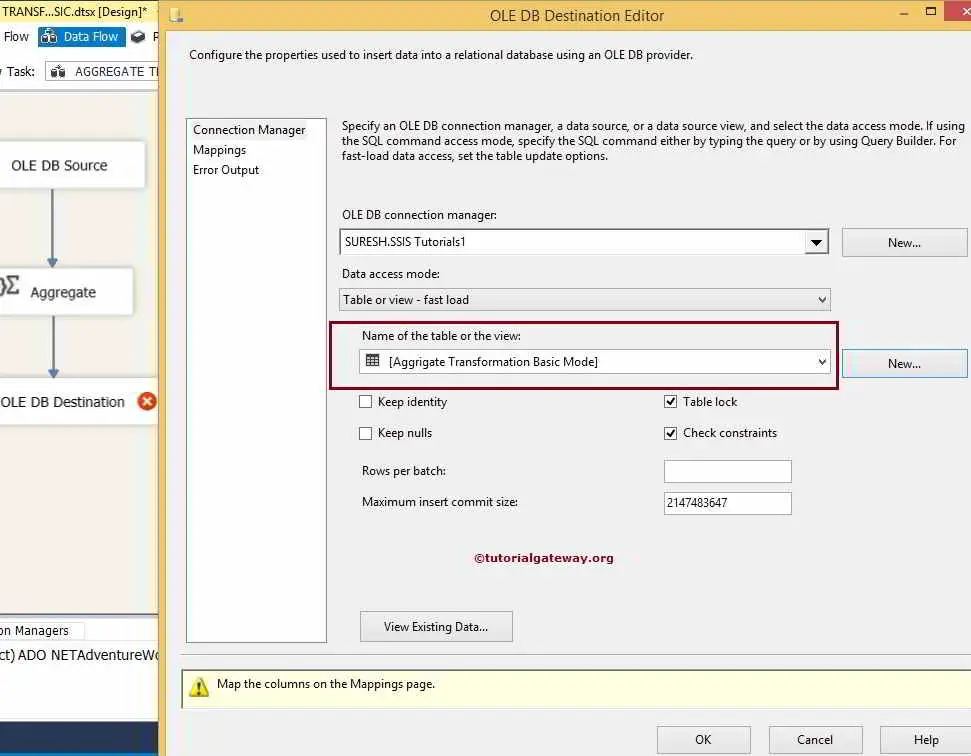
Here we pointer our destination database as [SSIS Tutorials] and for time being I used New button to create destination table for me and named it as Aggregate Transformation Basic Mode but in reality you should not design your table like this.
STEP 8: Click on Mappings tab to check whether the source columns are exactly mapped to the destination columns.

Click ok to finish our package design. Let us run the package

Let’s open the SQL Server Management Studio and write below T-SQL statement to check the results
Aggregate Transformation Advanced Option
The Aggregate Transformation includes a set of properties in the Advanced Tab present in the Aggregate Transformation Editor. By setting these properties we can increase the performance of the Aggregate Transformation.
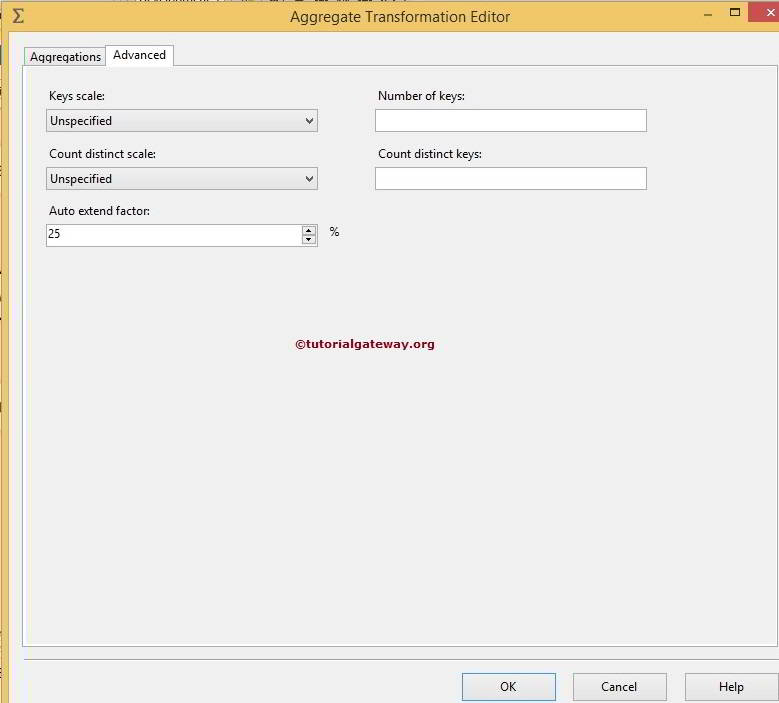
Key Scale: In this option, specify the approximate number of keys an aggregation can write. By default, the value of this option is Unspecified.
| Value | Description |
|---|---|
| Unspecified | The Key Scale property is not used. |
| Low | Aggregation can write nearly 500,000 keys. |
| Medium | Aggregation can write nearly 5,000,000 keys. |
| High | Aggregation may write more than 25,000,000 keys. |
- Keys: Specifying the exact number of keys an aggregation can write. Keys refers to the number of groups that are expected to result from a Group by operation. If both the Key Scale and Keys properties are set, the value of Keys takes precedence.
- Count Distinct Scale: We can specify the approximate number of distinct values an aggregation can write.
- Count Distinct Keys: In this, We can specify the exact number of distinct values that the aggregation can write. If both CountDistinctScale and CountDistinctKeys are specified, CountDistinctKeys takes priority.
- Auto extend factor: In this option, We can specify the percentage of memory it can extend in the aggregation process. We can choose the values from 1 to 100. By default, the value of this option is 25%.
Thank you for Visiting Our Blog
Aggregate Transformation in SSIS 2014 Advanced Mode
Please refer Aggregate Transformation in SSIS Basic Mode article to understand the Aggregations.
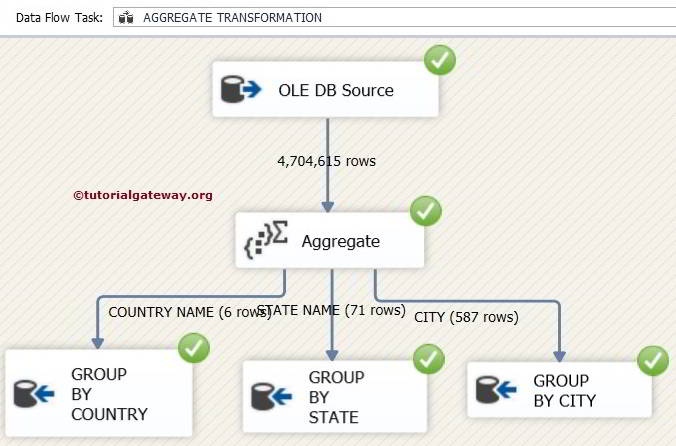
The Aggregate Transformation in SSIS support multiple outputs. It means Aggregate Transformation can read the data from the source for once and then we can create multiple outputs and each output may have different set of aggregations.
In this article we will show to you, How to configure multiple outputs in one aggregate transformation in ssis 2014 with example
STEP 1: Open BIDS and Drag and drop the data flow task from the toolbox to control flow and rename it as Aggregate Transformation.
Double click on it and it will open the data flow tab.
STEP 2: Drag and drop OLE DB Source, Aggregate Transformation from toolbox to data flow region
STEP 3: Double click on OLE DB source in the data flow region will open the connection manager settings and provides space to write our SQL statement. Here we are using DimGeography and [FactResellerSales] present in the AdventureworkDW2014
SQL command we used in the above screenshot to retrieve data is:
STEP 4: Click on columns tab to verify the columns. In this tab we can uncheck the unwanted columns also.
STEP 5: Double-click on the Aggregate transformation to open the Aggregate Transformation editor. In the upper pane we have a button to toggle between Basic and Advance Mode. In this example we want to configure multiple outputs so select the Advance mode.
Once you click on the Advance mode button new pane will be opened to configure multiple outputs.
- Aggregate Name: Specify the aggregate name.
- Group By Columns: Here it will show the list of columns we used for grouping.
Next in the lower pane we select the required columns to perform Aggregate Transformation operations by checking them in Available Input Columns.
Once you check the required columns then those column names will be appeared in the Input Column located in lower pane as shown in below figure.
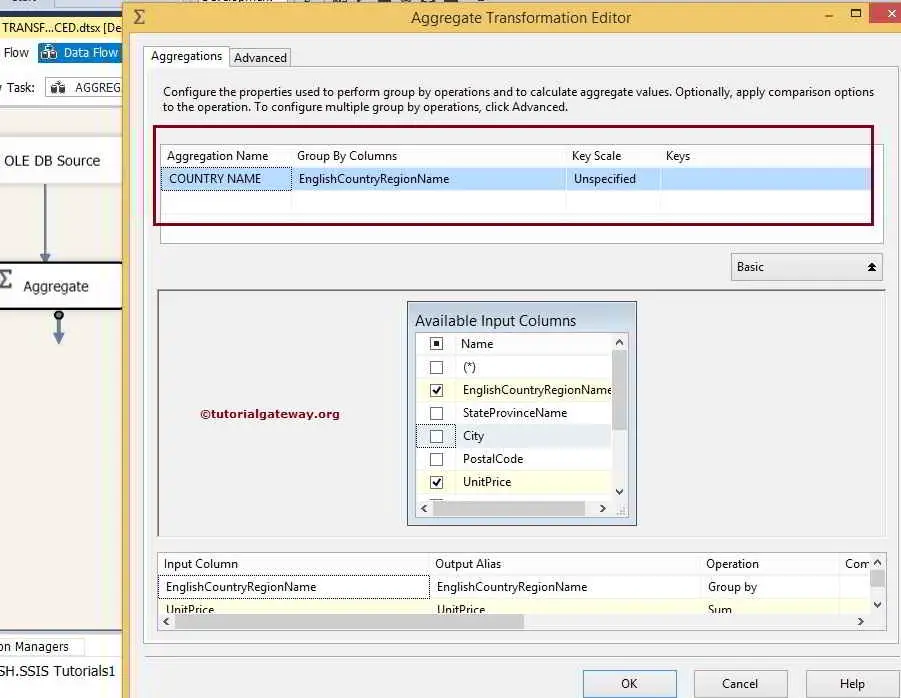
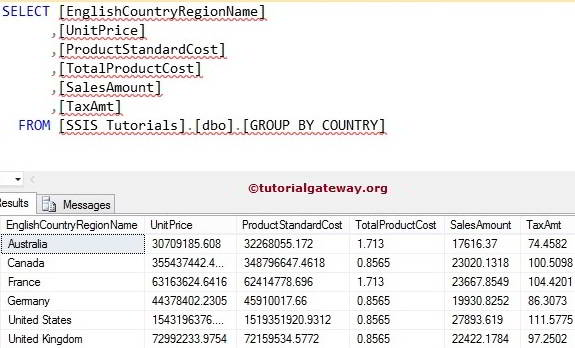
From the above screenshot you can observe that, we assigning Aggregation name as COUNTRY NAME and Group by as EnglishCountryRegionName.
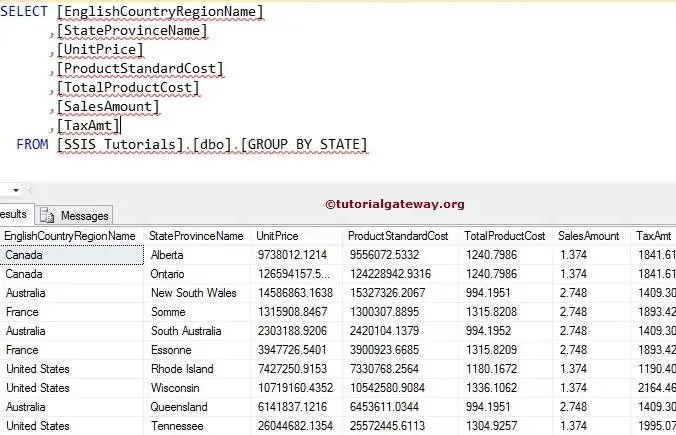
Let us add one more aggregation and assigning name as STATE NAME and Group by as EnglishCountryRegionName, StateProvinceName.
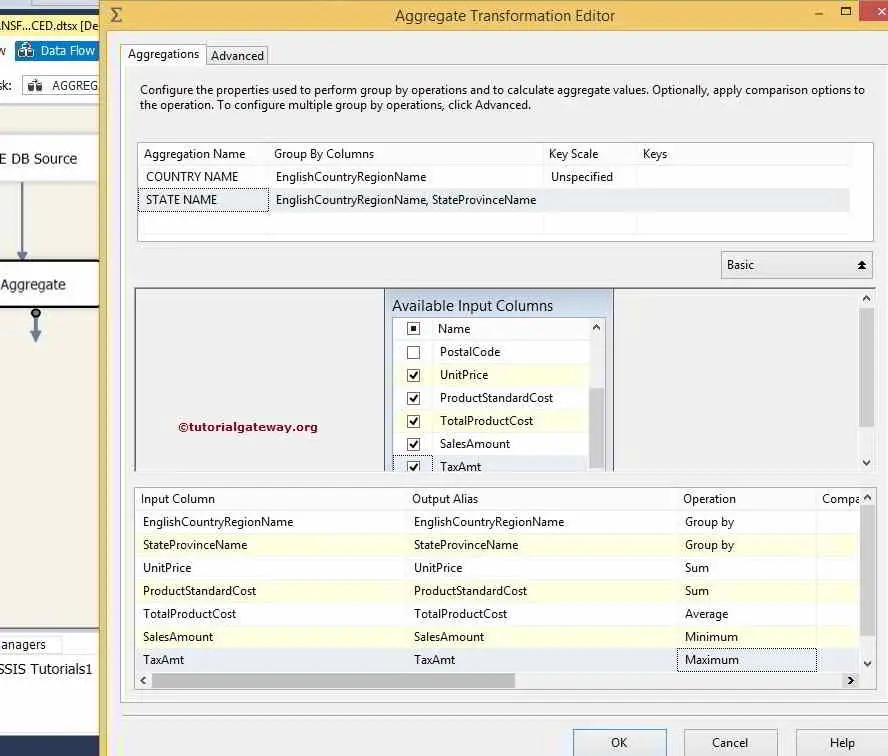
From the above screenshot you can observe that, We are calculating the Sum of Unit Price, Sum Product Standard Cost, Average of Total Product Cost, Minimum of Sales Amount and Maximum of Tax Amount and Group by English Country Region Then by State Province Name.
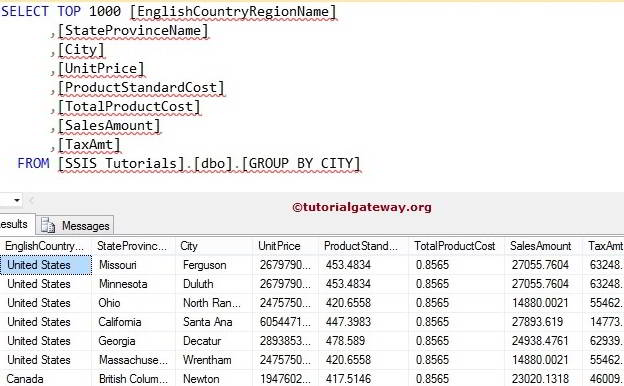
Let us add one more aggregation and assigning name as CITY and Group by as EnglishCountryRegionName, StateProvinceName, City.
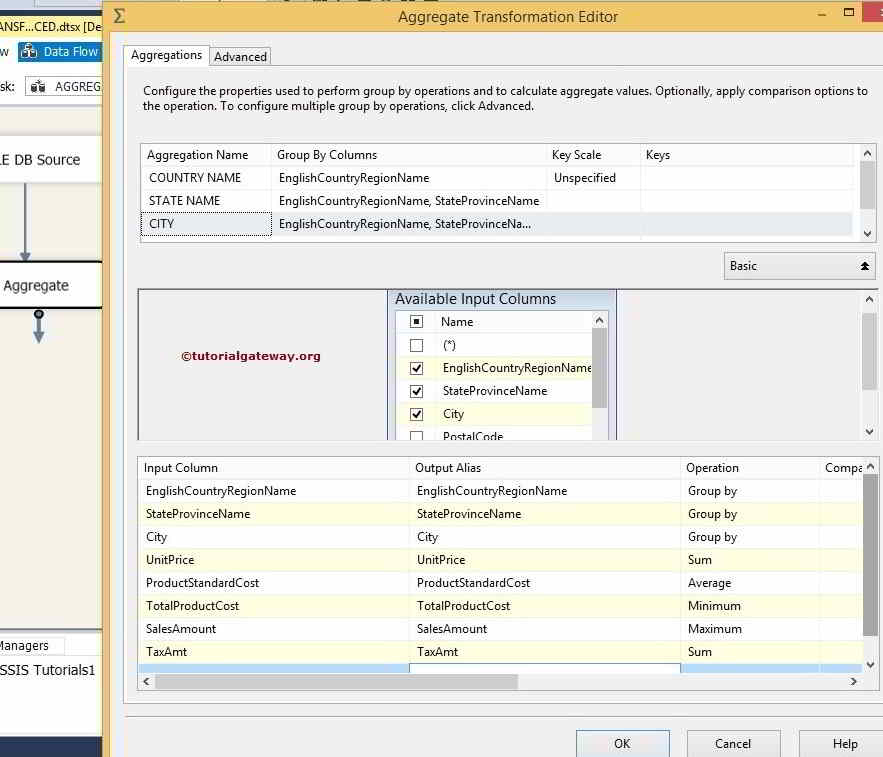
From the above screenshot you can observe that, We are calculating the Sum of Unit Price, Average of Product Standard Cost, Minimum of Total Product Cost, Maximum of Sales Amount and Sum of Tax Amount and Group by English Country Region Then by State Province Name and Then by City.
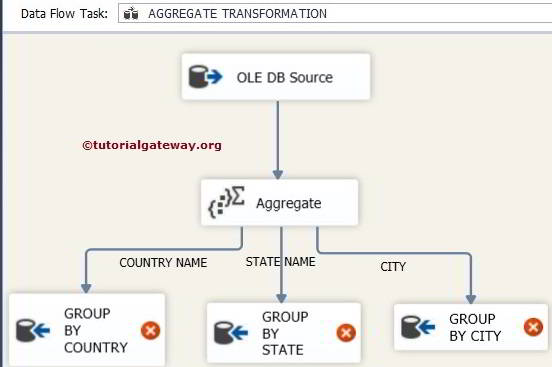
STEP 6: Drag and drop 3 OLE DB destinations from toolbox to data flow region to configure the three output we get from Aggregate transformation.
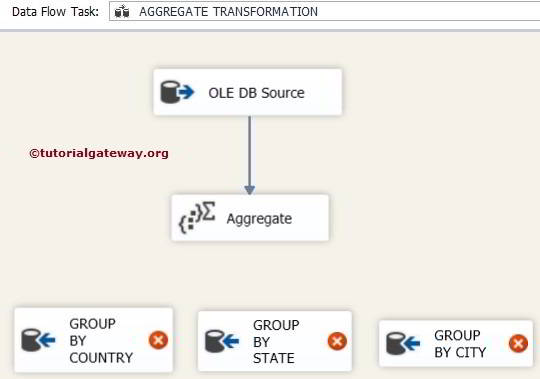
From the above screenshot you can observe that, rename the OLEDB destinations to Group By Country, Group By State and Group By City
STEP 7: When you drag the Aggregate transformation output arrow to OLE DB destination anInput Output Selection window will open to select one of the output and here we are selecting COUNTRY NAME

Let us assign State name output to second OLE DB destination
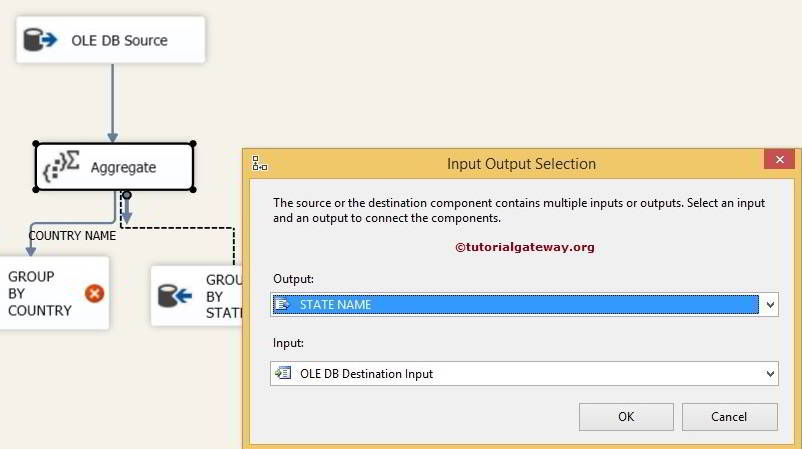
We have one more output (CITY) left so, when we drag green arrow from aggregate transformation to 3rd OLE DB Destination it will automatically assigned to City.
STEP 8: Now we have to configure the OLE DB destination for the country name. So double click on the OLE DB Destination and provide the required information.
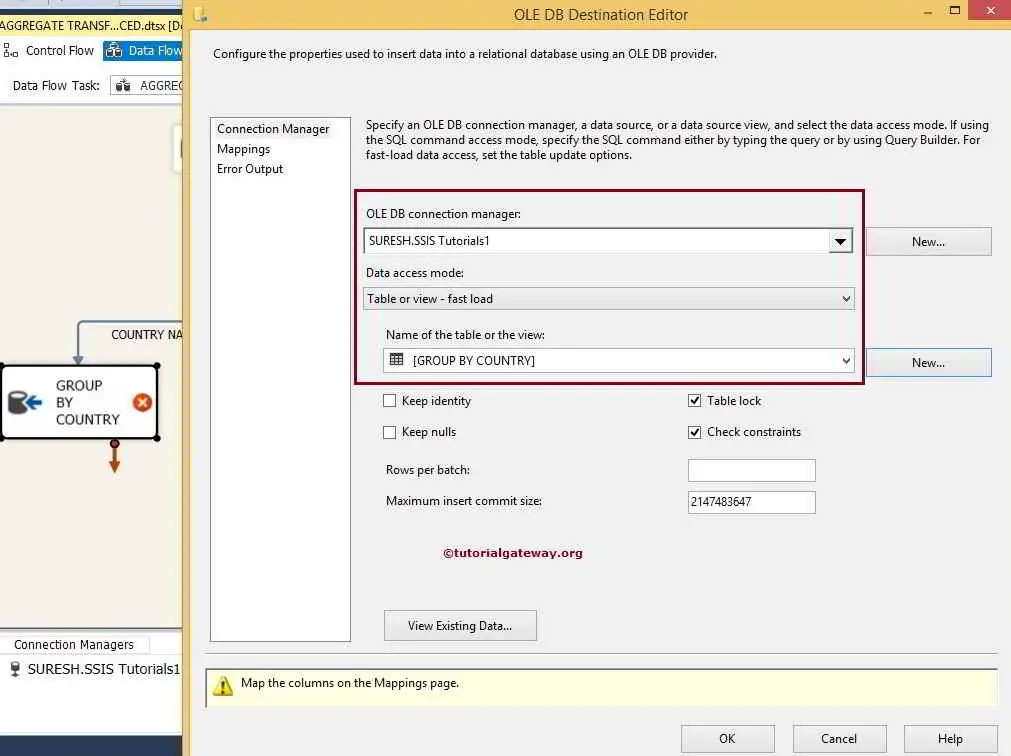
Here we are selecting [SSIS Tutorials] data base as destination data base and [Group By Country] table as destination table
STEP 9: Click on Mappings tab to check whether the aggregate source columns are exactly mapped to the destination columns.
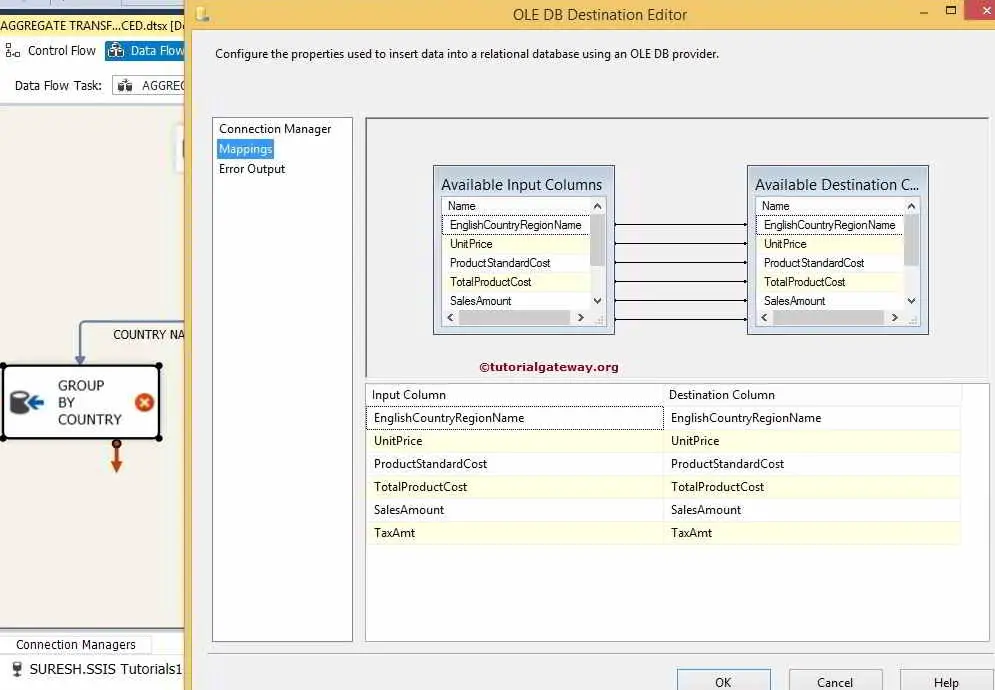
STEP 10: Now we have to configure the OLE DB destination for the group by state aggregation output. So double click on the OLE DB Destination and provide the required information
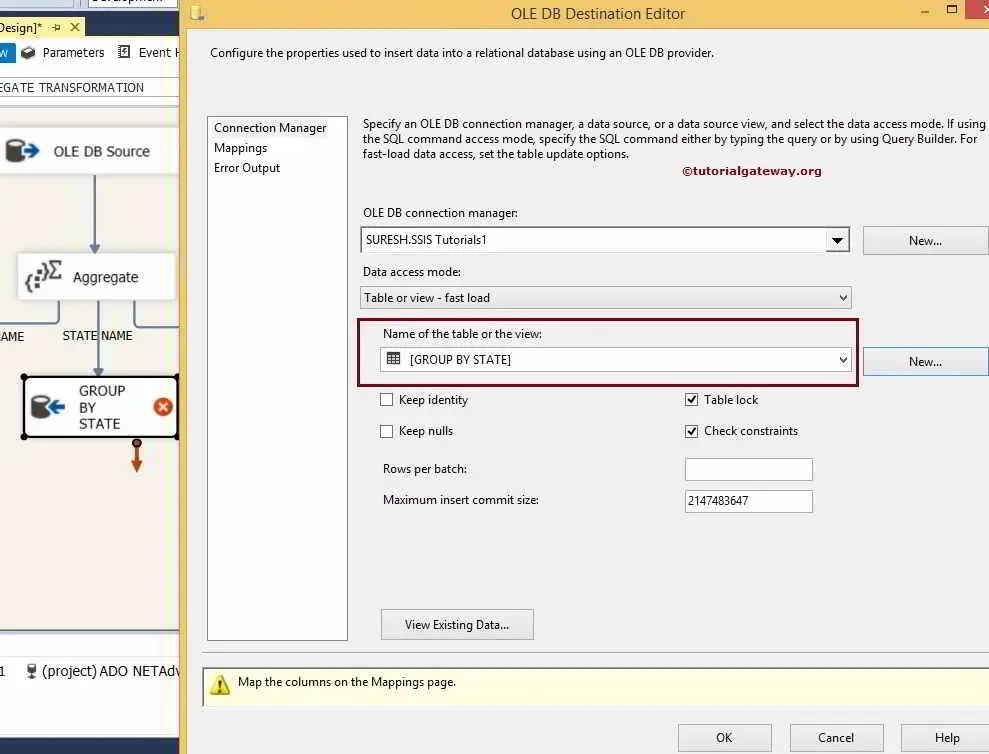
Here we are selecting [SSIS Tutorials] data base as destination data base and [Group By State] table as destination table
Repeat Step 9 check whether the aggregate source columns are exactly mapped to the destination columns.
STEP 12: Now we have to configure the OLE DB destination for the city output rows. So double click on the OLE DB Destination and provide the required information
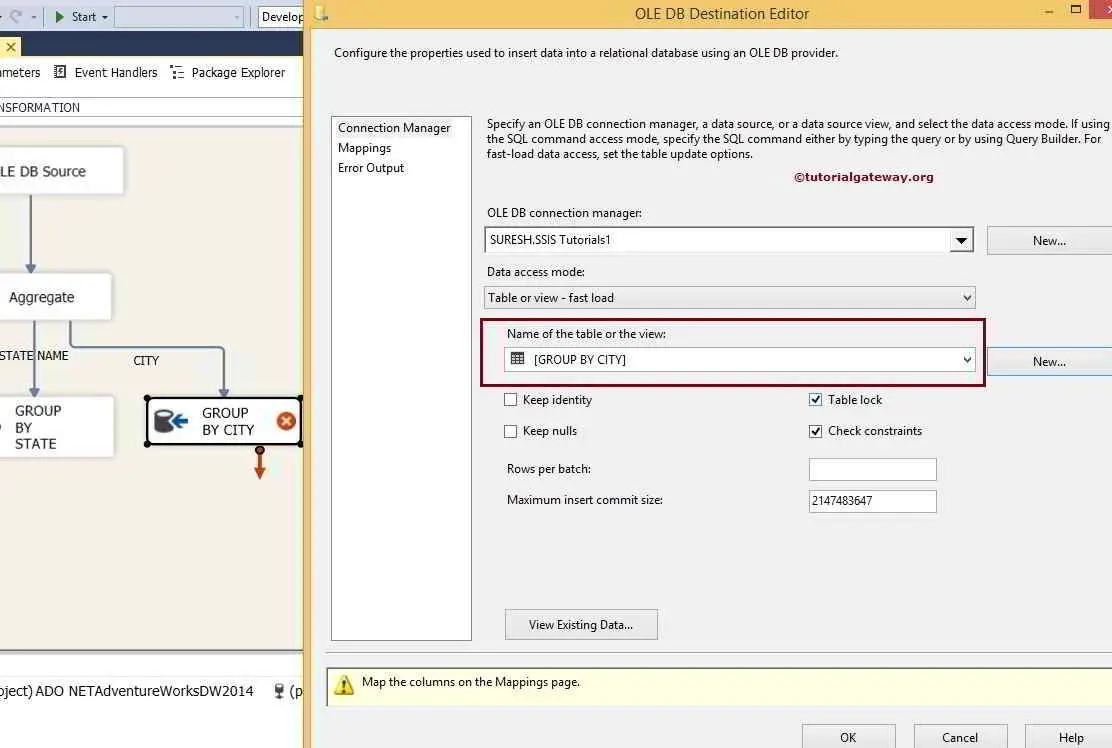
Here we are selecting [SSIS Tutorials] data base as destination data base and [Group By City] table as destination table
Repeat Step 9 check whether the aggregate source columns are exactly mapped to the destination columns.
Click ok to finish our package design. Let us run the package
Let us see the result of Group By English Country Region Name by opening the SQL Server Management studio and write the below query
Let us see the result of Group By English Country Region Name, State Province Name
Let us see the result of Group By English Country Region Name, State Province Name and City
Thank you for Visiting Our Blog
Audit Transformation in SSIS 2014
Audit Transformation in SSIS 2014 allows you to add auditing information required in auditing. For instance, If we want to check
- Which user executed this package?
- Execution time of the package?
- From which machine he/she executed?
- What is the task ID, PackageID, Name of the Package etc?
Then we can use this audit transformation and store that information in the destination table.
Available options are
- ExecutionInstanceGUID – The GUID that identifies the execution instance of the package.
- PackageID – This is the unique identifier of the package.
- PackageName – Shows the name of the package.
- VersionID – The unique version number of the package.
- ExecutionStartTime – The time the package started to run.
- MachineName – The Name of the computer.
- UserName – The login name of the person who started the package.
- TaskName – Name of the Data Flow task with which the Audit transformation is associated.
- TaskId – The unique identifier of the Data Flow task.
AUDIT TRANSFORMATION in SSIS 2014 Example
For this example, We are using Adventure Works DW 2014
STEP 1: Drag and drop the data flow task from the toolbox to control flow and rename it to Audit transformation.

Double click on it will open data flow tab.
STEP 2: Drag and drop OLE DB Source, AUDIT transformation, ADO.NET destination on to the data flow region

STEP 3: Double click on OLE DB source in the data flow region will open the connection manager settings and provides space to write our SQL statement.

For the time being we selected firstname, lastname, yearlyIncome from Adventure Works 2014 data base and we want to send the same to the destination table with extra audit information.
SQL Command Text
STEP 4: Click on columns tab to verify the columns. In this tab we can uncheck the unwanted columns also.

TIP: If we don’t want any column then there is no point to add it in to your SQL command.
STEP 5: Click ok and connect the green arrow of OLE DB Source to Audit Transformation. Double click on the AUDIT Transformation to edit it

Select the required Audit Types and click ok. Here I am selecting all the audit types.
NOTE: You can change the Column name as per your requirement by editing the Output Column Name field.
STEP 6: Now we have to provide Server, database and table details of the destination. So double click on the ADO.NET Destination and provide the required information

From the above screenshot you can observe, We are storing the audit transformation data in the [AUDIT Destination] table present inside the SSIS Tutorials database.
STEP 7: Click on Mappings tab to check whether the source columns are exactly mapped to the destination columns.

NOTE: If your input column names and destination column names are same then, the intelligence will automatically map. if there is any changes in the column names t(any alias columns or any calculated columns) then we have map them manually.
By clicking ok we finished our package. Let us run the package

Let us open the SQL Management Studio Query window to Preview the data

NOTE: This transformation doesn’t support error output.
Thank you for Visiting Our Blog
Copy Column Transformation in SSIS 2014
Copy Column Transformation simply duplicates the source columns. Just like copying the column data and pasting the data into new column. This is very important transformation because if we want to perform multiple operations on single column then we can create multiple copies and later we can perform one operation on one copy.
For example, we have column name product price and we want to calculate dealer price, distributer price, price including VAT, price plus wastage cost. Now we simply create duplicate columns for the above requirements using Copy Column Transformation and then we will calculate dealer, distributer, VAT etc prices individually.
Copy Column Transformation in SSIS 2014 Example
STEP 1: Drag and drop the data flow task from the toolbox to control flow region.
Double click on the data flow task, it will open the data flow tab.
STEP 2: Drag and drop OLE DB Source, Copy Column transformation from toolbox to data flow region. Double click on OLE DB source in the data flow region will open the connection manager settings and provides option to select the table holding the source data.
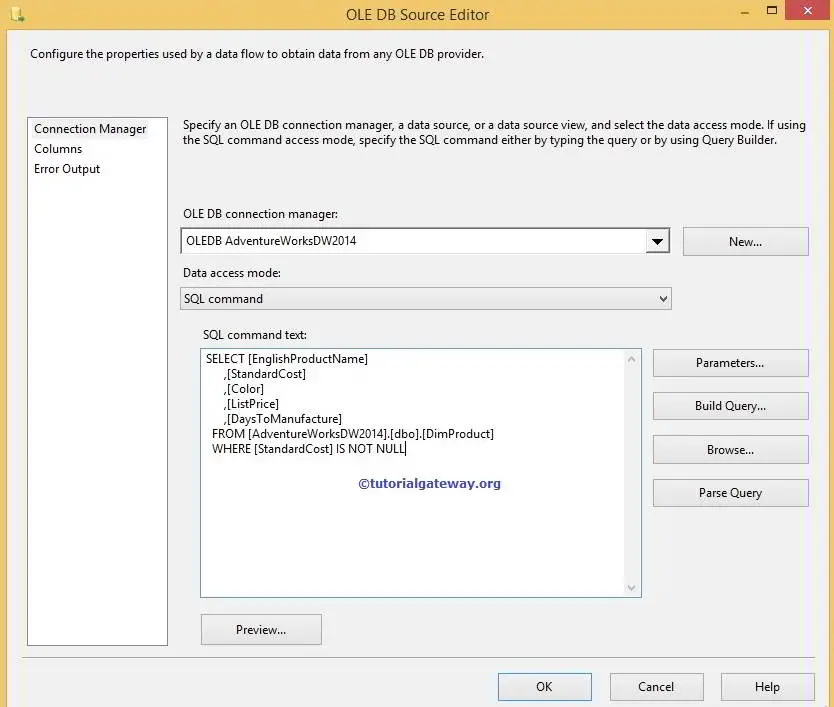
SQL Command Text
STEP 3: Click on columns tab to verify the columns. In this tab we can uncheck the unwanted columns also.

STEP 4: Click ok and drag and drop the arrow from OLE DB Source to Copy Column Transformation. Double click on the Copy Column Transformation and select the columns you want to duplicate.
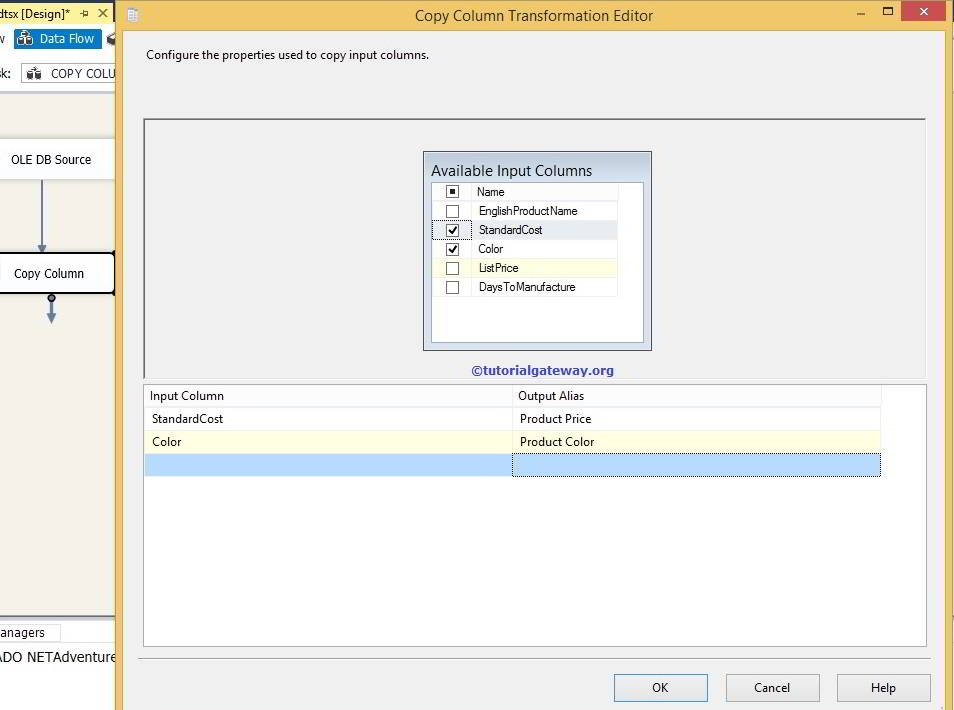
We are just duplicating the [Standard Cost] and color columns and named as Product price and Product Color.
By default, The duplicate column are named as Copy of Column Name in Output Alias but you can edit this name as per your requirement.
Click ok and then drag and drop the OLE DB Destination into data flow region.
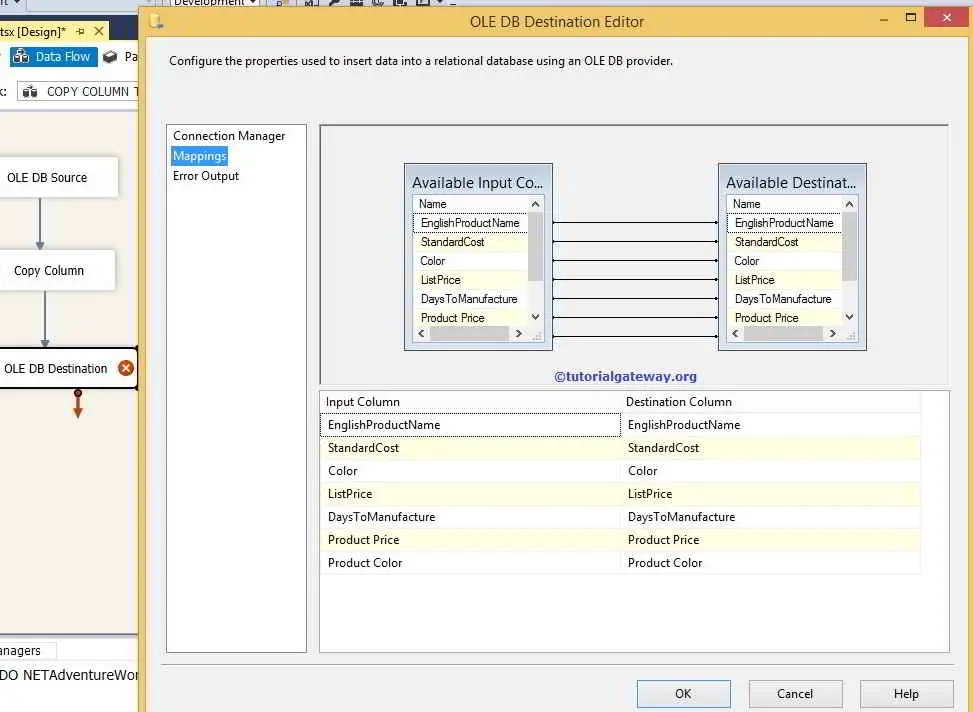
STEP 5: Now we have to provide OLE DB connection manager and table details of the destination. So double click on the OLE DB Destination and provide the required information

We are storing the output in [Copy Column Transformation] present in the Adventure Works DW 2014 database.
STEP 6: Click on Mappings tab to check whether the source columns are exactly mapped to the destination columns.
Click ok to finish our package design. Let us run the package
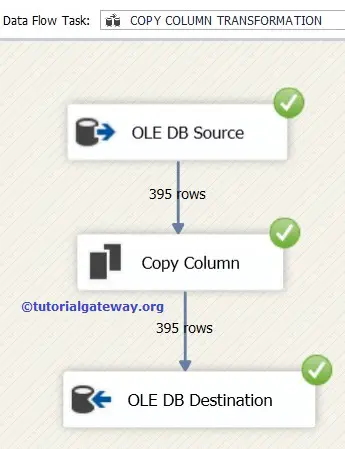
Let us open the SQL Management Studio Query window to Check the results
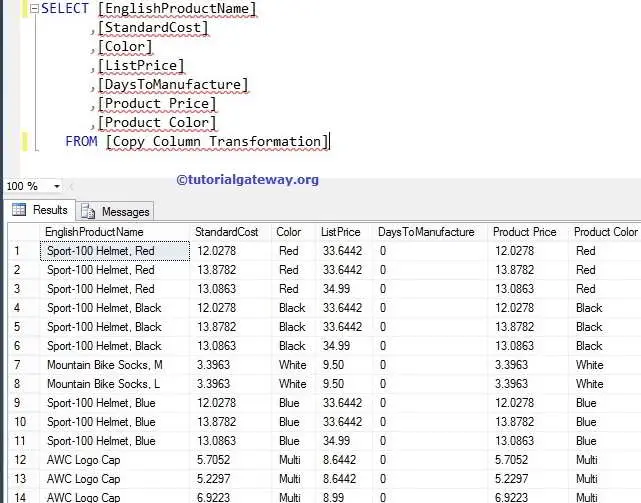
You can observe the extra columns [Product Price] and [Product Color] with same data as [standard cost] and [color]
Thank you for Visiting Our Blog
Character Map Transformation in SSIS 2014
Character Map Transformation in SSIS is useful to transform input characters. If we want to change our string columns to Upper Case, Lower case, Simplified Chinese, Katakana, Hiragana and Traditional Chinese then character map transformation do the trick for you. It gives you the options to select, whether you want to override the existing column with output result or you want to add it as a new column.
Character Map Transformation in SSIS supports 10 types of operations. The operations and the description is displayed below.
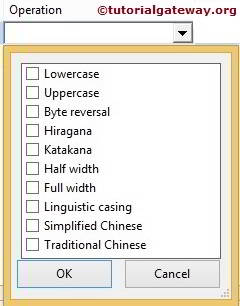
- Lowercase: Converts the string column characters to lowercase. For instance TutorialGateway column is converted into tutorialgateway
- Uppercase: Converts the string column characters to uppercase. For instance TutorialGateway column is converted into TUTORIALGATEWAY
- Bye Reversal: Reverses the bytes order of the Unicode
- Hiragana: Converts Katakana characters to Hiragana characters.
- Katakana: Converts Hiragana characters to Katakana characters.
- Half Width: Converts Full-width characters to Half-width characters. For instance hello is converted to hello.
- Full Width: Converts Half-width characters to Full-width characters. For instance hello is converted to hello
- Linguistic casing: In general database uses its system language to store the data into columns. For instance my system stores date in English US format because it is my systems local language. To use other local languages then we can use this Linguistic casing option
- Simplified Chinese: Converts traditional Chinese characters to simplified Chinese characters. For instance, how are you in Simplified Chinese is 你好吗
- Traditional Chinese: Converts simplified Chinese characters to traditional Chinese characters.
Character Map Transformation allows us to select more than one option for a single column however, there are some restrictions while selection. For instance, if we select the lowercase operation then there is no point in selecting the uppercase also. Below table shows the operations we should not select on a single column.
| Selected Operation | Operations Should Not Select |
|---|---|
| Lowercase | Uppercase, Hiragana, Katakana, Half Width and Full Width |
| Uppercase | Lowercase, Hiragana, Katakana, Half Width and Full Width |
| Hiragana | Katakana, Lowercase, Uppercase |
| Katakana | Hiragana, Lowercase, Uppercase |
| Half Width | Full Width, Lowercase, Uppercase |
| Full Width | Half Width, Lowercase, Uppercase |
| Simplified Chinese | Traditional Chinese |
| Traditional Chinese | Simplified Chinese |
Character Map Transformation in SSIS 2014 Example
STEP 1: Drag and drop the data flow task from the toolbox to control flow and change the name as Character Map Transformation in SSIS.

Double click on it will open data flow tab.
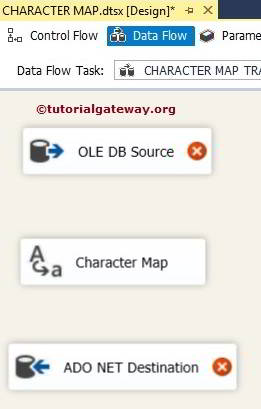
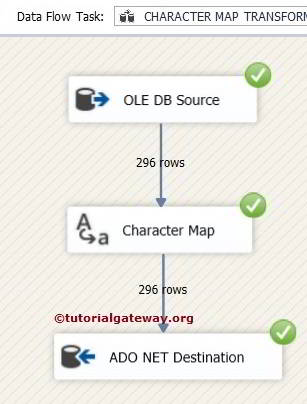
STEP 2: Drag and drop OLE DB Source, CHARACTER MAP Transformation and ADO.NET destination into the data flow region
STEP 3: Double click on OLE DB source in the data flow region will open the connection manager settings and provides space to write our SQL statement.
For the time being we selected [First Name], [Last Name] and [Email ID] from DimEmployees table present in the [Adventure Works DW 2014] data base.
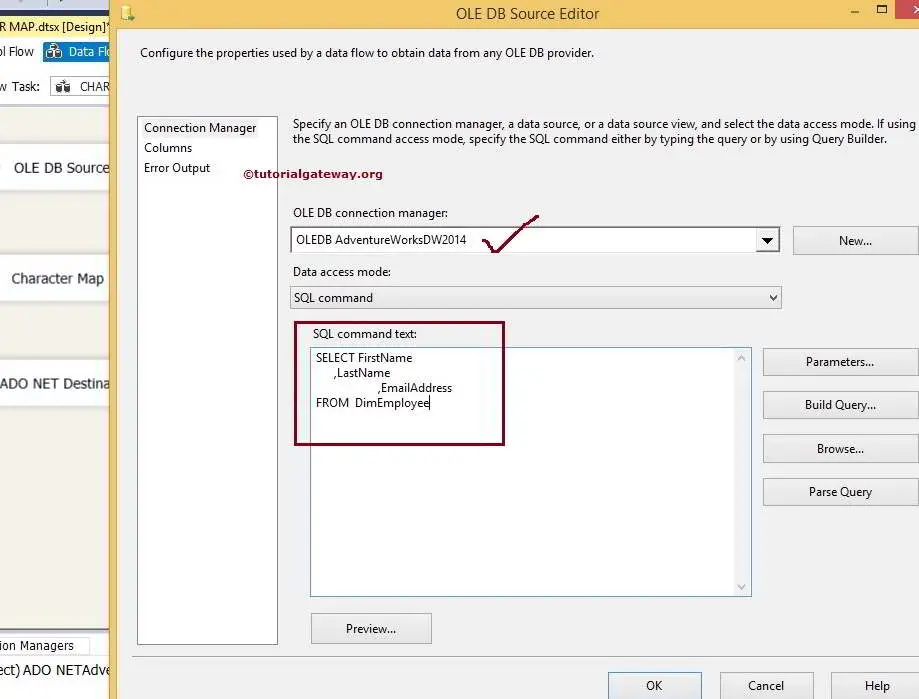
SQL Command we used in the above screenshot is:
STEP 4: Click on columns tab to verify the columns. In this tab we can uncheck the unwanted columns also.
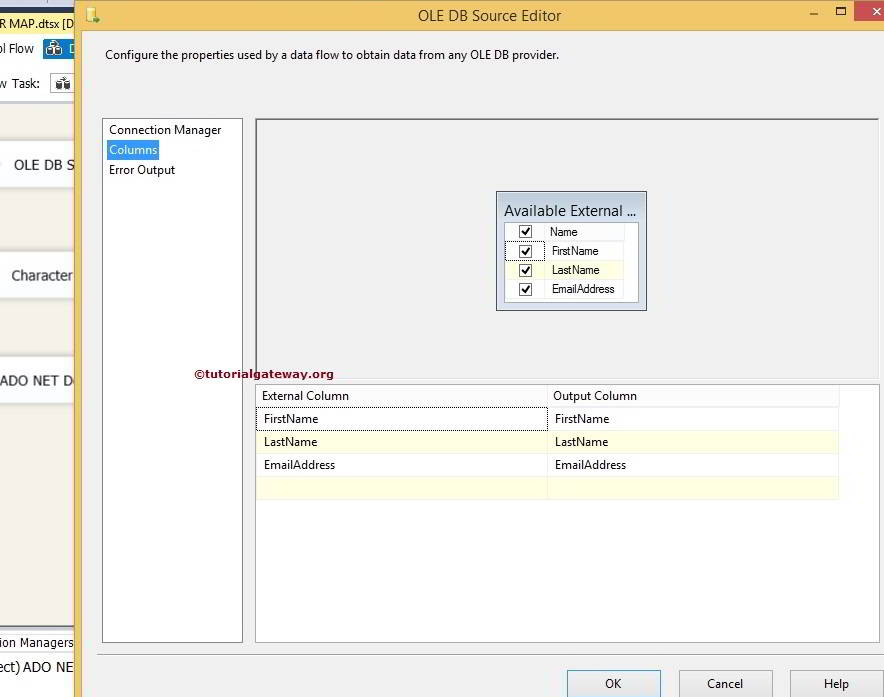
STEP 5: Click ok and connect the output arrow of OLE DB Source to Character Map Transformation.
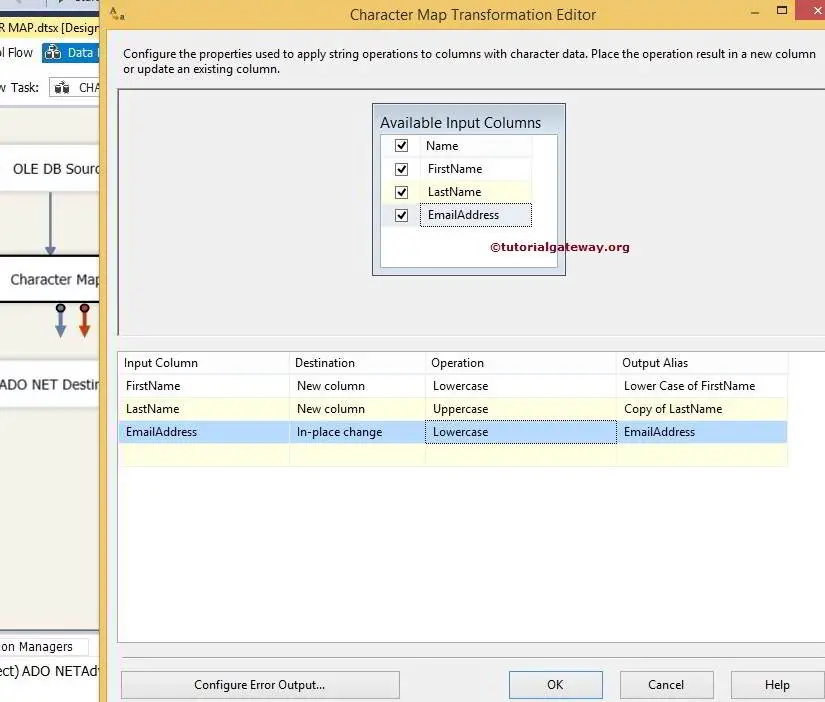
Double click on Character Map Transformation to configure it
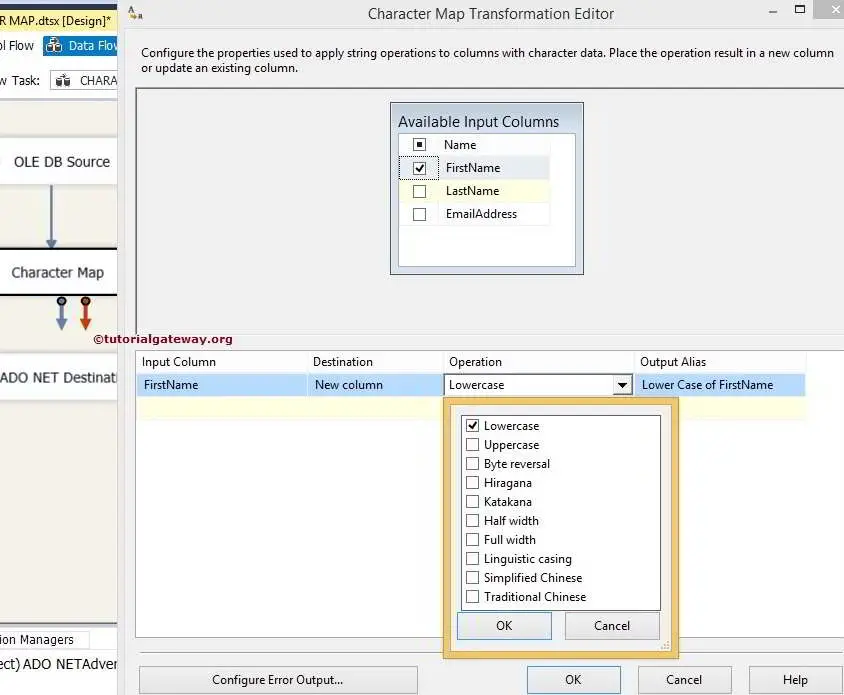
- Input Column: Whatever we selected in the Available Input Columns option will automatically reflected in this option. We can also directly select input column here itself.
- Destination: We have an option to select, Whether we want to replace the original column or we want to add this as a new column. In this example we are using New column option.
- Operation: We already discussed above
- Output Alias: Specify the new column name. It acts same as ALIAS column in SQL
For the time being we are using only Upper and Lower but you can try all the available option. Click ok.
STEP 6: Now we have to provide Server, database and table details of the destination. So double-click on the ADO.NET Destination and provide the required information
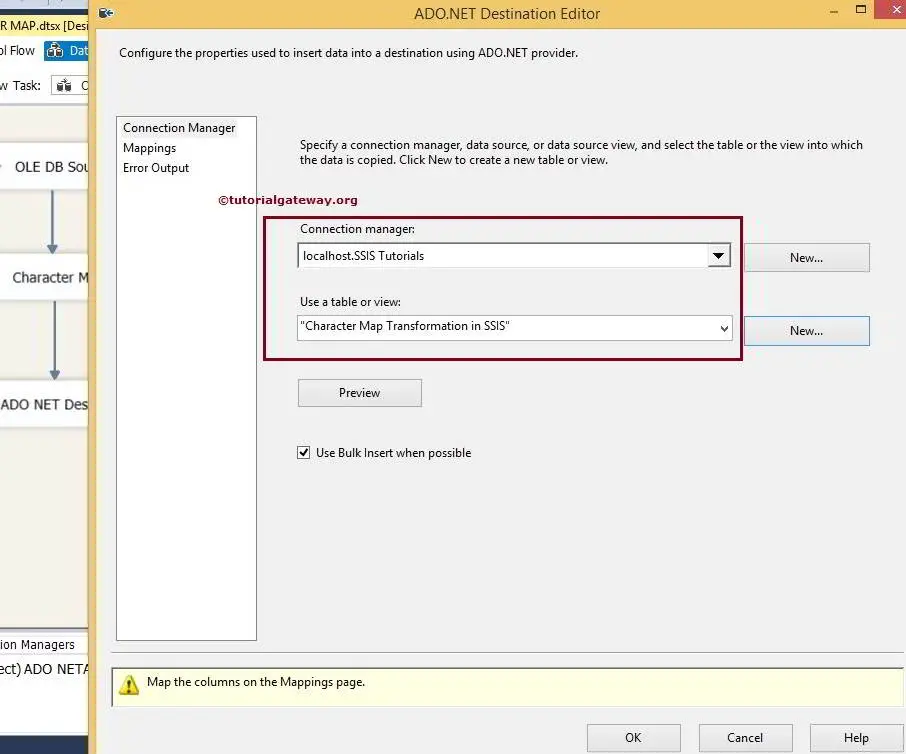
Here we are selecting the Character Map Transformation in SSIS table from SSIS Tutorials Database
STEP 7: Click on Mappings tab to check whether the source columns are exactly mapped to the destination columns.
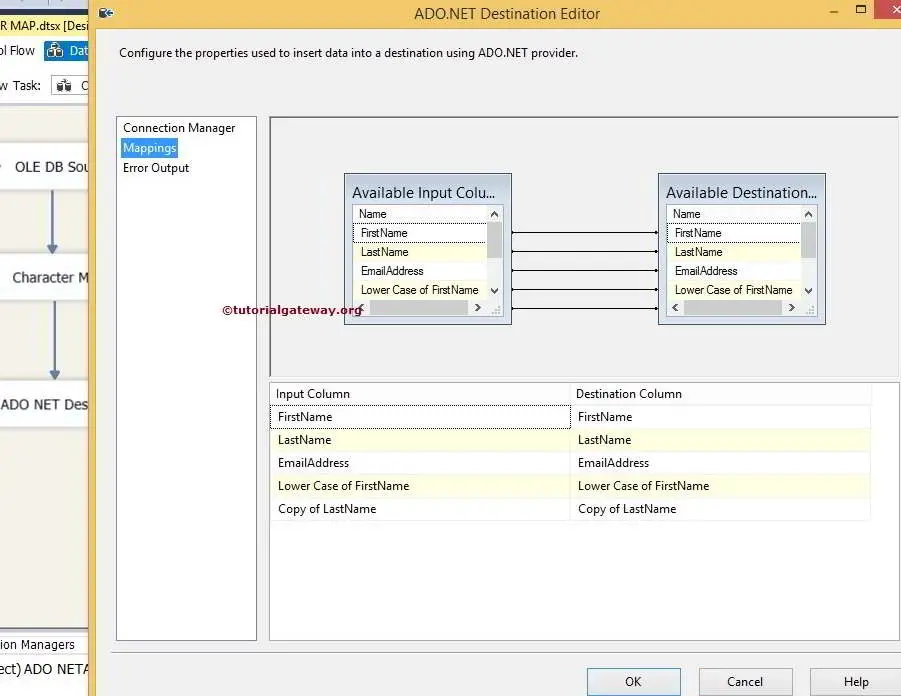
NOTE: If your input column names and destination column names are same then, the intelligence will automatically map. If there is any changes in the column names (any alias columns or any calculated columns) then we have map them manually.
By clicking ok we finished our package. Let us run the package
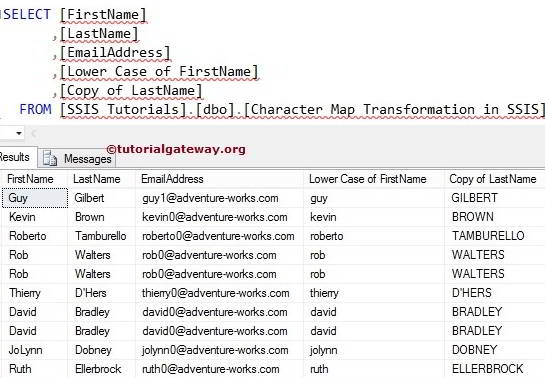
Let us open the SQL Management Studio Query window to Preview the data
Thank you for Visiting Our Blog
Data Conversion Transformation in SSIS 2014
Data Conversion Transformation is similar to T-SQL function CAST or CONVERT. If you wish to convert the data from one data type to another data type then Data Conversion Transformation is the best bet. But, please make sure that you have compatible data in the column and don’t forget to change the column length for Varchar, NVarchar data types.
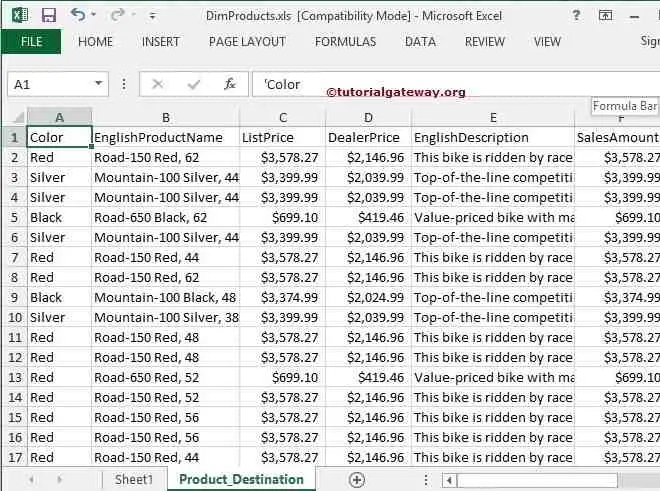
In this article, We will Export data present in the DimProducts Excel Worksheet to SQL Server database table by converting the data type from DT_NTEXT to DT_WSTR using Data Conversion Transformation. Below image shows the data present in the DimProducts Excel file.
Data Conversion Transformation in SSIS 2014 Example
STEP 1: Drag and drop the data flow task from the toolbox to control flow and rename it as Data Conversion Transformation

Double click on it and it will open the data flow tab.
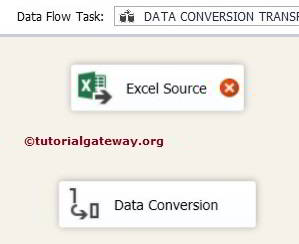
STEP 2: Drag and drop EXCEL Source, Data Conversion Transformation from toolbox to data flow region.
STEP 3: Double click on Excel source in the data flow region will open the connection manager settings and provides option to select the table holding the source data.
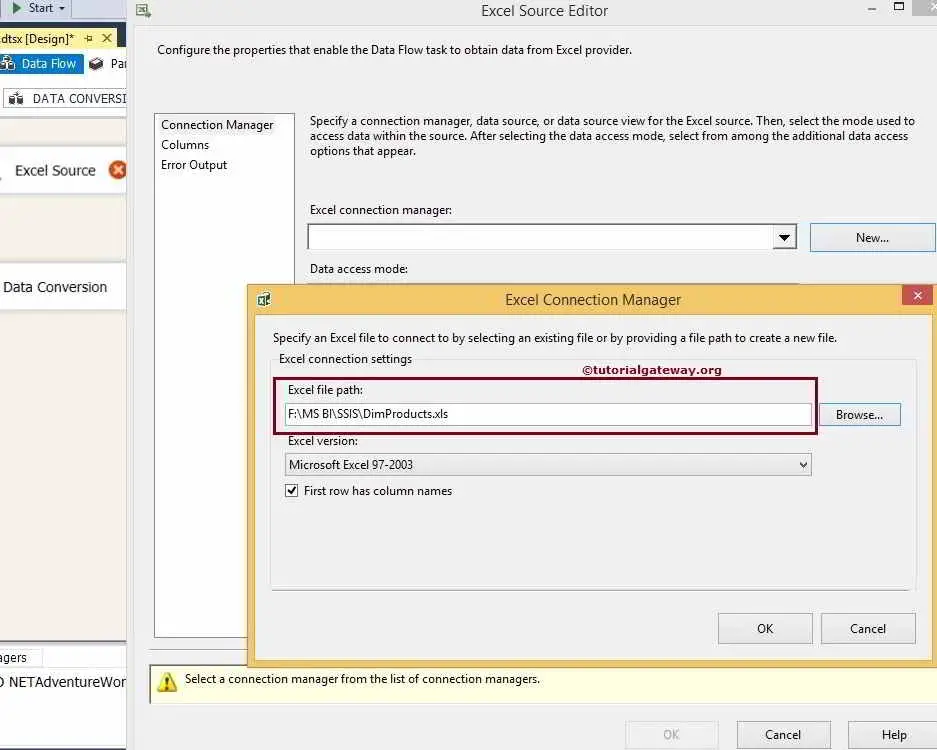
From the above screenshot you can observe that we are selecting the DimProducts.xls file present in our local hard drive
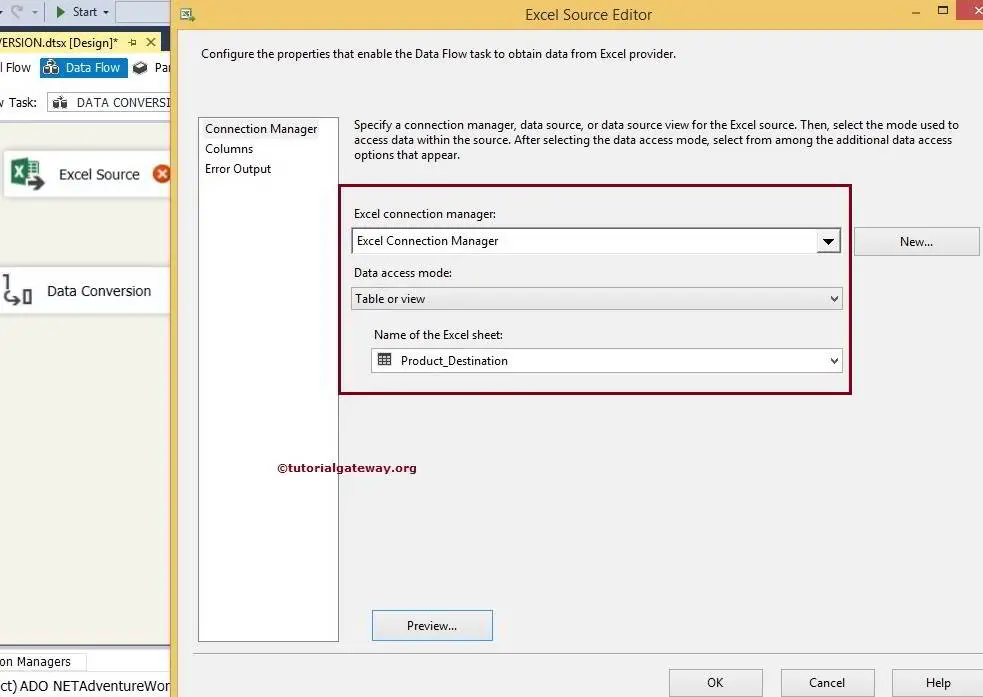
From the above screenshot you can observe that, we are selecting the Product Destination table present in the DimProducts.xls.
STEP 4: Click on columns tab to verify the columns. In this tab we can uncheck the unwanted columns also.
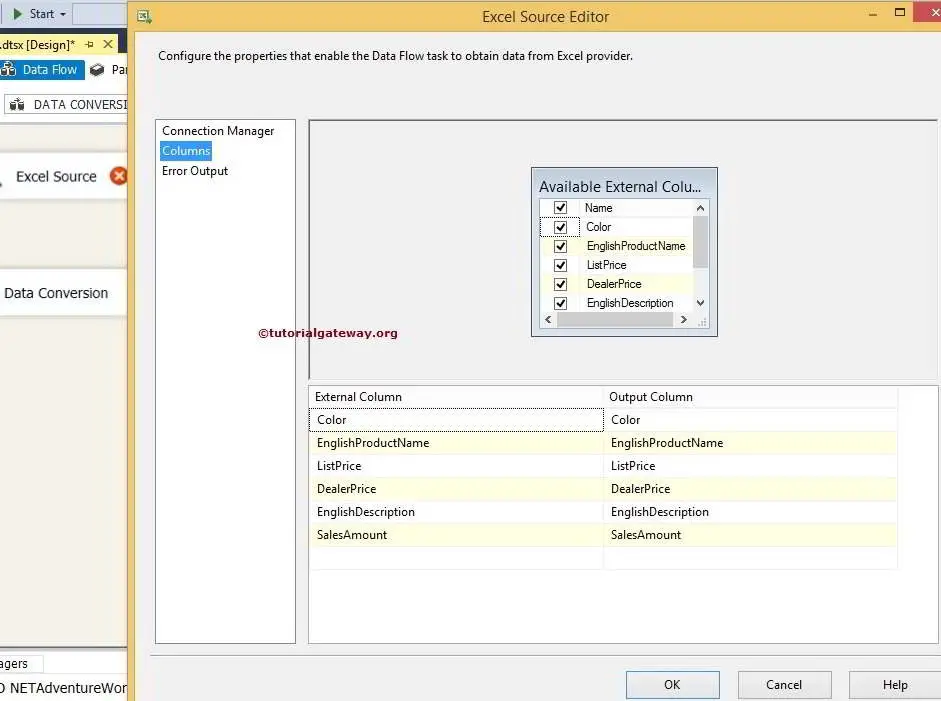
TIP: If we don’t want any column then there is no point to add it in to your SQL command.
Click ok and drag the blue arrow from Excel Source to Data Conversion Transformation. This will allow the transformation to use the source data.
STEP 5: Double click or right-click on the Data Conversion Transformation to edit and convert our source columns data type to required data type with length.
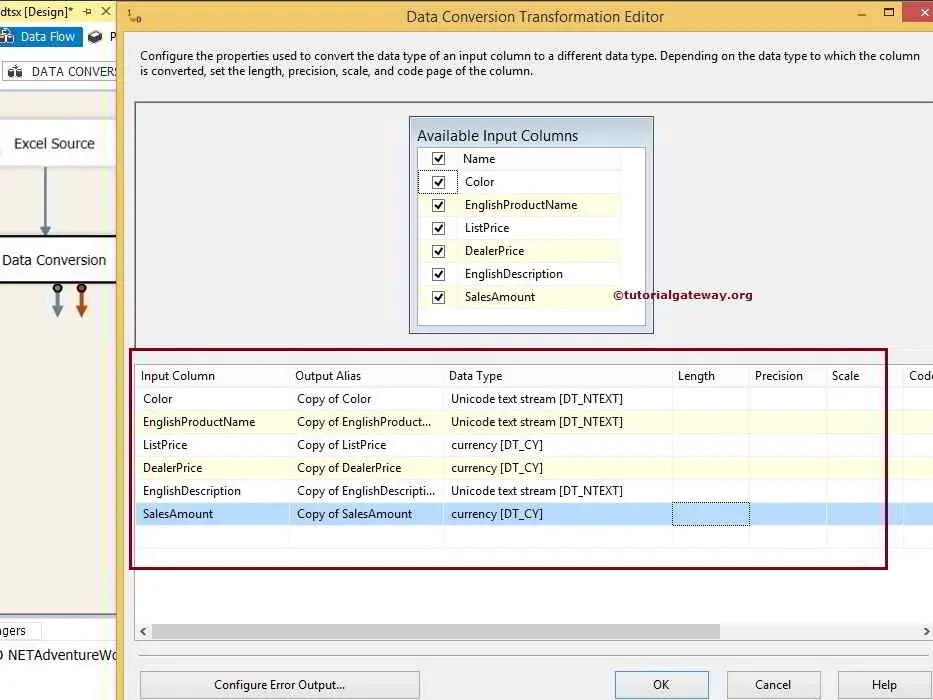
This is the table description we are using for the destination table
We have to change our data types before we transfer data to the SQL server destination table to match Excel columns with the destination table.
NOTE: It is always necessary to convert data types while transfer from Excel to SQL server database.
STEP 6: Change the data type from DT_NTEXT to DT_WSTR and don’t forget to change the length.

Most of the times intelligence will automatically change the data type but sometimes we have to do it by our own.
Click ok
STEP 7: Now we have to provide Server, database and table details of the destination. So double-click on the OLE DB Destination and provide the required information
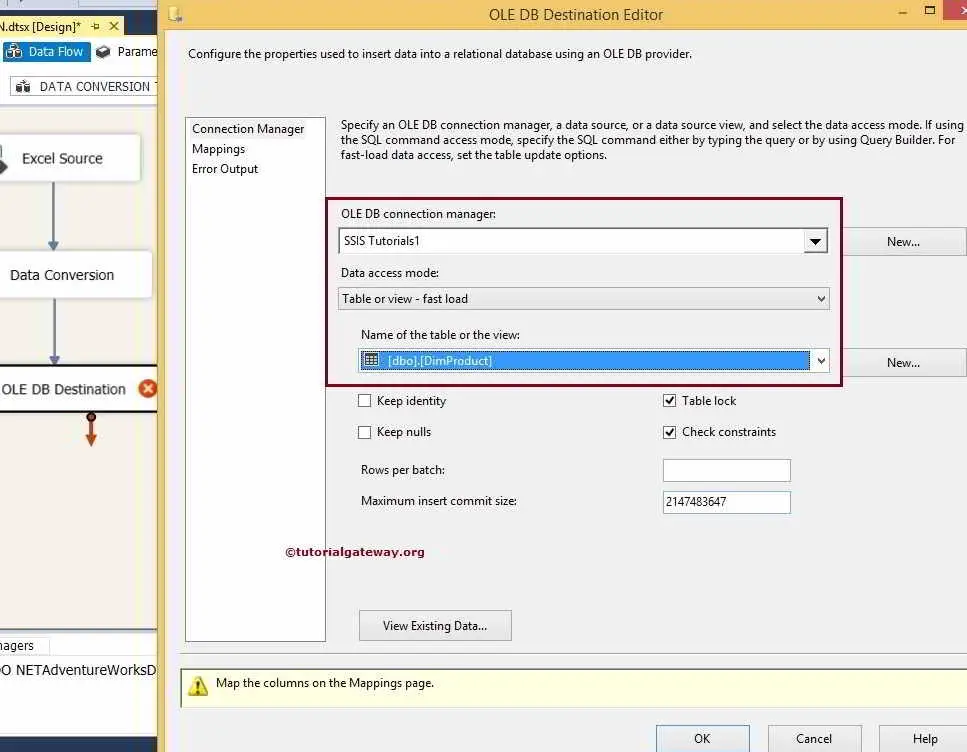
STEP 8: Click on Mappings tab to check whether the source columns are exactly mapped to the destination columns.

If you forget the conversion, it will fail because of the data conversion from DT_NTEXT to DT_WSTR.
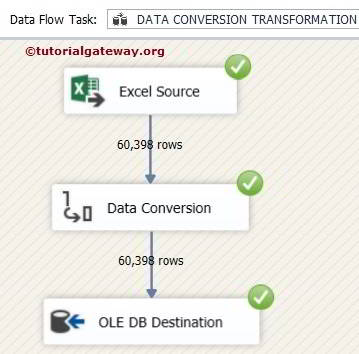
Let’s map the correct columns and Click ok to finish our Data Conversion Transformation package design. Let us run the package
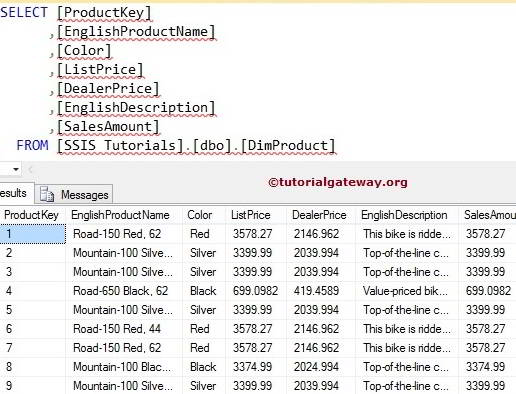
Check the results
Thank you for Visiting Our Blog
Derived Column Transformation in SSIS 2014
Derived Column Transformation plays vital role in dealing with expressions in SSIS. The SSIS Expression Language has powerful built-in functions for string manipulation, data type conversions, mathematical functions, conditional expressions and handling Null values.
We can create the required expression using those built-in functions, Columns, Operators and variables. Derived Column Transformation provides an option to choose whether you want to create new columns or replace existing columns with values calculated from expressions.
Derived Column Transformation in SSIS 2014 Example
STEP 1: Drag and drop the data flow task from the toolbox to control flow and rename it as Derived Column Transformation.
Double click on it and it will open the data flow tab.
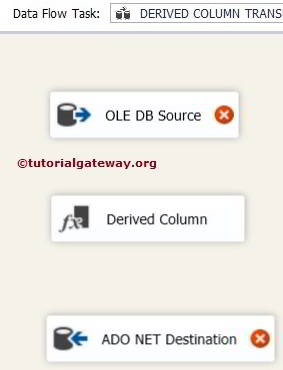
STEP 2: Drag and drop OLE DB Source, Derived Column Transformation and ADO.NET Destination from toolbox to data flow region
STEP 3: Double click on OLE DB source in the data flow region will open the connection manager settings and provides space to write our SQL statement.

SQL Command We used in the above screenshot is:
STEP 4: Click on columns tab to verify the columns. In this tab we can uncheck the unwanted columns also.
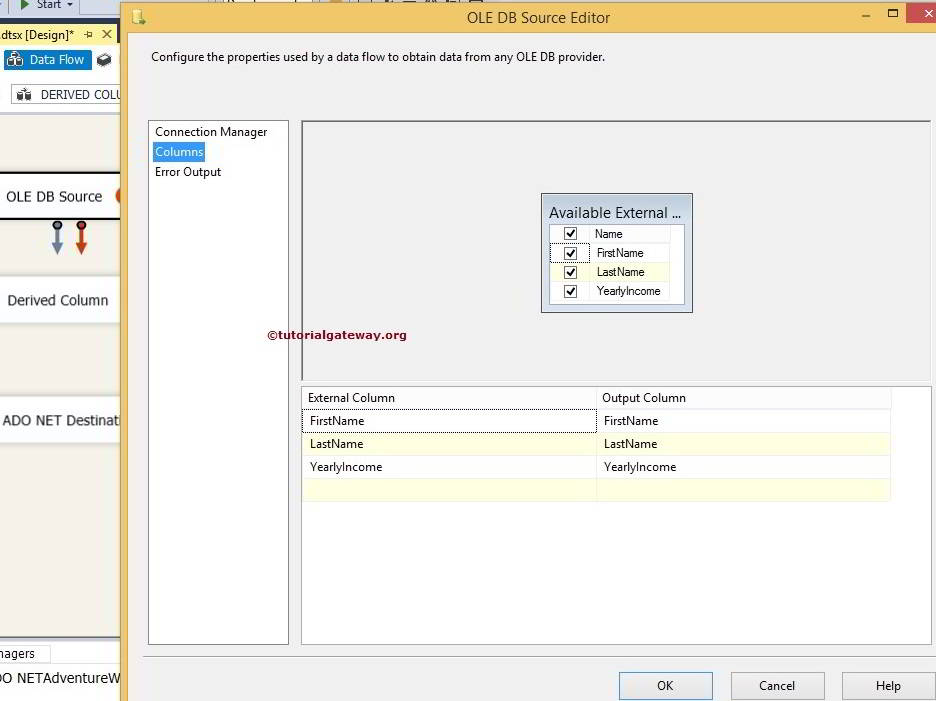
TIP: If we don’t want any column then there is no point to add it in to your SQL command.
Click ok and drag the blue arrow from OLE DB Source to Derived Column Transformation. This will allow the transformation to use the source data.
STEP 5: Double click or right click on the Derived Column Transformation to edit
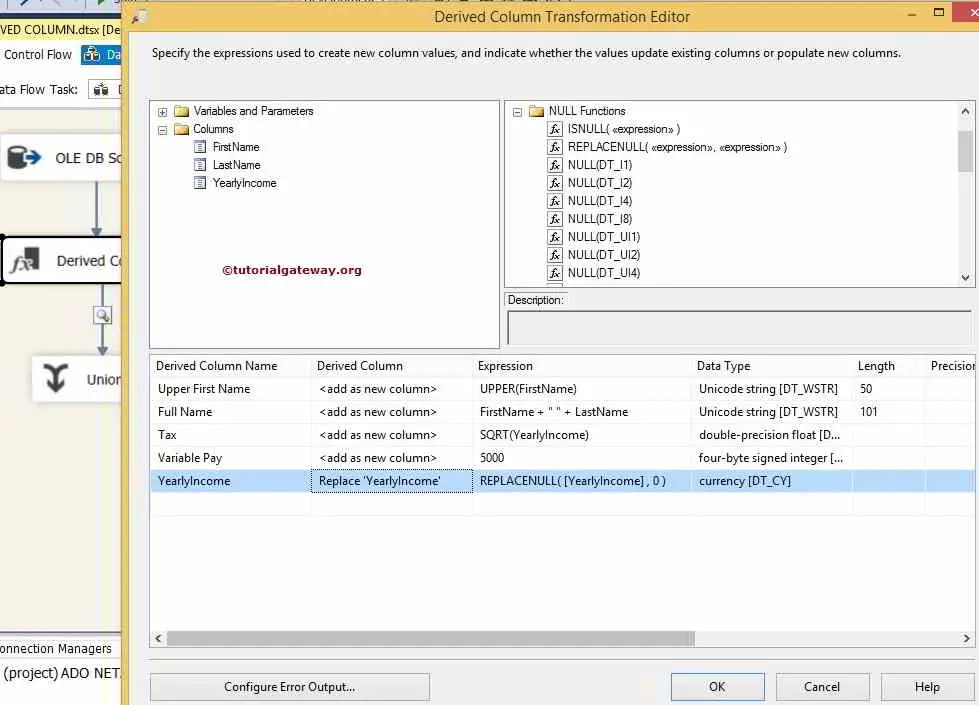
- Derived Column Name: Provide any unique name. Same like Alias column in T-SQL
- Derived Column: It Provides 2 options. Whether you want to add this as new column or you want to replace any existing column with this one
- Expression: In this place we will write custom expression by combining the built-in SSIS function, variables and Columns.
- Precision: When we are adding any new column then Derived Column Transformation automatically sets the precision for numeric data based on the data type. The value of this is read-only.
- Scale: When we are adding any new column then Derived Column Transformation automatically sets the scale for numeric data based on the data type. The value of this is read-only.
- Code Page: When we are adding any new column then Derived Column Transformation automatically sets code page for the DT_STR data type.
- Configure error output: Specify how to handle errors.
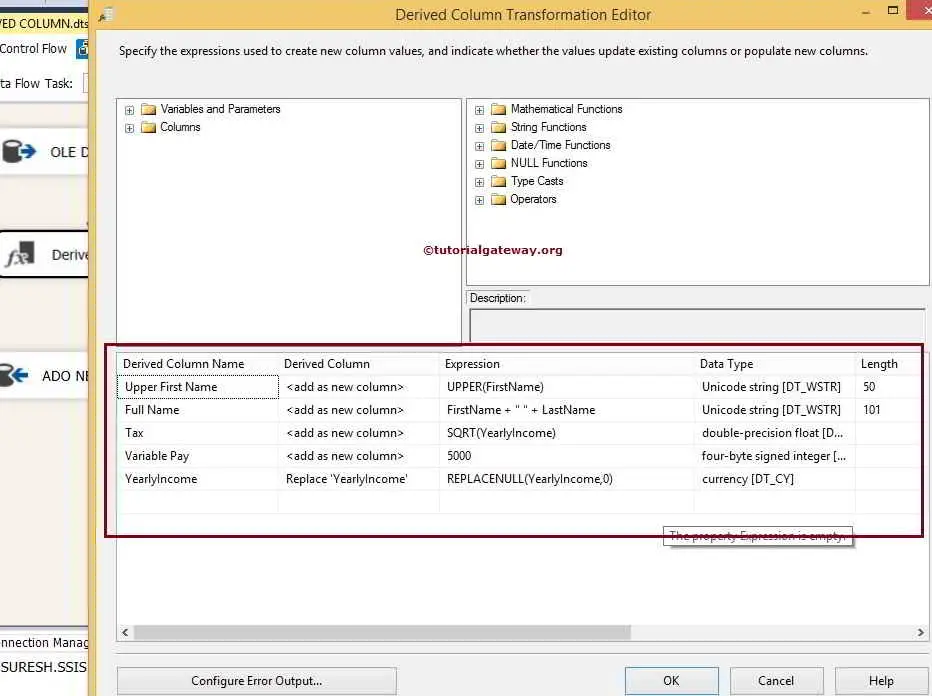
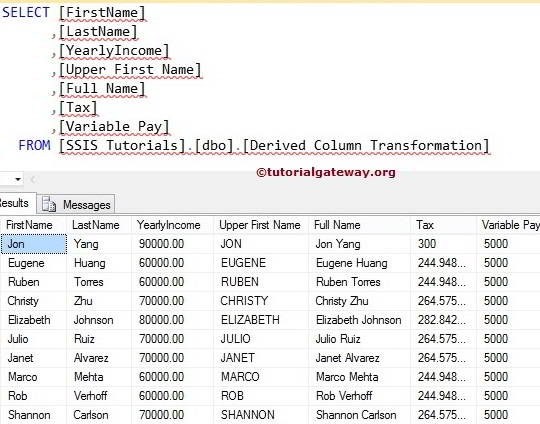
- Upper First Name: UPPER (FirstName) – It will convert the data present in the [FirstName] column to Upper Case.
- Full Name: FirstName + “ ” + LastName – It will combine the [FirstName] and [LastName] columns to display the Full Name
- Tax: SQRT ([YearlyIncome]) – It will calculate the Square Root of [YearlyIncome] column and assign it to Tax Column
- Variable Pay: 5000 – We are assigning constant value 5000 to new column Variable pay
- YearlyIncome: REPLACENULL ([YearlyIncome], 0) – We are replacing the Null values with Zeros using the REPLACENULL built-in function in SSIS
Click ok to finish configuring the Derived Column Transformation. Drag and drop the blue arrow to the ADO.NET Destination
STEP 6: Now we have to provide Server, database and table details of the destination. So double click on the ADO.NET Destination and provide the required information
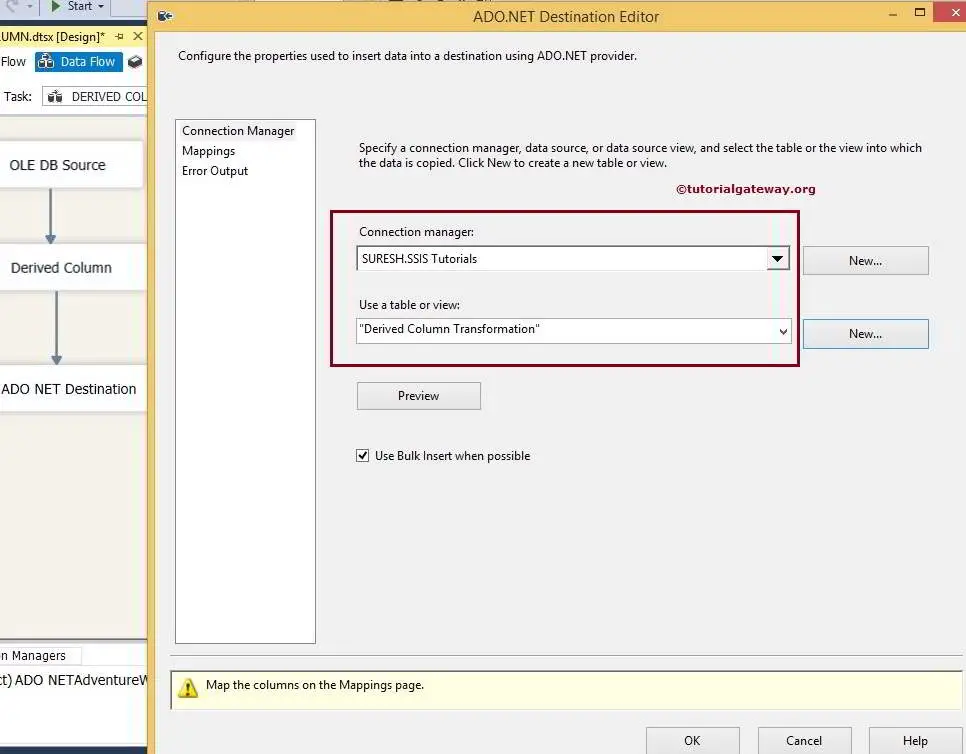
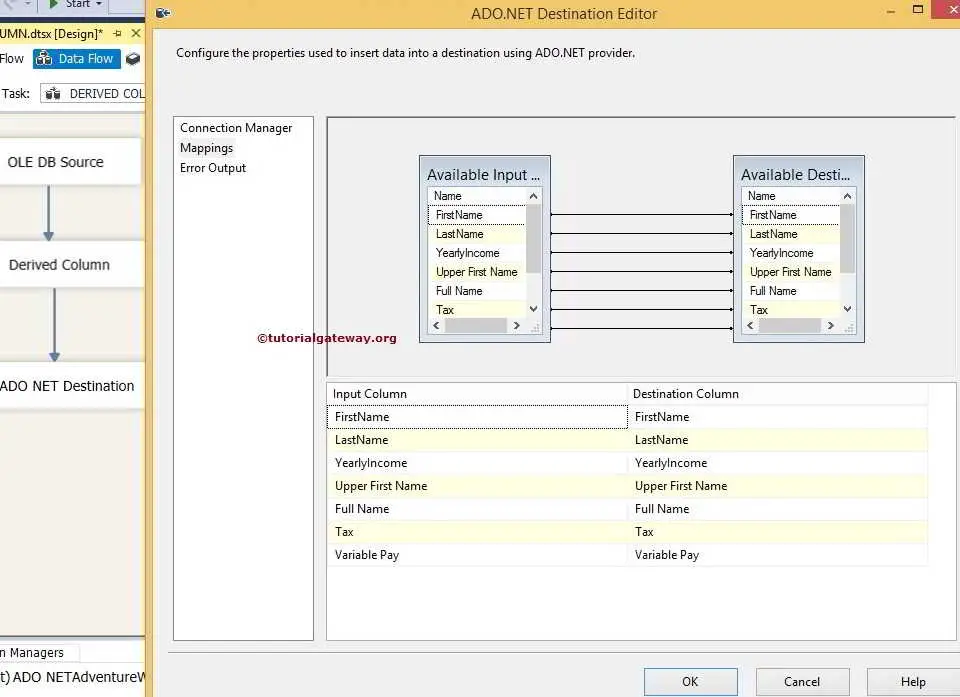
STEP 7: Click on Mappings tab to check whether the source columns are exactly mapped to the destination columns.
Click ok to finish Derived Column Transformation package design. Let us run the package
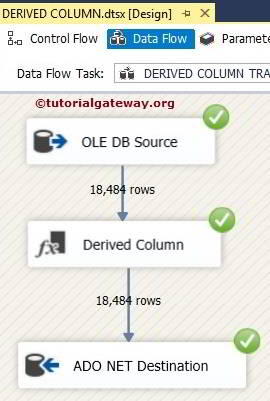
Let us open the SQL Server management Studio and Check the results
Thank you for Visiting Our Blog
Row Count Transformation in SSIS 2014
In SQL Server Integration Services, Row Count Transformation is used to counts the rows as they pass through a data flow and stores the final count in a variable. For example, If we want to inform the Manager to inform the number of rows this package is inserted then we can use Row Count Transformation for counting the rows and then use Script Task to send an e-mail message to the Manager.
Row Count Transformation will not the update the variable value until the last row of the source data has passed through the Row Count Transformation. So, we can’t use the updated values in the middle.
Let us design one package so that we can understand this Row Count Transformation better.
The Row Count Transformation in SSIS 2014 Example
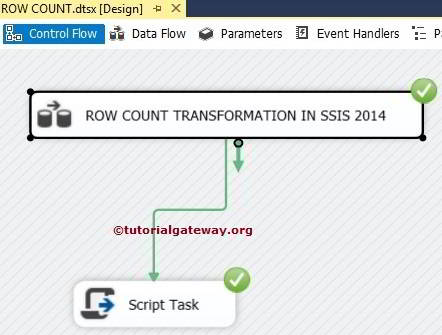
STEP 1: Drag and drop the data flow task from the toolbox to control flow and rename it as Row Count Transformation in SSIS 2014

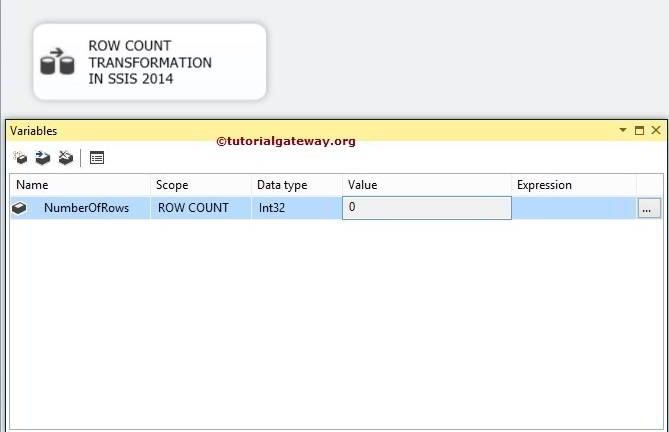
STEP 2: Row Count Transformation stored row count information in variable only, so before using this transformation we need to create a variable on the Variables tab and add an integer variable to the package, as shown in below Figure.
Right click on the Control Flow region will open the context menu with multiple options. Select the Variables option from the context menu to create a variable.
In this case, we’ve chosen to add a variable named NumberOfRows of integer type and assigned value to 0.
Double click on the data flow task will open the data flow tab.
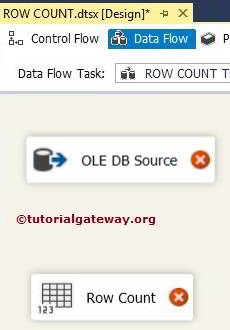
STEP 3: Drag and drop OLE DB Source, Row Count Transformation from toolbox to data flow region
STEP 4: Double click on OLE DB source in the data flow region will open the connection manager settings and provides space to write our SQL statement.
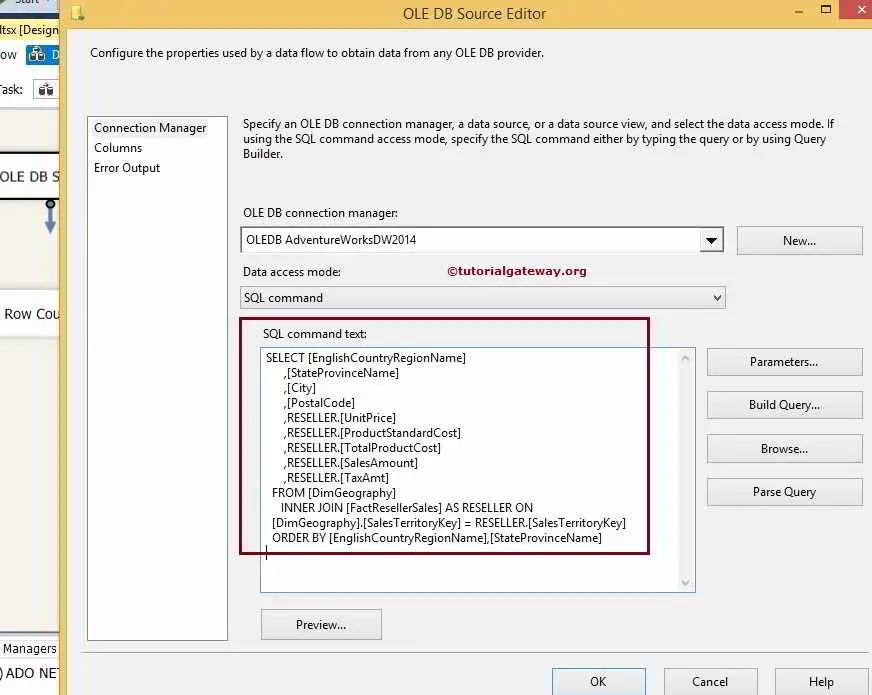
SQL Command we used in the above figure
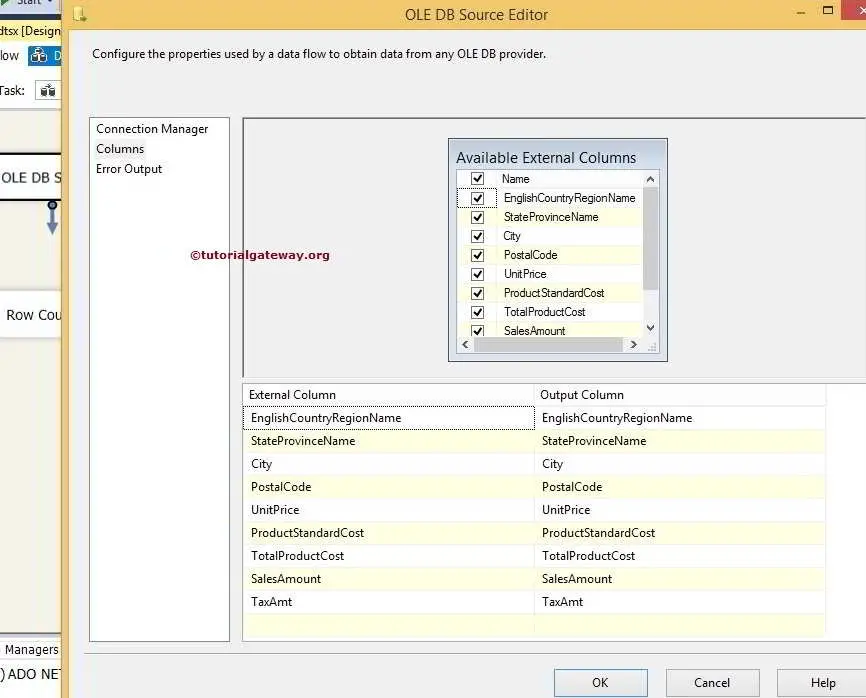
STEP 5: Click on columns tab to verify the columns. In this tab we can uncheck the unwanted columns also.
Click ok
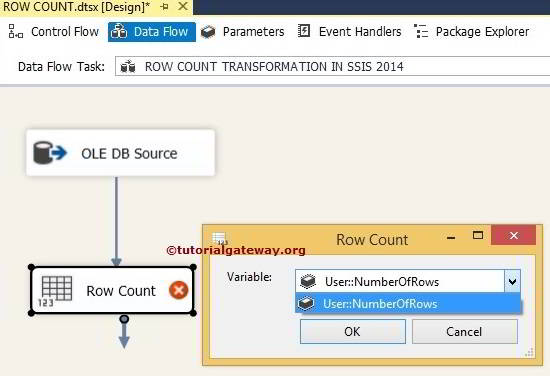
STEP 6: The final step is to configure the Row Count transformation. Double click on the Row Count Transformation will open small Row Count Window to select the User defined Variable from the drop down. Here we are selecting the already created variable (NumberOfRows).
Or you can configure the Row Count Transformation with more Traditional approach. Right click on the Row Count Transformation will open the context menu with multiple options. Here select the Show Advanced Editor option from the context menu as shown in below screenshot.

This will open the Advanced Editor of the Row Count Transformation. Within the Component Properties tab choose the VariableName property of the Row Count Editor, shown in Figure below and associate the variable we created before (NumberOfRows)

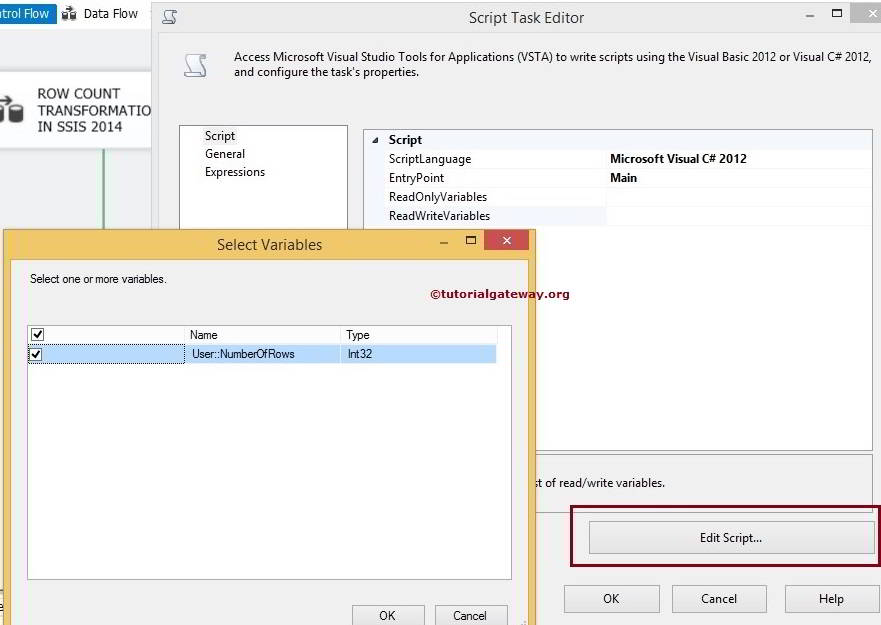
STEP 7: Go to Control flow region and Drag and drop the Script Task from toolbox to Control Flow Region and drag the double-click on it to configure
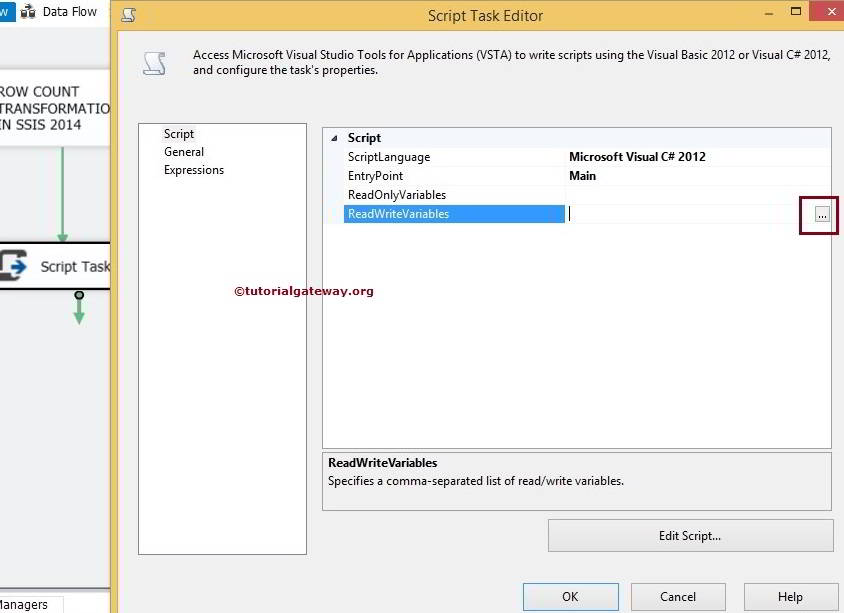
STEP 8: Select the user defined variable as a read write variable as shown in below figure
STEP 9: Click ok and then click on Edit Script button to open class file
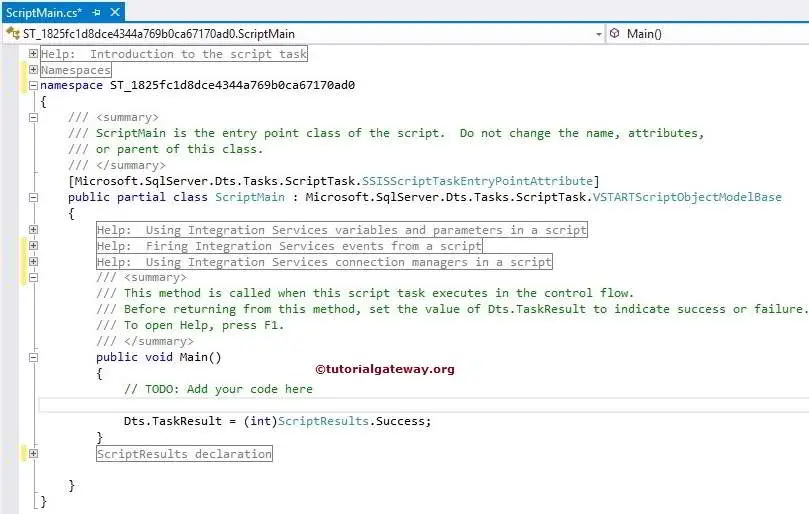
Type the following lines of code in Main method
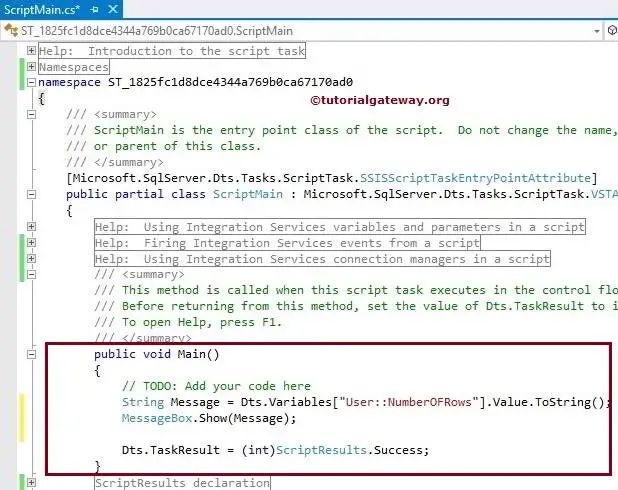
NOTE: Here I used C# programming language code and I am sorry for VB.Net people. Hope you can understand this code.
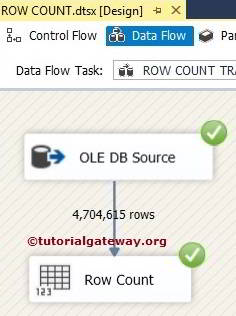
Close the class file and Let’s run the Row Count Transformation package. From the below screenshot you can observe that it is displaying the Message Box with Number of Rows information.
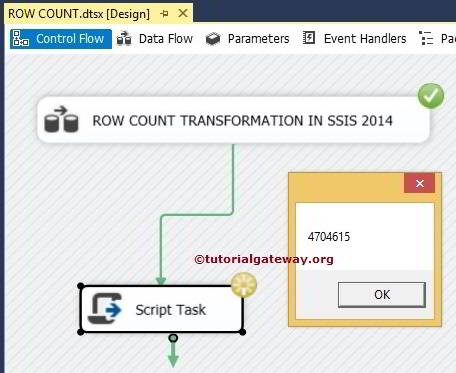
Let us see the data Flow region whether the Row Count Transformation is giving the correct Result or not
Remember, Until you click the ok button Script task will be in running mode. Once you close the Message Box then the Green Tick Mark will be show
You can observe the message box displaying the number of rows passed through that transformation.
NOTE: This transformation has one input and one output. It does not support an error output.
Thank you for Visiting Our Blog
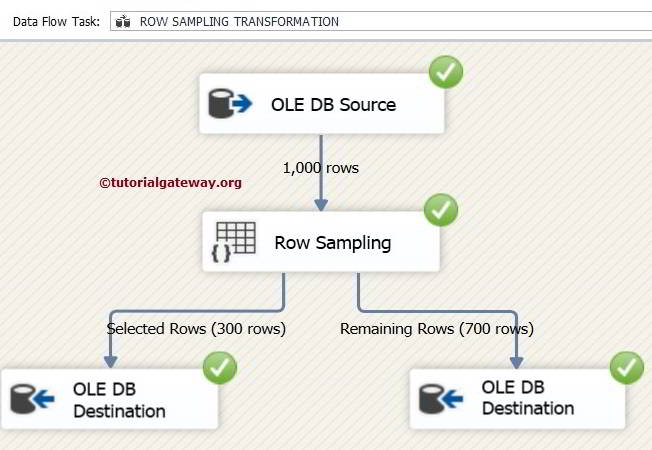
Row Sampling Transformation in SSIS 2014
Row Sampling Transformation provides an option to specify the number of rows you would like to retrieve from the data source. Data is randomly selected unless you use this Use the following random seed option.
Row Sampling Transformation will take the whole data from source and it will randomly extract the selected number of row data from it. It gives you 2 outputs. First is selected data and second one is unselected data. This transformation is used in the situation where you train data mining model.
It is too early to understand data modeling so let’s take simple example. For instance 100 employees working in a software company. Company has to select 10 employees for abroad tour then company can use Row Sampling Transformation to select 10 employees randomly. If company would likely to select the same 10 employees every year then they can check mark the Use the following random seed option.
Row Sampling Transformation in SSIS 2014 Example
STEP 1: Drag and drop the data flow task from the toolbox to control flow and name it as Row Sampling Transformation.

Double click on it will open the data flow tab.
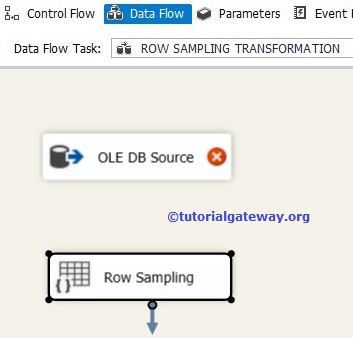
STEP 2: Drag and drop OLE DB Source, Row Sampling transformation from toolbox to data flow region
STEP 3: Double click on OLE DB source in the data flow region will open the connection manager settings and provides space to write our SQL statement.
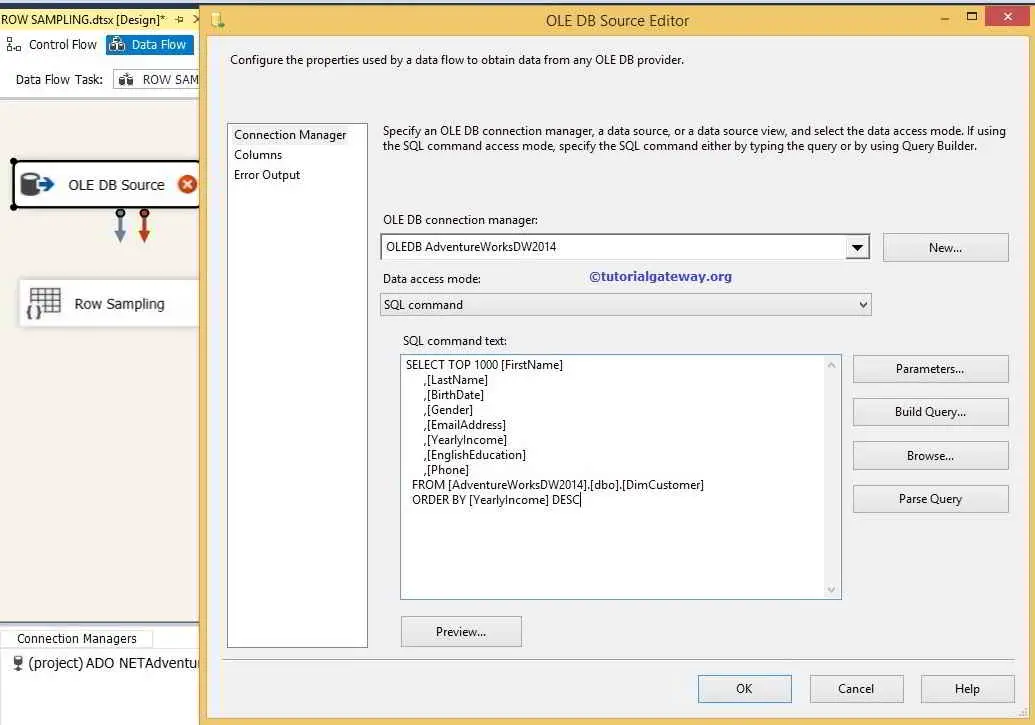
SQL Command Text
For the time being we selected top 1000 rows from DimCustomers in Adventure Works DW 2014 data base and we want to select 300 number of rows into the destination table.
STEP 4: Click on columns tab to verify the columns. In this tab we can uncheck the unwanted columns also.
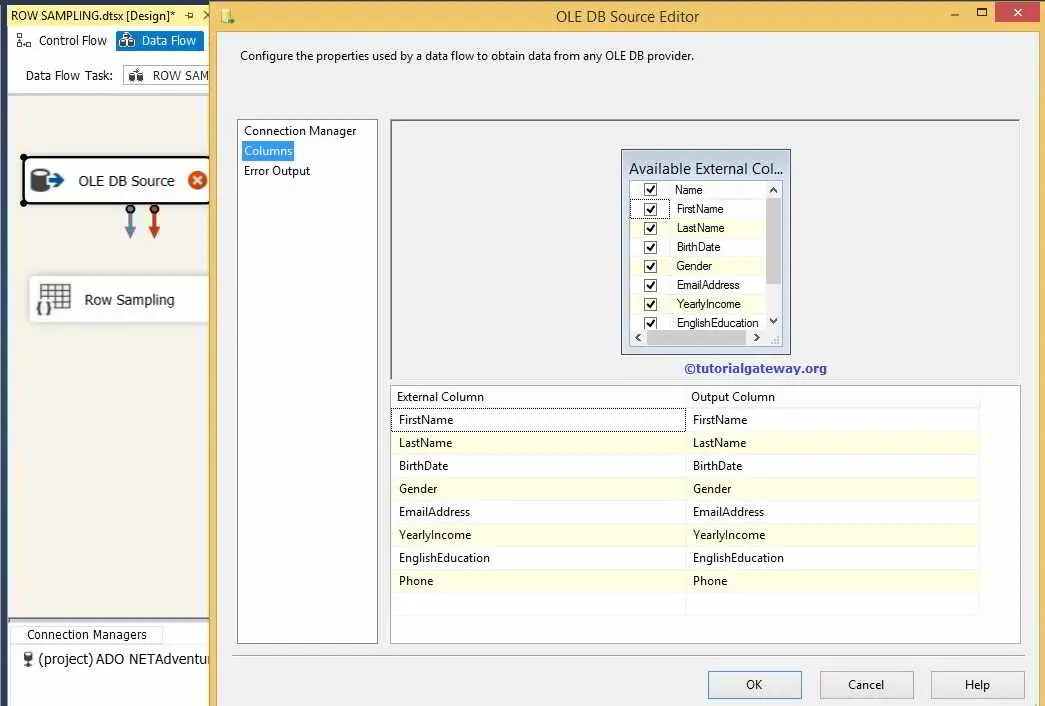
TIP: If we don’t want any column then don’t add them in your SQL command.
STEP 5: Click ok and connect the OLE DB Source and Row Sampling Transformation using the arrow. Double click on the Row Sampling Transformation to configure.
Here we are selecting 300 rows as selected rows and remaining 700 rows as unselected rows.
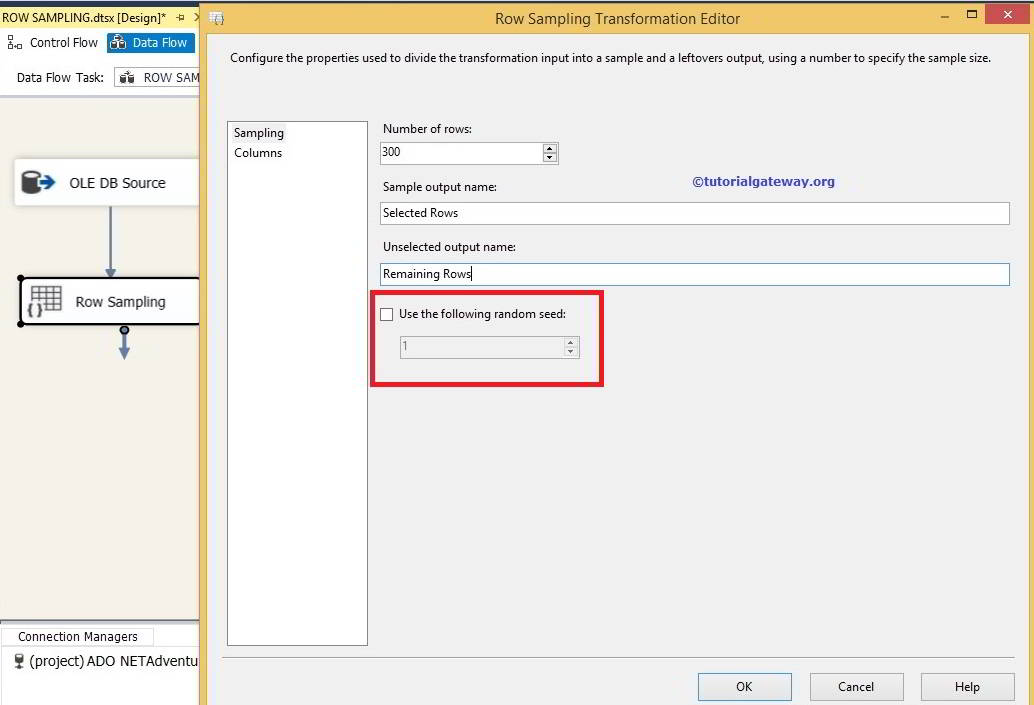
TIP: If you check the “Use the following random seed” option then it will select the same set of rows every time you run the package. If not then Row Sampling Transformation will pick the rows randomly.
STEP 6: When we try to connect the Row Sampling Transformation to OLE DB destination then it will pop up Input Output Selection window to provide the choice of selecting output.
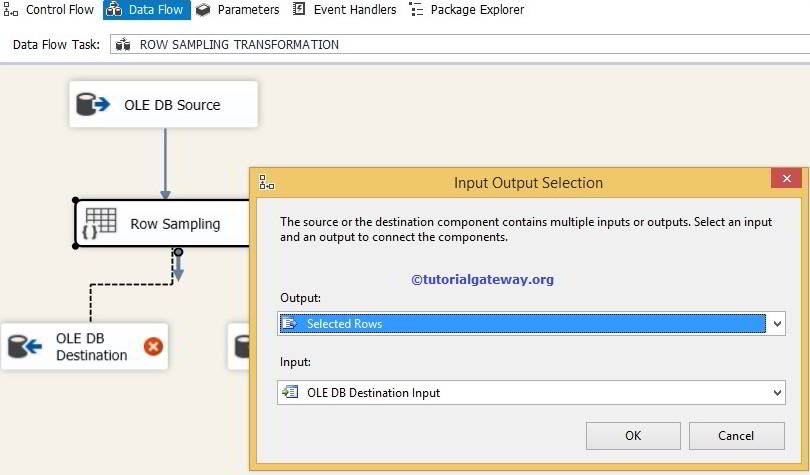
Here we are selecting the SELECTED ROWS output. Click ok and drag and drop another arrow from Row Sampling to second destination. Here it will automatically selects Remaining Rows option.
STEP 7: Now we have to provide Server, database and table details of the destination. So double click on the OLE DB Destination for the selected rows and provide the required information
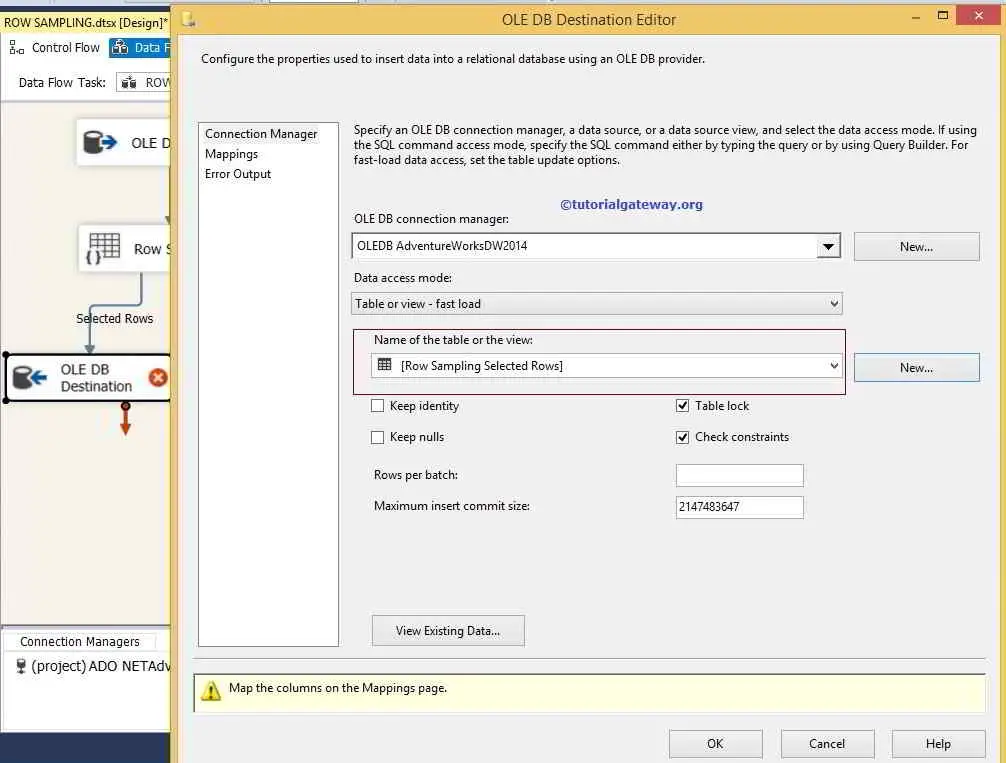
Here we are selecting the [Row Sampling Selected Rows] table present in the [Adventure Works DW 2014] database
STEP 8: Click on Mappings tab to check whether the source columns are exactly mapped to the destination columns.

Click ok to finish the configuration of OLE DB destination for the SELECTED ROWs.
NOTE: If your input column names and destination column names are same then, the intelligence will automatically map. If there is any changes in the column names then we have map them manually.
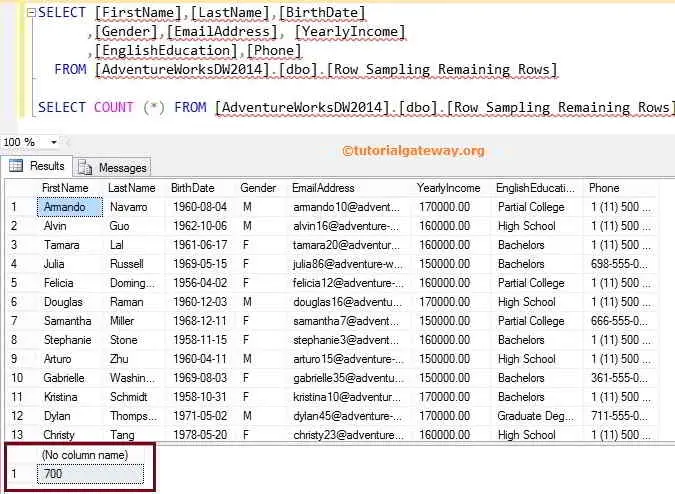
STEP 9: Now we have to configure the OLE DB destination for the remaining rows. So double click on the OLE DB Destination and provide the required information

Here we are selecting the [Row Sampling Remaining Rows] table present in the [Adventure Works DW 2014] database
Click on Mappings tab to check whether the source columns are exactly mapped to the destination columns and then click ok to finish our package design.
Let us run the package
Let us open SQL Server Management Studio and check the result of both the tables
Selected Rows Table
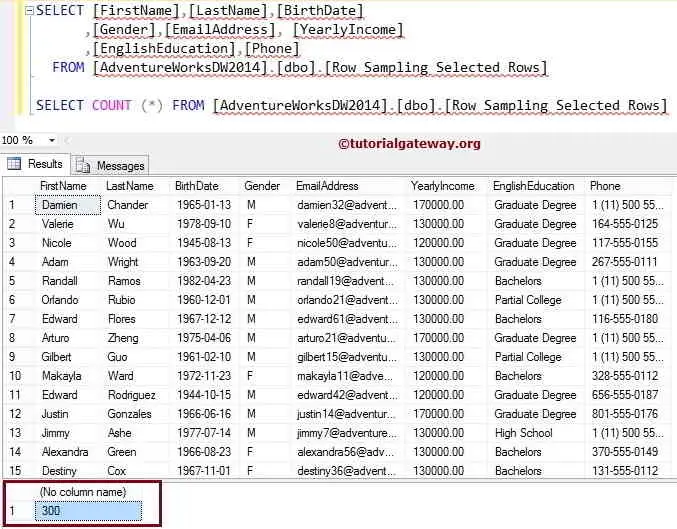
You can observe the number of rows in that table = 300
Remaining Rows Table
Thank you for Visiting Our Blog
Percentage Sampling Transformation in SSIS 2014
Percentage sampling transformation is generally used for data modeling. This transformation selects given percentage of rows from the data source and transfer it to selected output rows option and the remaining rows will be transferred to unselected output rows.
For example if the input has 1000 rows and if we specify 10 as percentage sample then the transformation returns approximately 10% of the RANDOM records from the input data.
Functionality of Percentage Sampling Transformation is same as Row Sampling Transformation. Only difference is, Percentage Sampling selects percentage of rows rather than number of rows (Row Sampling).
Percentage Sampling Transformation in SSIS 2014 Example
STEP 1: Drag and drop the data flow task from the toolbox to control flow and rename it to Percentage Sampling Transformation

Double click on it and it will open the data flow tab.
STEP 2: Drag and drop OLE DB Source, Percentage Sampling Transformation from toolbox to data flow region
STEP 3: Double click on OLE DB source in the data flow region will open the connection manager settings and provides space to write our SQL statement.
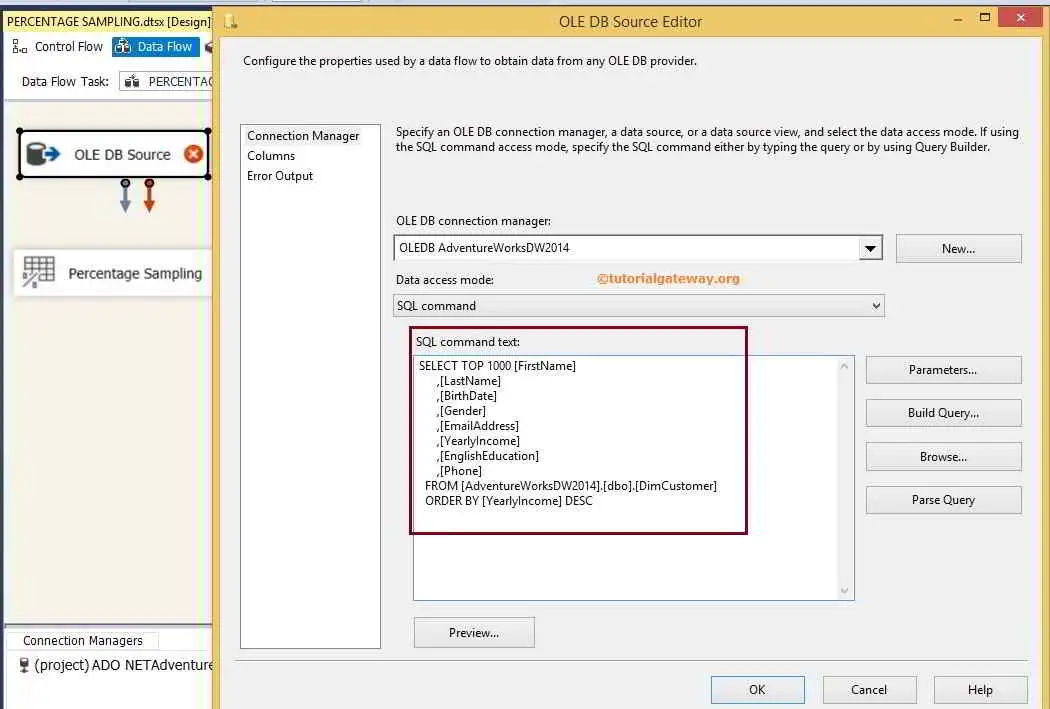
SQL command Text
For the time being we selected top 1000 rows from DimCustomers in Adventure Works DW 2014 data base and we want to send the 40% of rows to the destination table
STEP 4: Click on columns tab to verify the columns. In this tab we can uncheck the unwanted columns also.

TIP: If we don’t want any column then don’t add them in your SQL command.
STEP 5: Click ok and edit the Percentage Sampling Transformation
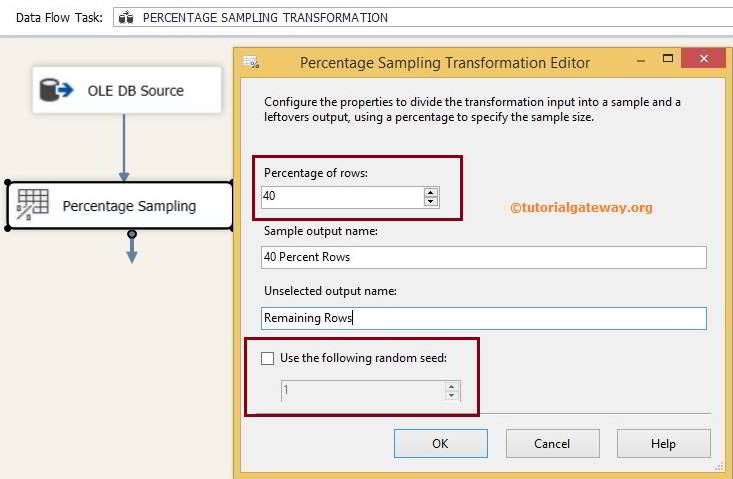
For this example, we are selecting 40% of rows from the input as selected rows and remaining rows are considered as remaining rows.
TIP: if you check the “Use the following random seed” option then it will select the same set of rows every time you run the package. If not then Percentage Sampling Transformation in SSIS will pick the rows randomly.
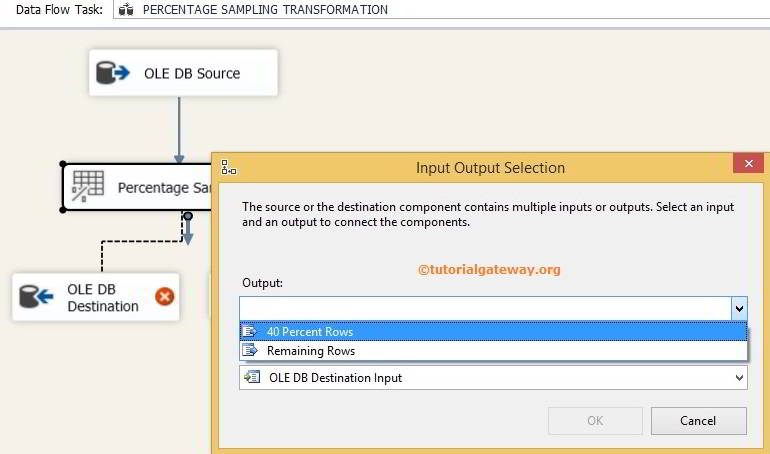
STEP 6: When we try to connect the Percentage sampling to OLE DB destination then it will pop up Input Output Selection window to provide the choice of selecting output. First select the 40 percent rows output as input for OLE DB destination and when you drag another arrow to other OLE DB Destination will automatically selects the remaining rows output.
STEP 7: Now we have to provide Server, database and table details of the destination. So double click on the OLE DB Destination and provide the required information
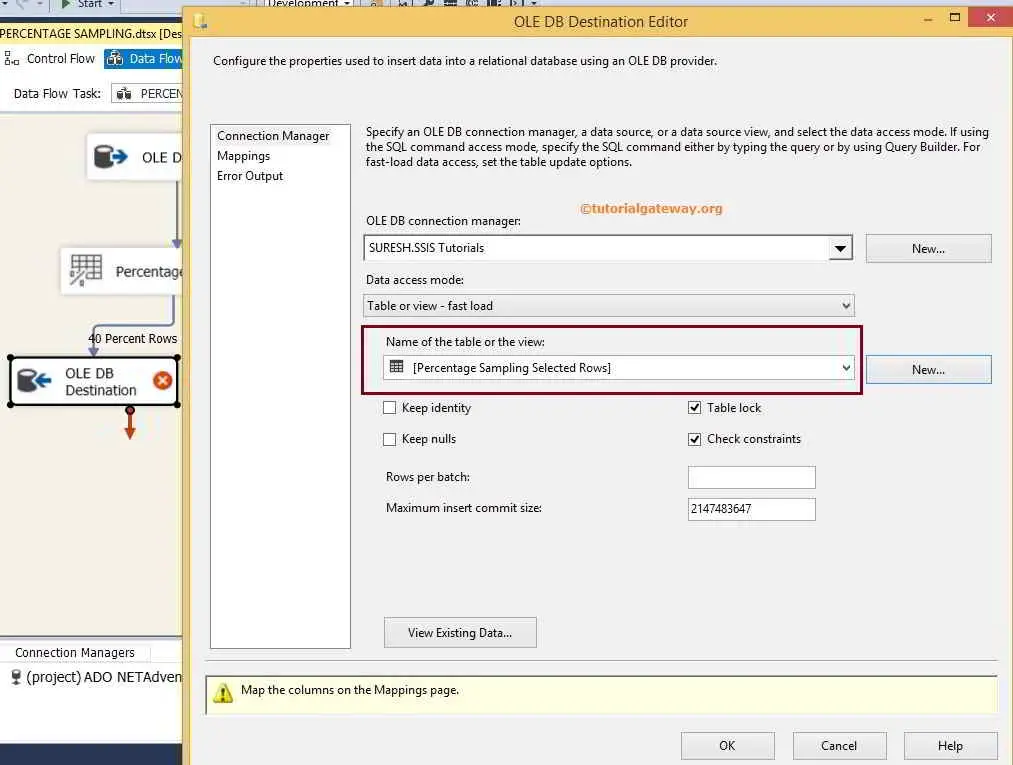
Here we selected the [Percentage Sampling Selected Rows] table present in the SSIS Tutorials Database
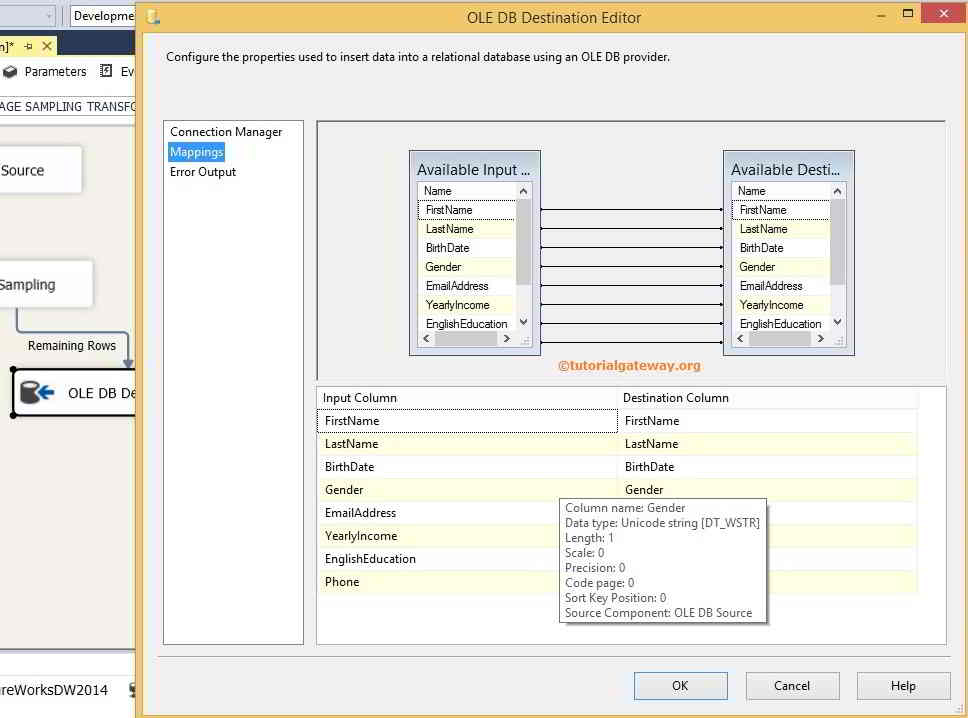
STEP 8: Click on Mappings tab to check whether the source columns are exactly mapped to the destination columns.

Click ok to finish the configuration of OLE DB destination for the 40% ROWS.
STEP 9: Now we have to configure the OLE DB destination for the remaining rows. So double click on the OLE DB Destination and provide the required information

Here we selected the [Percentage Sampling Remaining Rows] table present in the SSIS Tutorials Database
STEP 10: Click on Mappings tab to check whether the source columns are exactly mapped to the destination columns.
Click ok to finish our package design. Let us run the package
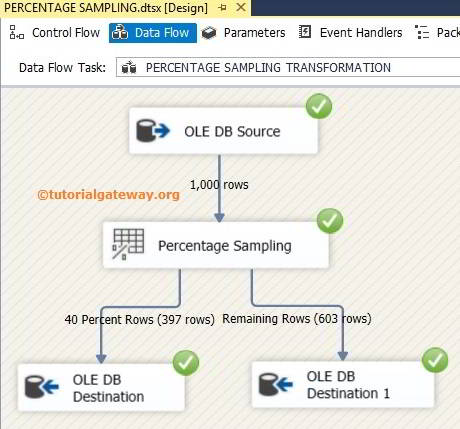
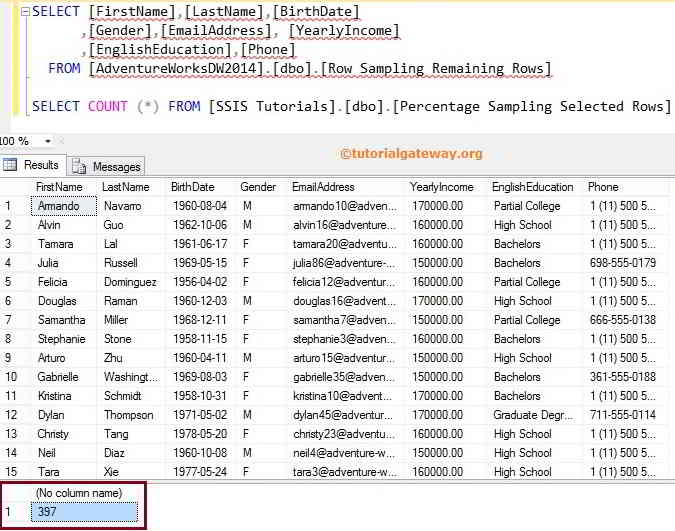
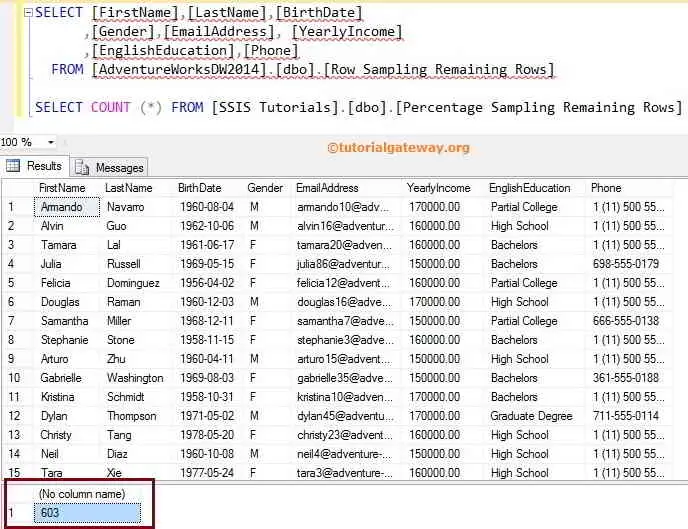
We configured the Percentage Sampling Transformation to select 40 percent rows from the data source means 400 rows. From the above you can observe that, 397 rows are selected and transferred to the [Percentage Sampling Selected Rows] table which mean approximately 40% rows. Remaining 603 records are transferred to [Percentage Sampling Remaining Rows] table
NOTE: Instead of selecting the exact percentage of rows, Percentage Sampling Transformation will selects the approximate percentage of rows and this approximate value differs every time you execute. For instance, If you run the above example multiple times you may get results like 397, 401, 405, 395 rows etc.
Let us open SQL Server Management Studio and check the result of both the tables
Selected Rows Table
Remaining Rows Table
Thank you for Visiting Our Blog