Aim :- Earlier tutorials were targeted to provide insight on various transformations in SSIS. Continuing with the same approach, today we are going to learn one more SSIS Transformation named as Derived Column Transformation. We fill follow our traditional method i.e. Learning things via doing them practically. This always gives a better vision of the concept.
Description :- Read this loudly – SSIS Derived Column Transformation. The name itself indicates that it is going to derive something from column(s). If this thing came to your mind then you hit the bulls eye. It will create a new column or replace existing column by writing an expression in Derived column editor. The expression may contain functions like Number, string, date, etc. and also we can use the variables.
Let’s understand this with an example – Suppose, we have three input columns like First_name, Middle_name and Last_name. Finally, I want only one column as an output column i.e. Full name. We can achieve this by concatenating the three input columns (First_name, Middle_name, Last_name).
But now the problem is how we can concatenate these three input columns. So, the solution to this problem is Expressions i.e. we can write a following expression (Expression starts with equal (=) sign):- =First_name+” ”+Middle_name+” ”+Last_name
NOTE – In above Expression, we are using “+” symbol for concatenation.
Recently someone asked us one question on Facebook which is quoted as below –
QUESTION –
Hi Everyone, Can you suggest me, if I have an input file like –
Input file :-
Id Genderid
1 1
2 2
3 3
Id Genderid
1 1
2 2
3 3
Then, how can we show an output like below?
Output file :-
Id GenderId Gender_Name
1 1 Male
2 2 Female
3 3 Unknown
Id GenderId Gender_Name
1 1 Male
2 2 Female
3 3 Unknown
Let us make this question clearer (Question modified a little bit for more understanding) –
While moving the input data into a table, user wants a new column (i.e. Gender_name) by referencing to the column “GenderID” which means –
- “1” as Male,
- “2” as “Female”, and
- “3” as “Unknown”
ANSWER –
SELECT Id, GenderId,
newcol =
CASE
WHEN GenderId=1 THEN ‘Male’
WHEN GenderId=2 THEN ‘Female’
ELSE ‘Unknown’
END
FROM <Tablename>
newcol =
CASE
WHEN GenderId=1 THEN ‘Male’
WHEN GenderId=2 THEN ‘Female’
ELSE ‘Unknown’
END
FROM <Tablename>
We will answer this question in two ways –
Scenario 1:- Here, I will show how we can achieve the output with SQL Server.
Scenario 2:- Here, I will show how we can achieve the same output via SSIS (By using SSIS Derived column transformation)
Before we begin our in depth study on 2 above scenarios, firstly let’s create a table.
================= Create Query to create Test table ====================
Use PhPRing
Go
Go
Create table Test
(Id varchar(10),
GenderId varchar(10))
Go
================ Insert Query to insert data into Test table =================
(Id varchar(10),
GenderId varchar(10))
Go
================ Insert Query to insert data into Test table =================
Insert into test values (‘1′,’1′),(‘2′,’2′),(‘3′,’3′)
Go
Go
Scenario 1:- With SQL server – By using CASE statement
Input Query –
SELECT Id,
GenderId,
Gender_Name=CASE
WHEN GenderId = 1 THEN‘Male’
WHEN GenderId = 2 THEN‘Female’
ELSE‘Unknown’
END
FROM Test
GenderId,
Gender_Name=CASE
WHEN GenderId = 1 THEN‘Male’
WHEN GenderId = 2 THEN‘Female’
ELSE‘Unknown’
END
FROM Test
Output –

Scenario 1 – With CASE statement in MS SQL Server
Scenario 2:- With SQL Server integration Services – By using SSIS Derived column transformation
- Create one SSIS package and give any name, say “Generate_Newcol”.
- Drag and drop Data Flow Task (DFT).
- Double click on Data Flow Task. Now, drag and drop OLEDB source and create connection to your database say, PhpRing in this example. (I hope you all know how to create a connection to the database).
- Now, drag and drop SSIS Derived Column Transformation and create a connection between OLEDB sources to Derived column.
- Double click on Derived Column Transformation. Finally it will look like below image.

Note down the things which needs to be done in the above Derived column Transformation editor.
- Expand columns.
- Provide Derived column name, say = Gender_Name.
- Derived column column = <add new column>.
- Write an Expression as = [GenderId]==”1″?”Male”: [GenderId]==”2″?”Female”:”Unknown”
Explanation about the expression – This expression will also work similar like CASE statement/IF statement. I hope you all know how IF works in reality. In case you are not sure, refer below line to understand the functionality of IF statement.
“If something equal to some value, do like this else do like other”.
Below are the Things to remember when writing an expression in SSIS Derived Column transformation.
- If we are going to equal any value then we must use two equal symbols i.e. “==”.
- If we equal any string fields, we must enclose them within double quotes i.e. “”.
- If there is anything wrong with your expression then the expression will be highlighted in Red color and we all very well know that red color indicates an error.
- If everything is right with your expression then the expression will be highlighted in black color.
- If you are writing an expression in editor and are using any columns then, just drag & drop those columns in your expression editor. This will avoid manual type errors such as column names mismatch, etc. As, Column names are case sensitive so expression may not be valid if column names are not written exactly with proper casing.
This is all about the two scenarios. Now, I am moving ahead and will execute my SSIS Derived Column Transformation package. Let’s see what will happen now.

Scenarion 2 – With Derived Column Transformation in SSIS
We can see in the above image that column Gender_Name is created and the result set is exactlysimilar to Scenario 1 result.
This is the end of the article. I hope you all enjoyed this quick post on Derived Column Transformation in SSIS. Kindly share feedback and doubts as comments below. If you have any questions which you want to discuss practically, just ask below in the form of comment or you can post it on our Facebook page too.


Merge Transformation in SSIS 2014
Merge Transformation in SSIS is used to merge two inputs (such as tables or files) and produce one output. Merge Transformation is very useful when we want to merge the error path data (after handling the errors) and normal data. This transformation uses key columnvalues to insert the data into destination columns.
For example, We split the data using Conditional Split Transformation as per the condition. After performing few more operations on them we want to merge them back.In these situations we can use Merge Transformation to Merge them back.
NOTE: Merge Transformation will produce only one output and it does not support error output.
Difference Between Merge Transformation and Union All Transformation
In SSIS, Merge Transformation is similar to Union All Transformation, but Merge has some restrictions:
| Merge Transformation | Union All Transformation |
|---|---|
| Data should be in sorted order before applying Merge Transformation | No need to sort the data |
| Output of the Merge Transformation will produce Sorted data | Output will be unsorted data. |
| It only accepts 2 inputs | It can accept more than 2 inputs |
Merge Transformation in SSIS 2014 Example
We have sales data of a products stored in two different SQL Server tables such as Sales 2, Sales 3 and we want to merge all the related information in one database table.
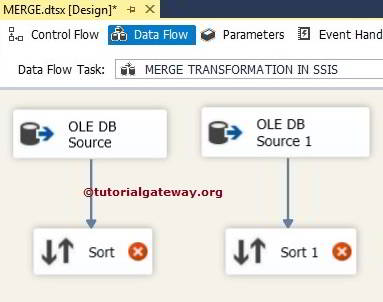
STEP 1: Drag and drop the data flow task from the toolbox to the control flow region and rename it as Merge Transformation in SSIS

Double click on the data flow task will take us to Data flow region.
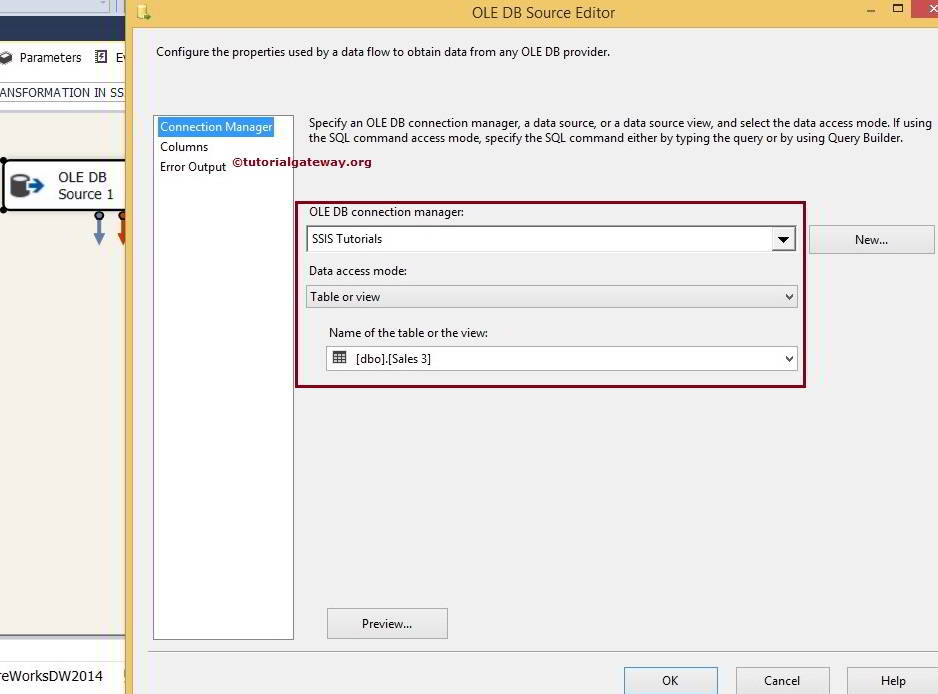
STEP 2: Drag and Drop two OLE DB Sources from the toolbox to data flow region and then double-click on first OLE DB source in the data flow region will open the connection manager settings and provides option to select the table holding the source data. Here we are selecting Sales2 table as source

STEP 3: Click on columns tab to verify the columns. In this tab we can uncheck the unwanted columns also.

Double click on second OLE DB source to configure it with Sales 2 table in SQL Server.
Repeat STEP 3 to verify the columns
STEP 4: Drag and drop two Sort Transformations to sort the SQL Server table’s inputs. Please refer Sort Transformation in SSIS article to understand, How to configure Sort Transformation
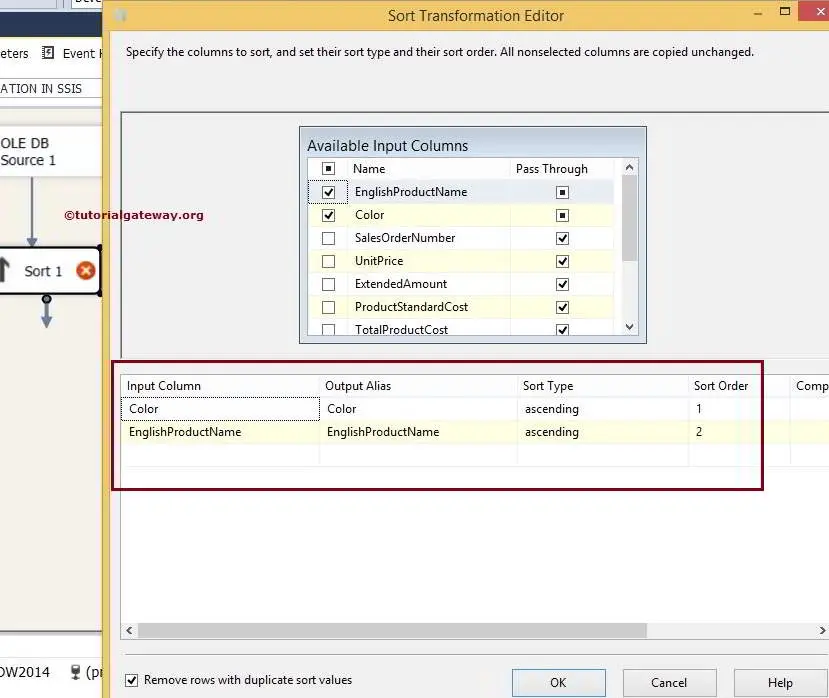
STEP 5: Double click on the sort transformation to configure it. Here we are sorting by color and then by English product name in ascending order
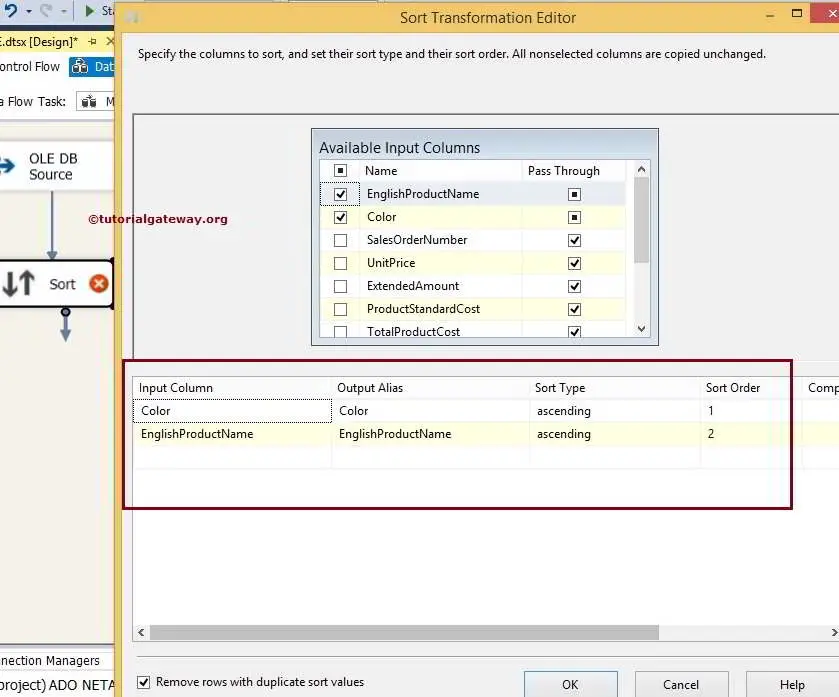
TIP: Merge transformation will not work without sorting the input rows. So sort transformation is mandatory before merge
Do the same for Sort Transformation1 also.
STEP 6: Now drag and drop the Merge Transformation to combine the sorted tables into one table
When you drag the output arrow of the Sort Transformation into Merge Transformation anInput Output Selection window will be appeared to select whether it is Merge Input 1 or Merge Input 2 as shown in the below screenshot
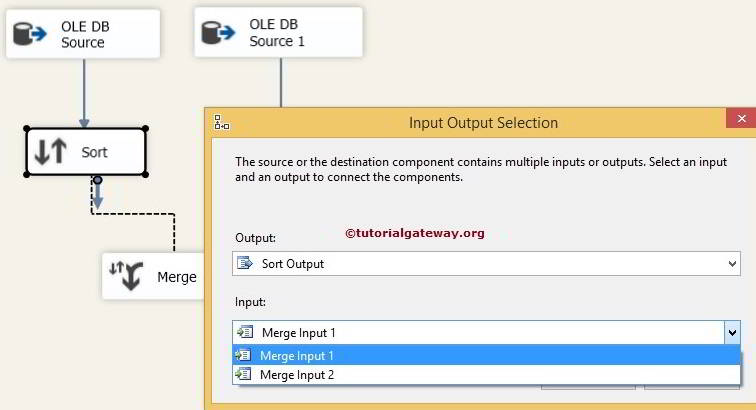
Click ok and drag and drop the output arrow of the Sort Transformation 1. Here Merge Input 2 is automatically selected by the intelligence.
STEP 7: Double click on Merge Transformation and configure it

Data will be inserted into the destination table based on the Color and English Product Name columns
STEP 8: Drag and drop the OLE DB destination into the data flow region and double-click on it to configure the destination server and destination table to store the merge transformation output
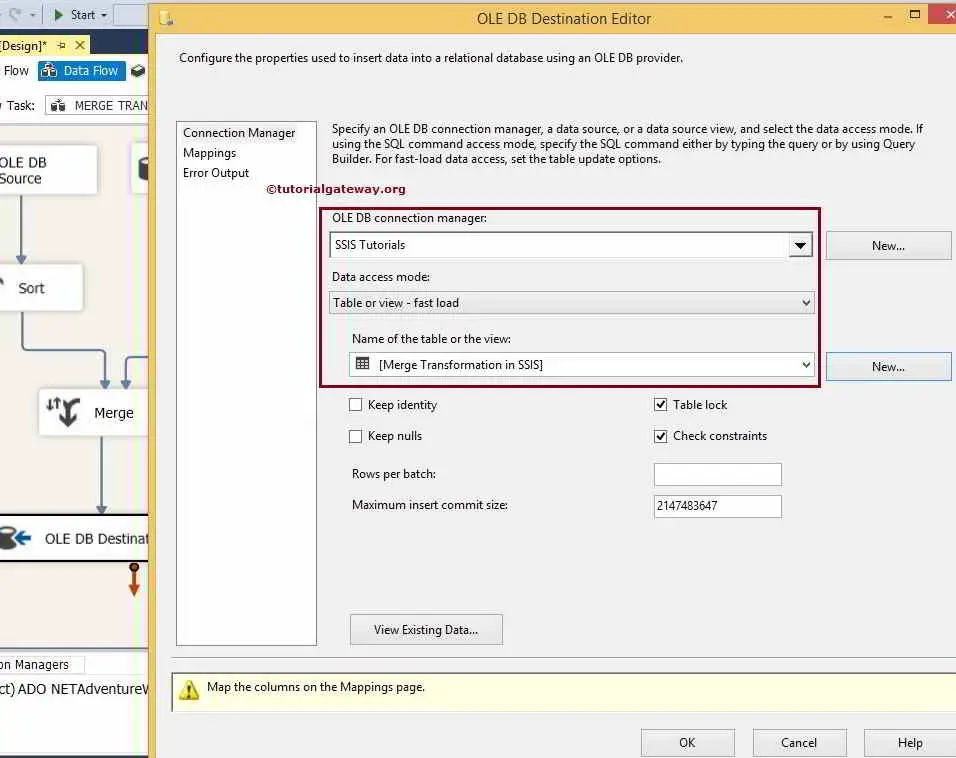
Here we selected [SSIS Tutorials] as database and [Merge Transformation in SSIS] as destination table
STEP 9: Check whether input columns are matching with the destination columns using Mappings Tab

We finished designing the Merge Transformation package. Let us execute the package
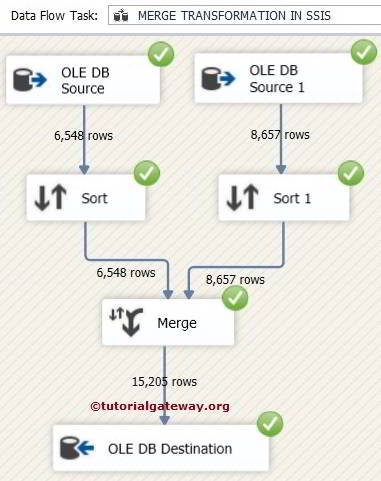
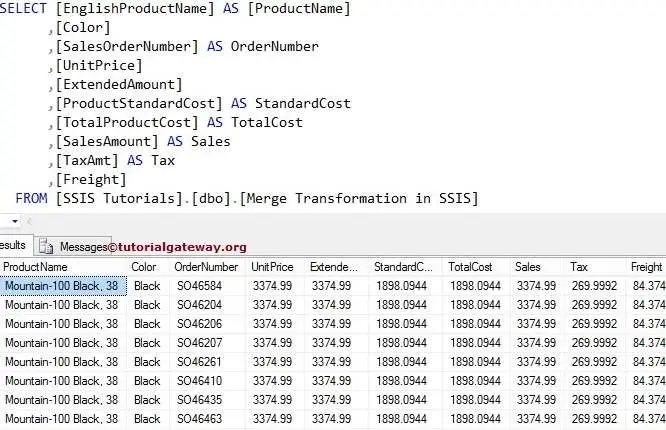
Now we will check the output in SQL Management studio
Thank you for Visiting Our Blog
Merge Join Transformation in SSIS 2014
Merge Join Transformation is used to perform SQL Joins such as Inner Join, Left Outer Join Full Outer Join and Right Outer Join (indirectly achieved by Swapping the tables) in SQL Server Integration Services. Merge Join Transformation is very useful to load data into the Dimension tables in Data Warehouse.
NOTE: Merge Join Transformation will only work with Sorted data so, Sort Transformation is mandatory before applying any joins using Merge Join Transformation. Please refer Sort Transformation in SSIS article to understand, How to perform Sort Operations on the Source Data.
Merge Join Transformation in SSIS 2014 Example
In this article we are going to perform Inner Join on two SQL tables using Merge Join Transformation in SSIS.
Before we start creating the SSIS Package let us look at our two source tables on which we are going to perform Inner Join using Merge Join Transformation.
Employees Table inside the [SSIS Tutorial] Database is:

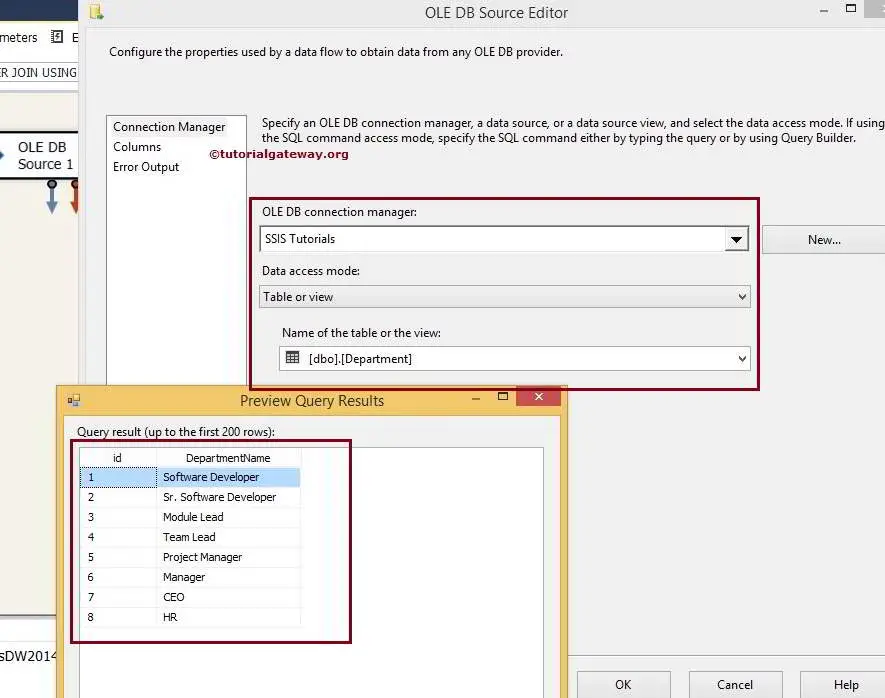
Department Table inside the [SSIS Tutorial] Database is:

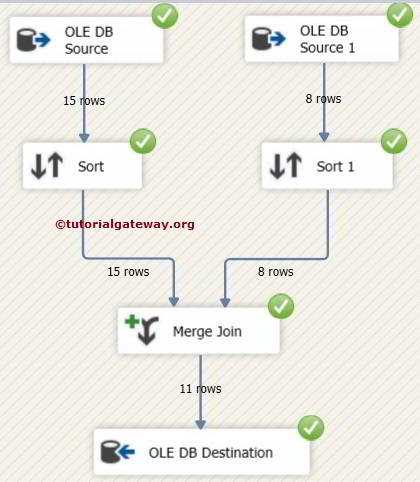
STEP 1: Drag and drop the data flow task from the toolbox to the control flow region and rename it as Performing Inner Join Using Merge Join Transformation
Double click on the data flow task will take us to Data flow region.
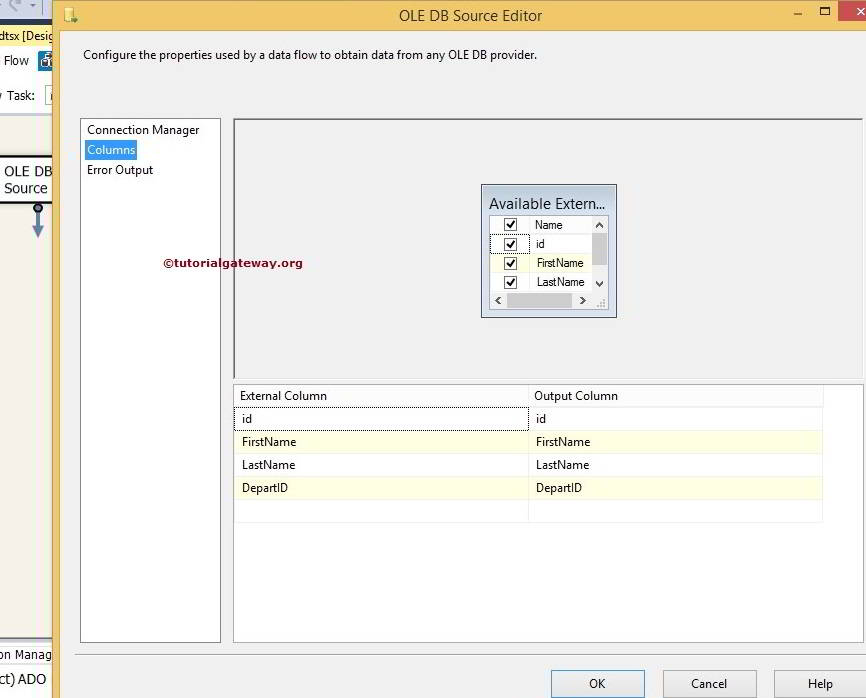
STEP 2: Drag and Drop two OLE DB Sources from the toolbox to data flow region and then double-click on first OLE DB source in the data flow region will open the connection manager settings and provides option to select the table holding the source data.

From the above screenshot you can observe that, We selected [Employees] Table from [SSIS Tutorials] Database
STEP 3: Click on columns tab to verify the columns. In this tab we can uncheck the unwanted columns also.
STEP 4: Double click on second OLE DB source to configure the Second table to perform Merge Join. Here we are selecting the [Department] Table from [SSIS Tutorials] Database
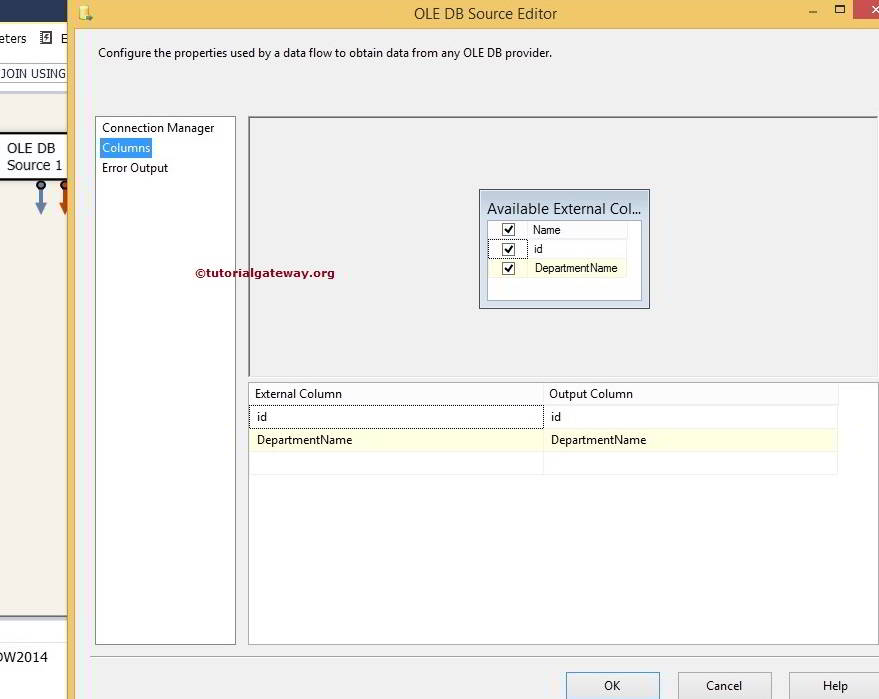
STEP 5: Click on columns tab to verify the columns. In this tab we can uncheck the unwanted columns also.
STEP 6: Drag and drop two Sort Transformations from SSIS toolbox to Data Flow region and connect the OLE DB Source output arrow to the Sort Transformation.

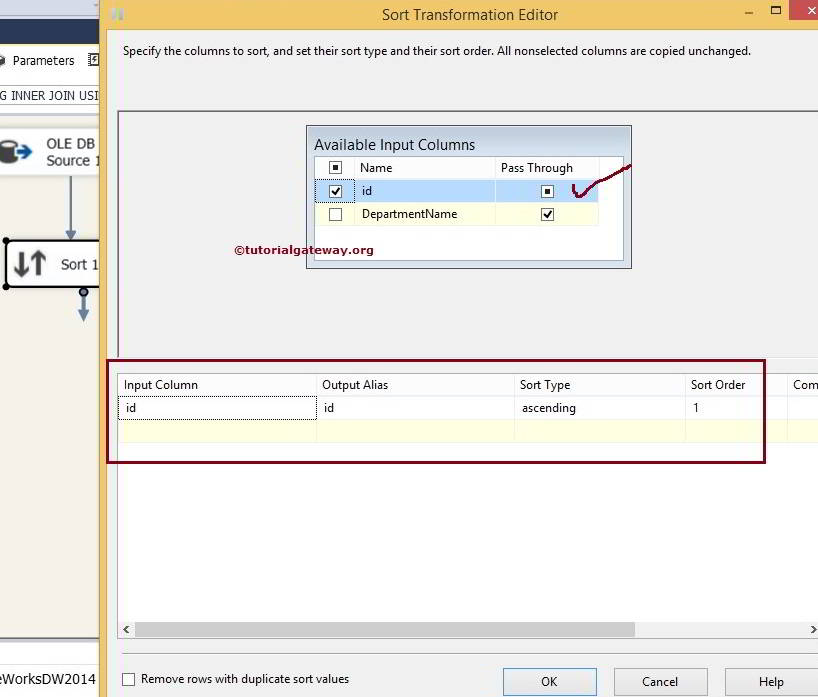
STEP 7: Double click on Sort Transformation to configure it. Check the columns we want to sort and don’t forget to Pass Through remaining column. If you forget to select the Pass Through then they won’t appear in output columns.
From the source data, DepartID is the Joining key between Employees and Department tables. So We are sorting the Employees table by DepartID in ascending order.

TIP: Merge Join Transformation will not work without sorting the input rows. So Sort Transformation is mandatory before applying Merge Join Transformation
Double click on Sort Transformation 1 and sort the Department table using id column in ascending order.
STEP 8: Now drag and drop the Merge Join Transformation into data flow region to perform Inner Join on the sorted tables.
When you drag the output arrow of the Sort Transformation into Merge Join Transformation an Input Output Selection window will be appeared to select whether it is Merge Join Left Input or Merge Join Right Input as shown in the below screenshot.
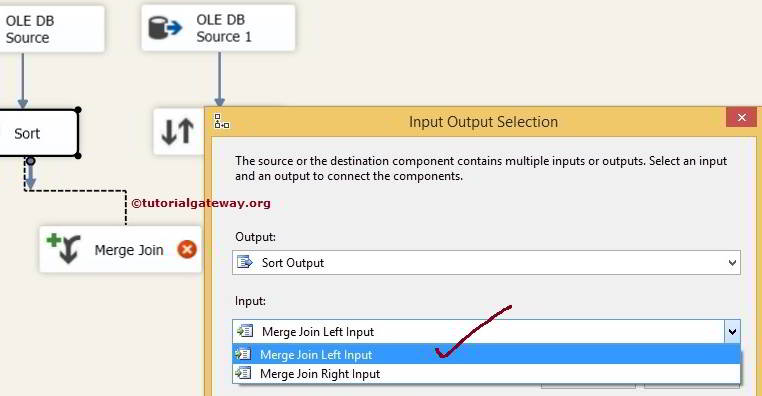
Here we selected Merge Join Left Input for Employees table. Click ok and drag and drop the output arrow of the Sort Transformation 1. Here Merge Join Right Input is automatically selected by the intelligence.
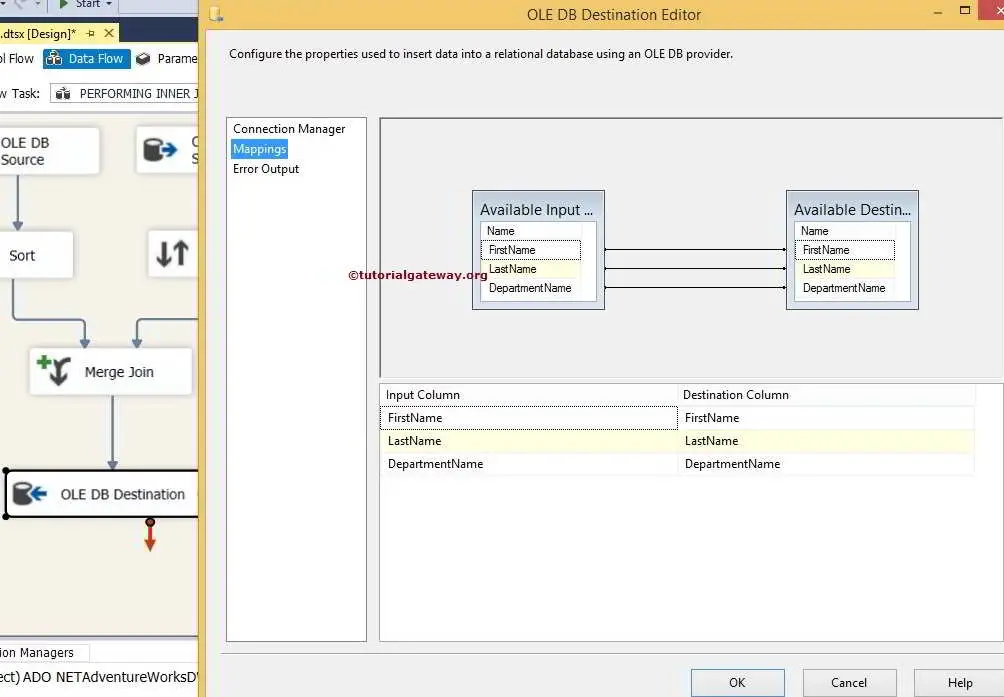
STEP 9: Double click on Merge Join Transformation will opens the Merge Join Transformation Editor to configure it.
Join Type provides an drop down list to select the Join type (such as Inner Join, Left Outer Join and Full Outer Join) you want to perform on the source data. In this example we performing Inner Join that’s why we selected the Inner Jon option from the Join Type option.
Please refer Left Outer Join in SSIS 2014 article to understand, How to perform Left Outer Join on two SQL Server Tables.
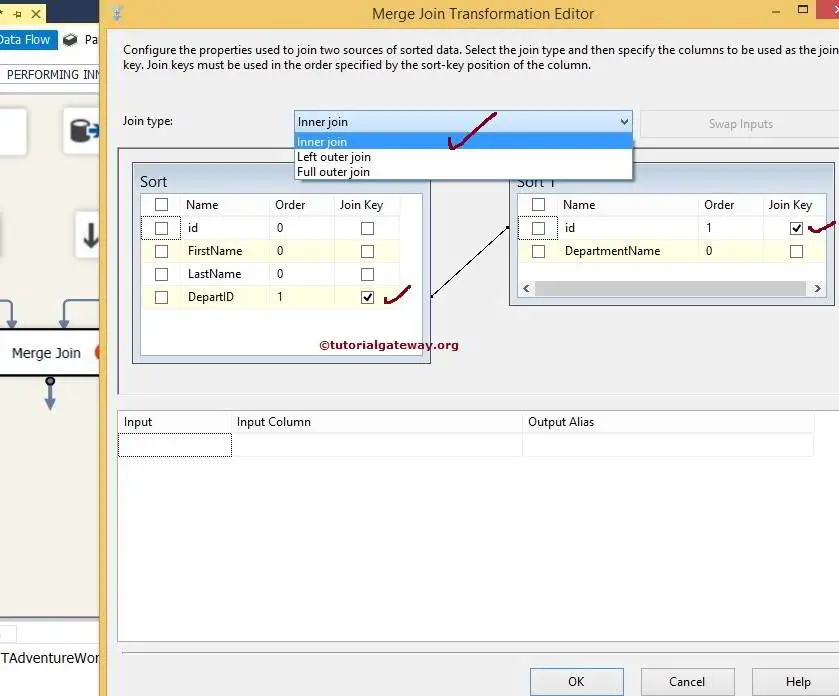
As you can observe from the source data, both Employees and Department tables are joined using DepartID and id columns so select them as Join keys by dragging the arrow.
Now select the columns you want to send to the destination table (Pass through columns) by check marking the column names.
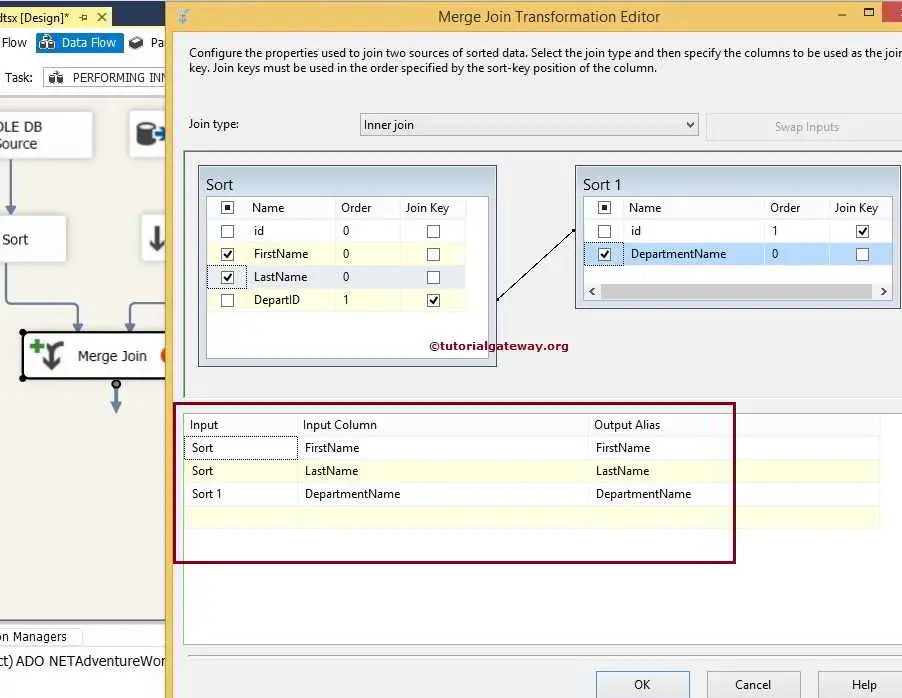
From the above screenshot you can observe that, We selected [First Name], [Last Name] and [Department Name] columns as output columns. It means Inner Join will produce output columns as [First Name], [Last Name] and [Department Name] where DepartID is exactly equal to any of the id column data.
TIP: Whatever columns you select here will only be stored in the destination table. If you don’t want any column then uncheck that column.
STEP 10: Drag and drop the OLE DB destination into the data flow region and double-click on it to configure the destination server and destination table to store the Merge Join Transformation output

Here we selected [SSIS Tutorials] as database and [Inner Join Using Merge Join Transformation] as destination table
STEP 11: Click on the columns Tab to check whether input columns are matching with the destination columns or not. If not, Please assign the appropriate columns to destination columns
We finished designing the Performing Inner Join Using Merge Join Transformation package. Let us execute the package
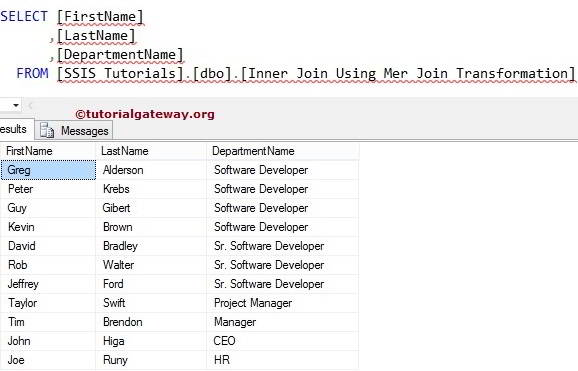
Now lets open the SQL Server Management studio and select the columns from [Inner Join Using Merge Join Transformation] table.
Thank you Visiting Our Blog
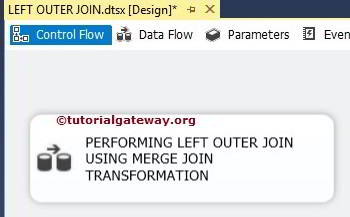
Left Outer Join in SSIS 2014
In this article we are going to perform Left Outer Join on two SQL tables using Merge Join Transformation in SSIS.
Before we start creating the SSIS Package let us look at our two source tables on which we are going to perform Left Outer Join using Merge Join Transformation.
Employees Table inside the [SSIS Tutorial] Database is:
Department Table inside the [SSIS Tutorial] Database is:
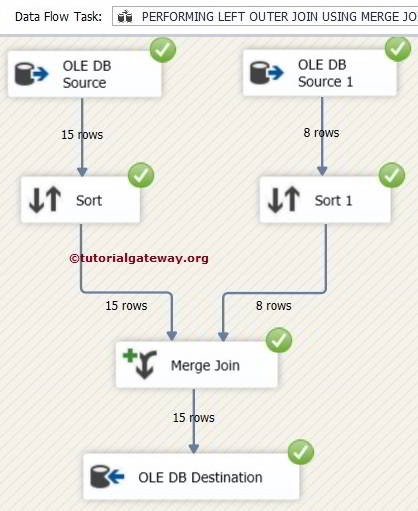
STEP 1: Drag and drop the data flow task from the toolbox to the control flow region and rename it as Performing Left Outer Join Using Merge Join Transformation
Double click on the data flow task will take us to Data flow region.
STEP 2: Drag and Drop two OLE DB Sources from the toolbox to data flow region and then double-click on first OLE DB source in the data flow region will open the connection manager settings and provides option to select the table holding the source data.
From the above screenshot you can observe that, We selected [Employees] Table from [SSIS Tutorials] Database
STEP 3: Click on columns tab to verify the columns. In this tab we can uncheck the unwanted columns also.
STEP 4: Double click on second OLE DB source to configure the Second table to perform Merge Join. Here we are selecting the [Department] Table from [SSIS Tutorials] Database
STEP 5: Click on columns tab to verify the columns. In this tab we can uncheck the unwanted columns also.
STEP 6: Drag and drop two Sort Transformations from SSIS toolbox to Data Flow region and connect the OLE DB Source output arrow to the Sort Transformation.
STEP 7: Double click on Sort Transformation to configure it. Check the columns we want to sort and don’t forget to Pass Through remaining column. If you forget to select the Pass Through then they won’t appear in output columns.
From the source data, DepartID is the Joining key between Employees and Department tables. So We are sorting the Employees table by DepartID in ascending order.
TIP: Merge Join Transformation will not work without sorting the input rows. So Sort Transformation is mandatory before applying Merge Join Transformation. Please refer Sort Transformation in SSIS article to understand, How to perform Sort Operations on the Source Data.
Double click on Sort Transformation 1 and sort the Department table using id column in ascending order.
STEP 8: Now drag and drop the Merge Join Transformation into data flow region to perform Left Outer Join on the sorted tables.
When you drag the output arrow of the Sort Transformation into Merge Join Transformation an Input Output Selection window will be appeared to select whether it is Merge Join Left Input or Merge Join Right Input as shown in the below screenshot.
Here we selected Merge Join Left Input for Employees table. Click ok and drag and drop the output arrow of the Sort Transformation 1. Here Merge Join Right Input is automatically selected by the intelligence.
STEP 9: Double click on Merge Join Transformation will opens the Merge Join Transformation Editor to configure it.
Join Type provides a drop down list to select the Join type (such as Inner Join, Left Outer Join and Full Outer Join) you want to perform on the source data. In this example we performing Left Outer Join that’s why we selected the Left Outer Jon option from the Join Type option.

As you can observe from the source data, both Employees and Department tables are joined using DepartID and id columns so select them as Join keys by dragging the arrow.
Now select the columns you want to send to the destination table (Pass through columns) by check marking the column names.
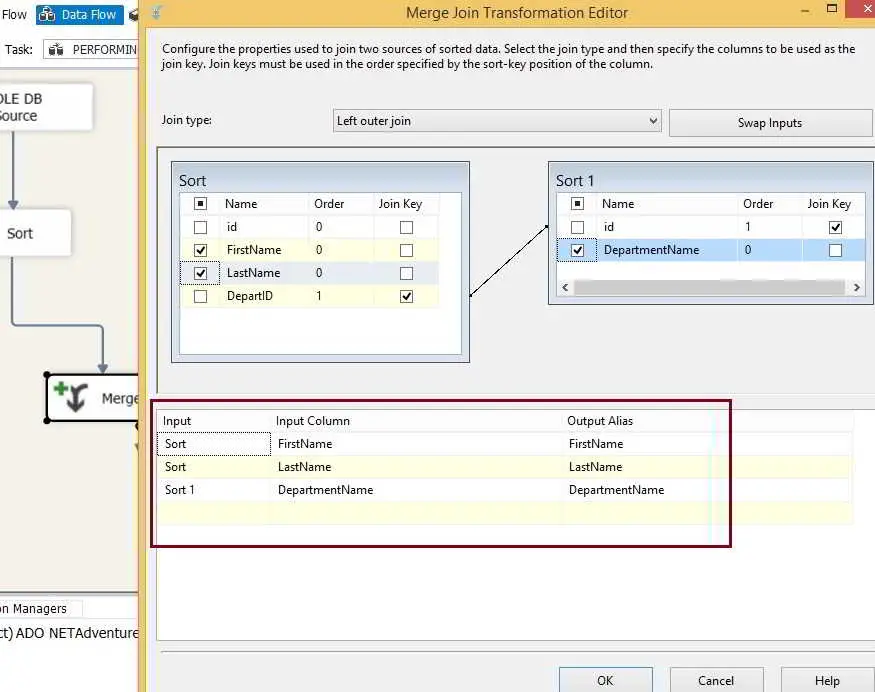
From the above screenshot you can observe that, We selected [First Name], [Last Name] and [Department Name] columns as output columns. It means Left Outer Join will produce all the [First Name], [Last Name] column rows from the Employees tables and matching rows of [Department Name] column where DepartID is exactly equal to any of the id column data. All the non matching rows of the [Department Name] column will be treated as NULL.
TIP: Whatever columns you select here will only be stored in the destination table. If you don’t want any column then uncheck that column.
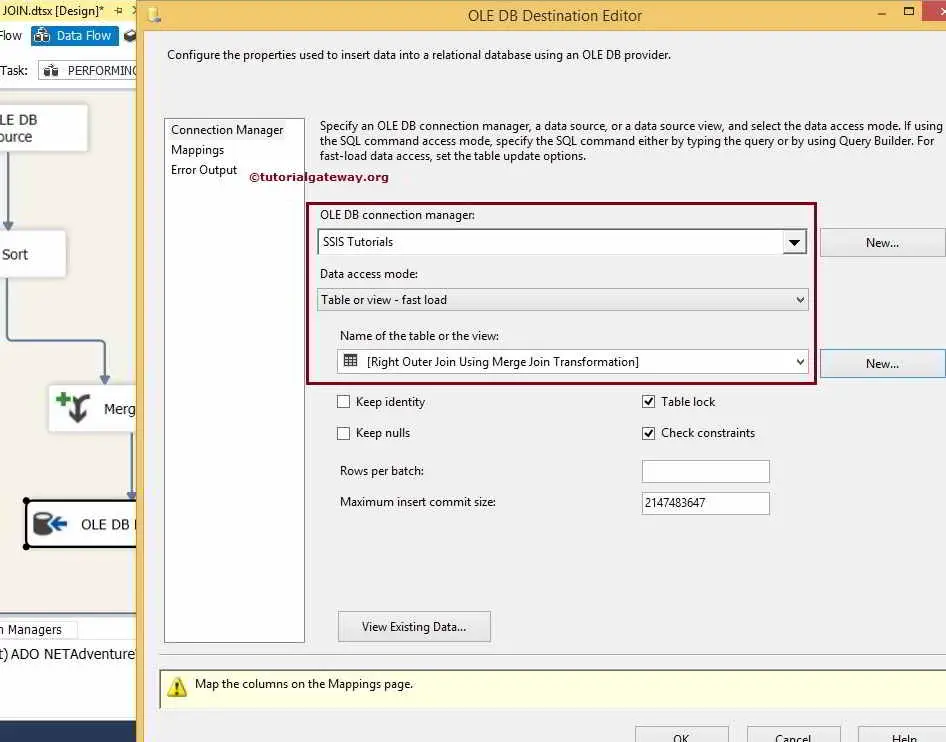
STEP 10: Drag and drop the OLE DB destination into the data flow region and double-click on it to configure the destination server and destination table to store the Merge Join Transformation output

Here we selected [SSIS Tutorials] as database and [Left Outer Join Using Merge Join Transformation] as destination table
STEP 11: Click on the columns Tab to check whether input columns are matching with the destination columns or not. If not, Please assign the appropriate columns to destination columns
We finished designing the Performing Left Outer Join Using Merge Join Transformation package. Let us execute the package
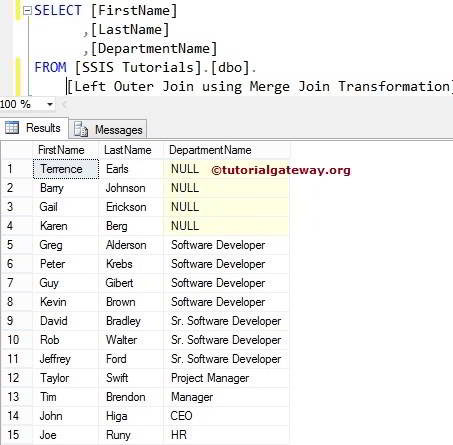
Now lets open the SQL Server Management studio and select the columns from [Left Outer Join Using Merge Join Transformation] table.
Thank you Visiting Our Blog
Right Outer Join in SSIS 2014
In this article we are going to perform Right Outer Join on two SQL tables using Merge Join Transformation in SSIS. Please refer Left Outer Join in SSIS 2014 article to understand, How to perform Left Outer Join on two SQL Server Tables and also refer Full Outer Join in SSIS 2014 article to understand, How to perform Full Outer Join on two SQL Server Tables using Merge Join Transformation.
Before we start creating the SSIS Package let us look at our two source tables on which we are going to perform Right Outer Join using Merge Join Transformation.
Employees Table inside the [SSIS Tutorial] Database is:
Department Table inside the [SSIS Tutorial] Database is:
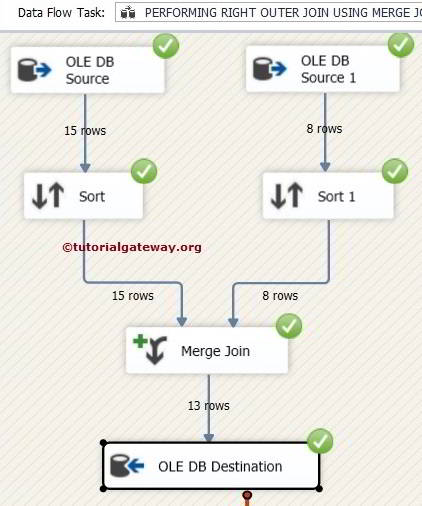
STEP 1: Drag and drop the data flow task from the toolbox to the control flow region and rename it as Performing Right Outer Join Using Merge Join Transformation

Double click on the data flow task will take us to Data flow region.
STEP 2: Drag and Drop two OLE DB Sources from the toolbox to data flow region and then double-click on first OLE DB source in the data flow region will open the connection manager settings and provides option to select the table holding the source data.
From the above screenshot you can observe that, We selected [Employees] Table from [SSIS Tutorials] Database
STEP 3: Click on columns tab to verify the columns. In this tab we can uncheck the unwanted columns also.
STEP 4: Double click on second OLE DB source to configure the Second table to perform Merge Join. Here we are selecting the [Department] Table from [SSIS Tutorials] Database
STEP 5: Click on columns tab to verify the columns. In this tab we can uncheck the unwanted columns also.
STEP 6: Drag and drop two Sort Transformations from SSIS toolbox to Data Flow region and connect the OLE DB Source output arrow to the Sort Transformation.
STEP 7: Double click on Sort Transformation to configure it. Check the columns we want to sort and don’t forget to Pass Through remaining column. If you forget to select the Pass Through then they won’t appear in output columns.
From the source data, DepartID is the Joining key between Employees and Department tables. So We are sorting the Employees table by DepartID in ascending order.
TIP: Merge Join Transformation will not work without sorting the input rows. So Sort Transformation is mandatory before applying Merge Join Transformation. Please refer Sort Transformation in SSIS article to understand, How to perform Sort Operations on the Source Data.
Double click on Sort Transformation 1 and sort the Department table using id column in ascending order.
STEP 8: Now drag and drop the Merge Join Transformation into data flow region to perform Right Outer Join on the sorted tables.
When you drag the output arrow of the Sort Transformation into Merge Join Transformation an Input Output Selection window will be appeared to select whether it is Merge Join Left Input or Merge Join Right Input as shown in the below screenshot.
Here we selected Merge Join Left Input for Employees table. Click ok and drag and drop the output arrow of the Sort Transformation 1. Here Merge Join Right Input is automatically selected by the intelligence.
STEP 9: Double click on Merge Join Transformation will open the Merge Join Transformation Editor to configure it.
Join Type provides a drop down list to select the Join type (such as Inner Join, Left Outer Joinand Full Outer Join) you want to perform on the source data. In this example, Although we are performing Right Outer Join, Merge Join Transformation Editor doesn’t have that option. So for now, We selected the Left Outer Jon option from the Join Type option.
As you can observe from the source data, both Employees and Department tables are joined using DepartID and id columns so select them as Join keys by dragging the arrow.
Now select the columns you want to send to the destination table (Pass through columns) by check marking the column names.
From the above screenshot you can observe that, We selected [First Name], [Last Name] and [Department Name] columns as output columns. To perform Right Outer Join we have to Swap the tables so Click on the Swap Inputs button. By this Left table become Right table and Right table becomes Left table as shown in below screenshot.

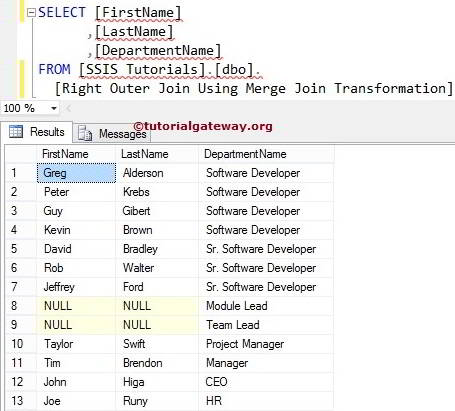
It means Right Outer Join will display all the [Department Name] column rows and matching rows of [First Name], [Last Name] columns from the Employees tables where DepartID is exactly equal to any of the id column data. All the non matching rows of the [First Name], [Last Name] columns will be treated as NULL.
TIP: Whatever columns you select here will only be stored in the destination table. If you don’t want any column then uncheck that column.
STEP 10: Drag and drop the OLE DB destination into the data flow region and double-click on it to configure the destination server and destination table to store the Merge Join Transformation output
Here we selected [SSIS Tutorials] as database and [Right Outer Join Using Merge Join Transformation] as destination table
STEP 11: Click on the columns Tab to check whether input columns are matching with the destination columns or not. If not, Please assign the appropriate columns to destination columns
We finished designing the Performing Right Outer Join Using Merge Join Transformation package. Let us execute the package
Now lets open the SQL Server Management studio and select the columns from [Right Outer Join Using Merge Join Transformation] table.
Thank you Visiting Our Blog
Full Outer Join in SSIS 2014
In this article we are going to perform Full Outer Join on two SQL tables using Merge Join Transformation in SSIS. Please refer Left Outer Join in SSIS 2014 article to understand Left Outer Join using Merge Join Transformation and Right Outer Join in SSIS 2014 article to understand Right Outer Join using Merge Join Transformation
Before we start creating the SSIS Package let us look at our two source tables on which we are going to perform Full Outer Join using Merge Join Transformation.
Employees Table inside the [SSIS Tutorial] Database is:
Department Table inside the [SSIS Tutorial] Database is:
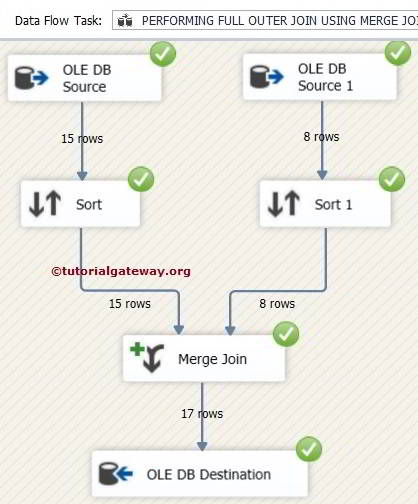
STEP 1: Drag and drop the data flow task from the toolbox to the control flow region and rename it as Performing Full Outer Join Using Merge Join Transformation
Double click on the data flow task will take us to Data flow region.
STEP 2: Drag and Drop two OLE DB Sources from the toolbox to data flow region and then double-click on first OLE DB source in the data flow region will open the connection manager settings and provides option to select the table holding the source data.
From the above screenshot you can observe that, We selected [Employees] Table from [SSIS Tutorials] Database
STEP 3: Click on columns tab to verify the columns. In this tab we can uncheck the unwanted columns also.
STEP 4: Double click on second OLE DB source to configure the Second table to perform Merge Join. Here we are selecting the [Department] Table from [SSIS Tutorials] Database
STEP 5: Click on columns tab to verify the columns. In this tab we can uncheck the unwanted columns also.
STEP 6: Drag and drop two Sort Transformations from SSIS toolbox to Data Flow region and connect the OLE DB Source output arrow to the Sort Transformation.
STEP 7: Double click on Sort Transformation to configure it. Check the columns we want to sort and don’t forget to Pass Through remaining column. If you forget to select the Pass Through then they won’t appear in output columns.
From the source data, DepartID is the Joining key between Employees and Department tables. So We are sorting the Employees table by DepartID in ascending order.
TIP: Merge Join Transformation will not work without sorting the input rows. So Sort Transformation is mandatory before applying Merge Join Transformation. Please refer Sort Transformation in SSIS article to understand, How to perform Sort Operations on the Source Data.
Double click on Sort Transformation 1 and sort the Department table using id column in ascending order.
STEP 8: Now drag and drop the Merge Join Transformation into data flow region to perform Full Outer Join on the sorted tables.
When you drag the output arrow of the Sort Transformation into Merge Join Transformation an Input Output Selection window will be appeared to select whether it is Merge Join Left Input or Merge Join Right Input as shown in the below screenshot.
Here we selected Merge Join Left Input for Employees table. Click ok and drag and drop the output arrow of the Sort Transformation 1. Here Merge Join Right Input is automatically selected by the intelligence.
STEP 9: Double click on Merge Join Transformation will opens the Merge Join Transformation Editor to configure it.
Join Type provides a drop down list to select the Join type (such as Inner Join, Left Outer Joinand Full Outer Join) you want to perform on the source data. In this example we performing Full Outer Join that’s why we selected the Full Outer Jon option from the Join Type option.
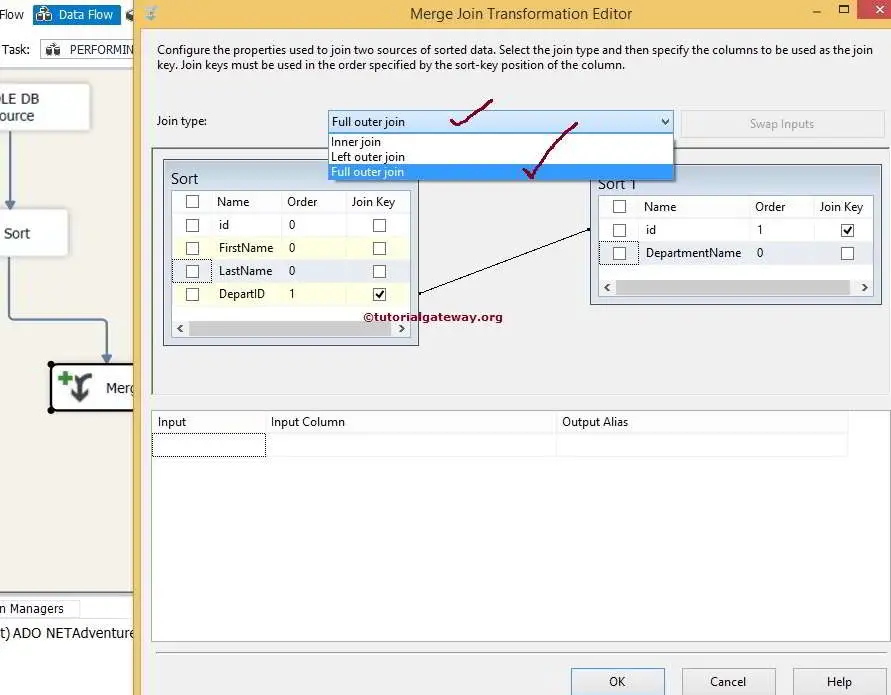
As you can observe from the source data, both Employees and Department tables are joined using DepartID and id columns so select them as Join keys by dragging the arrow.
Now select the columns you want to send to the destination table (Pass through columns) by check marking the column names.
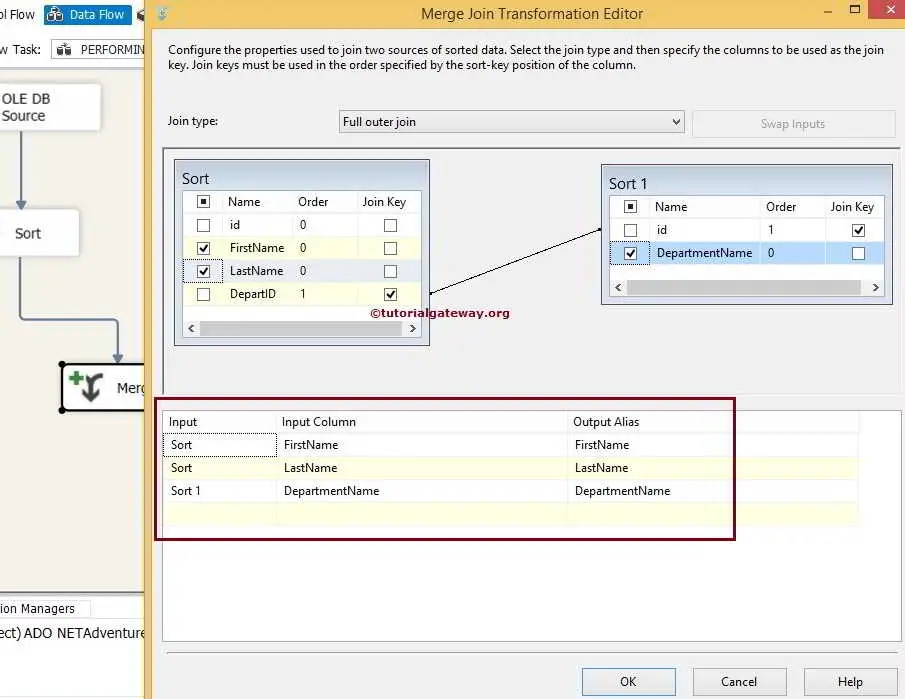
From the above screenshot you can observe that, We selected [First Name], [Last Name] and [Department Name] columns as output columns. It means Full Outer Join will produce all the rows from [First Name], [Last Name] and [Department Name] columns. All the non matching rows of the [First Name], [Last Name] and [Department Name] column will be treated as NULL.
TIP: Whatever columns you select here will only be stored in the destination table. If you don’t want any column then uncheck that column.
STEP 10: Drag and drop the OLE DB destination into the data flow region and double-click on it to configure the destination server and destination table to store the Merge Join Transformation output
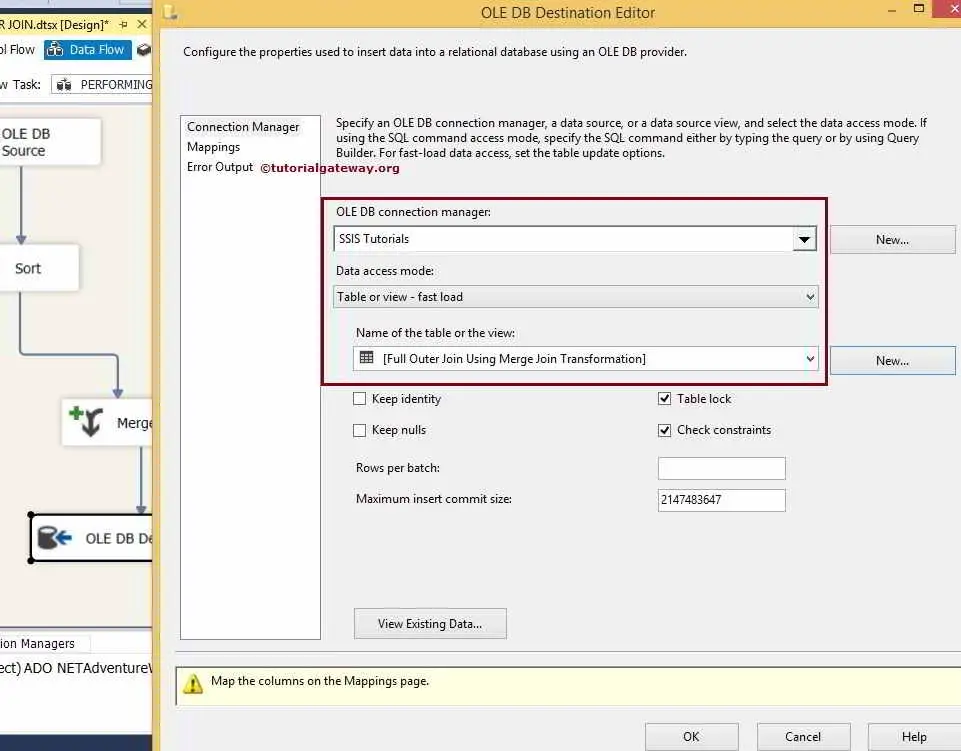
Here we selected [SSIS Tutorials] as database and [Full Outer Join Using Merge Join Transformation] as destination table
STEP 11: Click on the columns Tab to check whether input columns are matching with the destination columns or not. If not, Please assign the appropriate columns to destination columns
We finished designing the Performing Full Outer Join Using Merge Join Transformation package. Let us execute the package
Now lets open the SQL Server Management studio and select the columns from [Full Outer Join Using Merge Join Transformation] table.

Thank you Visiting Our Blog
Look Up Transformation in SSIS
In SQL Server Integration Services, Lookup Transformation is used to compare the source data to the existing data from the reference table (or Lookup Table) and find matching ones. For the non-matching rows we can further do some more work.
Case Sensitivity in Lookup Transformation: Lookup Transformation is Case-Sensitive, Kana-Sensitive, Accent-Sensitive and so on. Lookup Transformation doesn’t matter even your source and destinations databases setting are case-insensitive. So, if you data is not in proper case, it is advisable to convert your lookup table and source data to Uppercase or Lowercase. Please refer SSIS Lookup Transformation Case Sensitivity article for better understanding.
Configuring Lookup Transformation in SSIS 2014
Double click on the Lookup Transformation will open the Lookup Transformation Editor to configure it. Within the General page, it provides us the options to configure Cache Mode,Connection Type and Specify how to handle rows with no matching entries options as shown in the below screenshot.

In SSIS, Lookup Transformation supports only two types of SSIS Connection Managers:
- OLE DB Connection Manager: Lookup Transformation uses OLE DB Connection Manager to access the reference table present in the SQL Server, Oracle and DB2. Please referLookup Transformation Using OLE DB Connection Manager in SSIS article to understand, How to configure Lookup Transformation using the OLE DB Connection Manager.
- Cache Connection Manager: By default Lookup Transformation will use OLE DB Connection Manager to connect with the reference table. Other sources can be used, but they must be used indirectly via a Cache Transformation. For example, we can use Text file or an Excel file as lookup table using Cache Connection Manager. Please referSSIS Lookup Transformation in Full Cache Mode article to understand, How to configure Lookup Transformation using the Cache Connection Manager
You have three options for cache mode:
- Full Cache mode: This is the most commonly used approach in Lookup Transformation. If we selected this option then, entire lookup (or reference) table will be preloaded into the cache (Memory) and Lookup Transformation will perform lookup from the Memory instead of Dataset. This works well when we have less number of rows in the lookup table.
- Partial Cache mode: If we selected this option then, Lookup Transformation starts the transformation with empty cache. When a new row comes from the data flow, the Lookup Transformation first checks for the matching values in its cache. If it is not found in the cache then it will check in the lookup table. If no match is found, it queries the lookup table. If the match is found in the lookup table then, the value will be cached (stored in the memory) for the next time. If the lookup table is very big then we can use this approach.
- No Cache mode: If we selected this option then, Lookup Transformation will not use cache to store the lookup table at any stage. When a new row comes from the data flow, the Lookup Transformation directly check in the lookup table for the matching values.
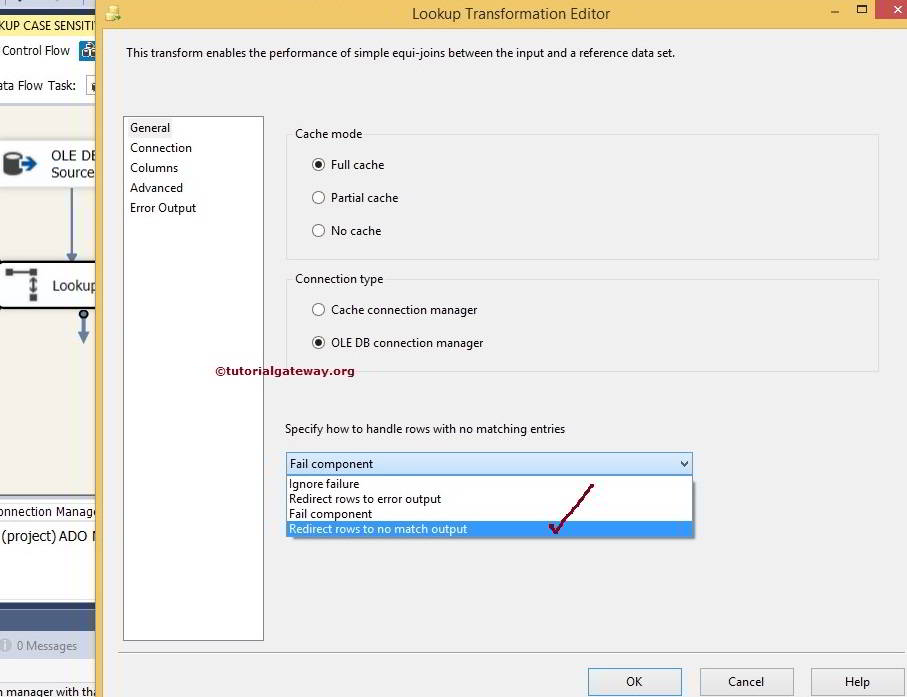
The final option in this page is to specify, How to handle rows with no matching entries. Lookup Transformation provides you four options:
- Fail Component (Default): If we selected this option then, When a new row is passed from the data, flow Lookup Transformation will fail the package if it doesn’t found any matching row in the lookup table.
- Ignore Failure: If we selected this option then, When a new row is passed from the data, flow Lookup Transformation will continue its processing even though it doesn’t found any matching row in the lookup table.
- Redirect Rows to No Match Output: If we selected this option then, Lookup Transformation will direct the rows that doesn’t found any matching row in the lookup table to No Match In real-time we mostly use this option.
- Redirect Rows to Error Output: If we selected this option then, Lookup Transformation will direct the rows that doesn’t found any matching row in the lookup table to standard error output.
TIP: Within the Advanced page we adjust the caching properties of the Lookup Transformation.
Thank you for Visiting Our Blog
Lookup Transformation Using OLE DB Connection Manager in SSIS
In this article we are going to explain, How to perform Lookup Transformation using OLE DB Connection Manager in SSIS with example. In this example we are going to use OLE DB Connection to connect with SQL Server 2014.
Let us see the Lookup table and its data before we start creating the package.
Now let’s see the source data as well.

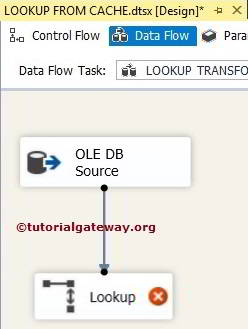
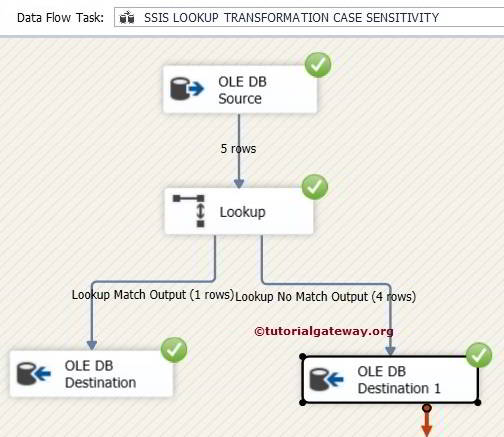
STEP 1: Drag and drop the Data Flow Task from toolbox to control flow region and rename it as Lookup Transformation in SSIS 2014.

Double click on it and it will open the data flow tab.
STEP 2: Drag and drop OLE DB Source from toolbox to data flow region. Double click on OLE DB source in the data flow region will open the connection manager settings
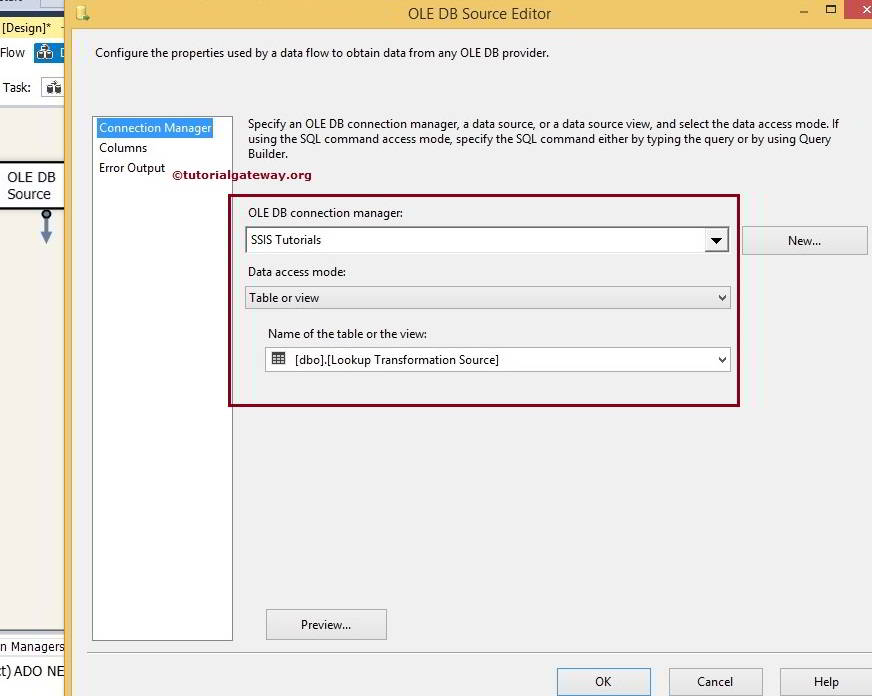
From the above screenshot you can observe that, We selected [SSIS Tutorials] Database as source database and [Lookup Transformation Source] as source table
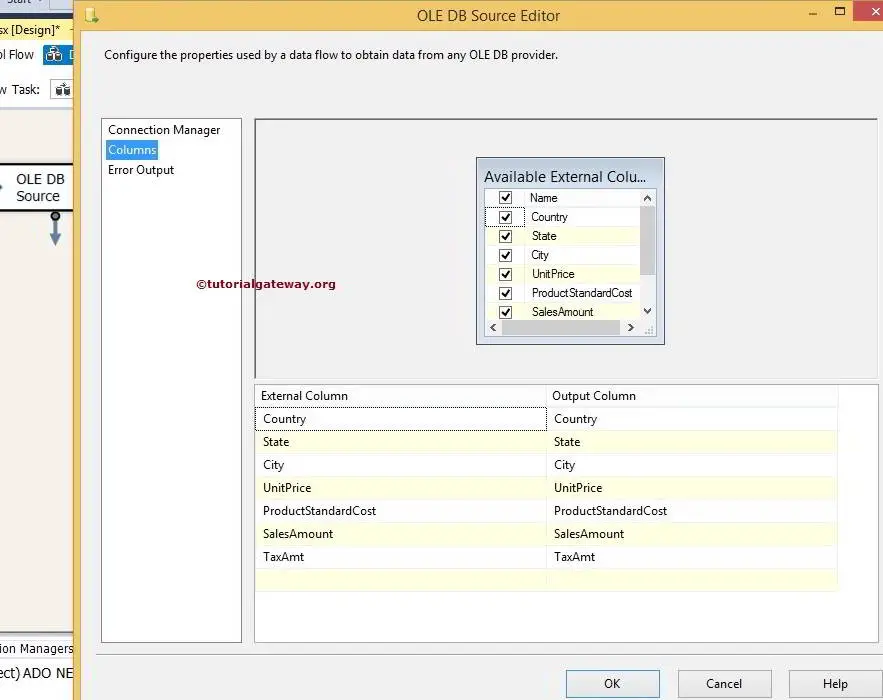
STEP 3: Click on columns tab to verify the columns. In this tab we can uncheck the unwanted columns also.
Click ok and Drag the Lookup Transformation from toolbox to the Data Flow tab.

STEP 4: Double click on the Lookup Transformation will open the Lookup Transformation Editor to configure the lookup table (reference table).
In the General Tab, under “Specify how to handle rows with no matching entries”. Change the default Fail Component to Redirect rows to no match Output option. By changing this option, Unmatched rows will be redirected to No match output otherwise, Package will Fail.
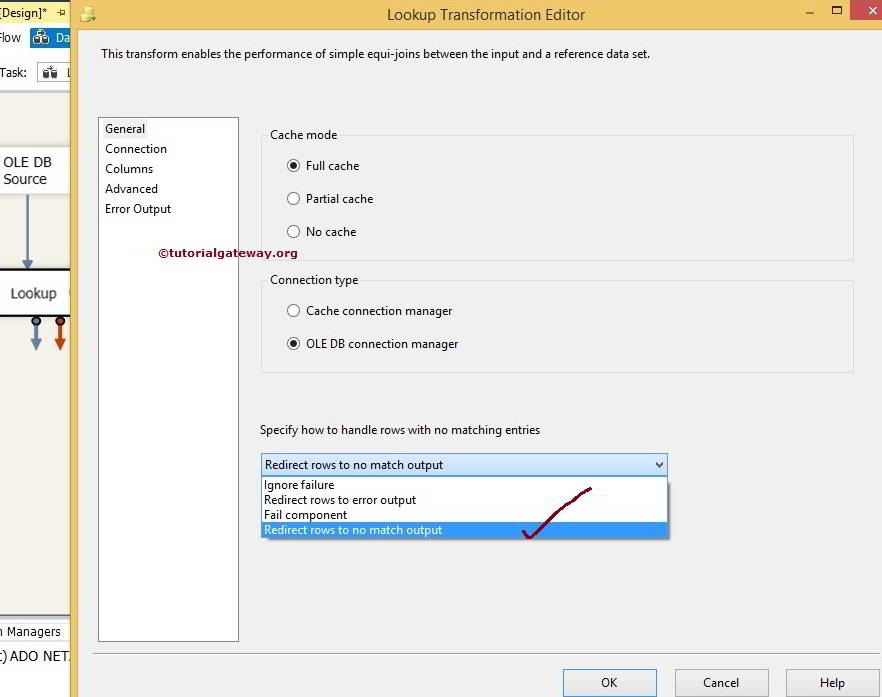
Under the connection type section we selected the OLE DB Connection manager because we are using SQL Server table as reference table. If you are using any cache file (.caw) then use Cache Connection Manager. Please refer SSIS Lookup Transformation in Full Cache Modearticle to understand, Howe to perform Lookup operations using Cache File in SSIS
Click on the connection Tab
STEP 5: If you already created the OLE DB connection Manager then select from the list otherwise, Click New button and configure it. Here we selected SSIS Tutorials Database.
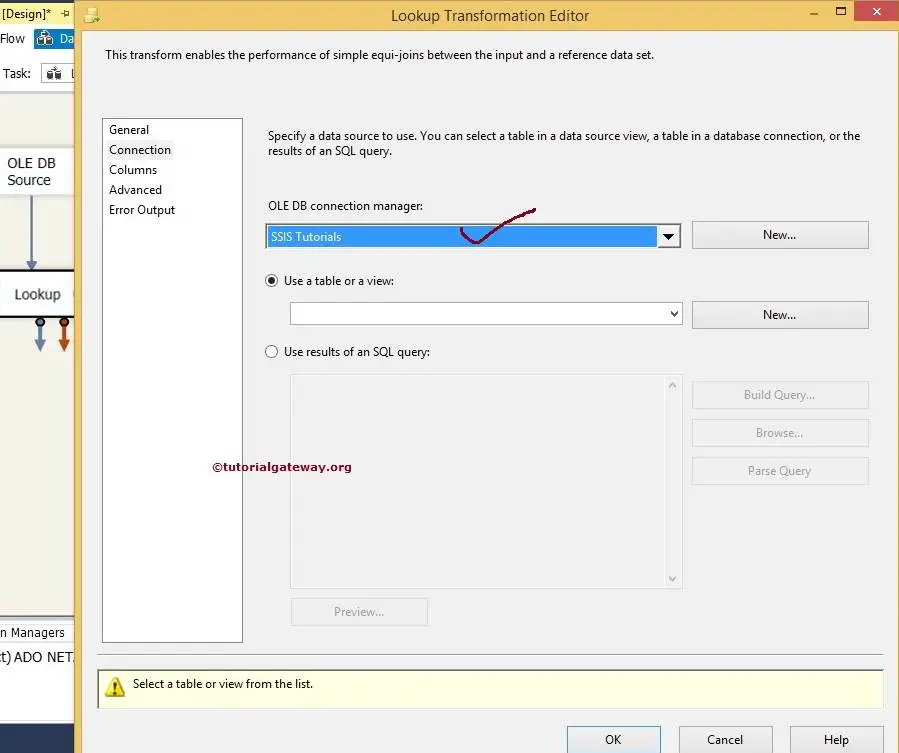
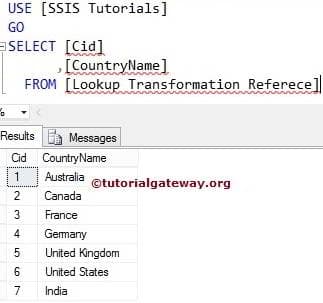
For this example, We are using [Lookup Transformation Reference] table as the lookup table or reference table. Source data will be compared with the data present in this table.

TIP: We should not use whole table as reference table perhaps you should use SQL command to select the required column name you want to reference.
STEP 6: Click on the Available Input columns and drag to the available lookup columns to create a join between the 2 data sets.
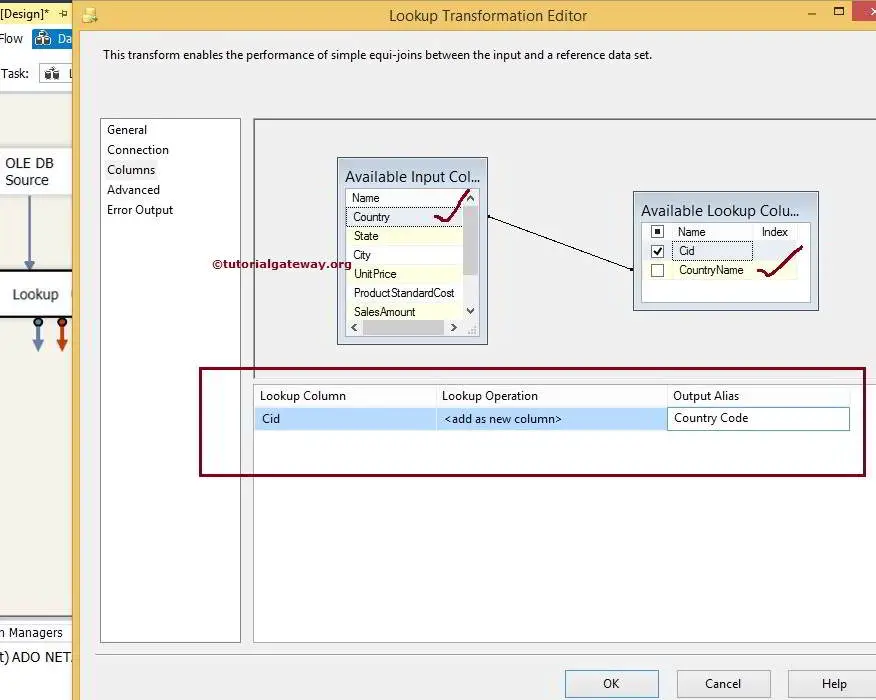
Country column in the source data will check against the [Country Name] column in the lookup table.
- If each row of the Country column in the source data match with any one row of the [Country Name] column in the lookup table then that row will be passed to Matched Output.
- If each row of the Country column in the source data does not match with any one row of the [Country Name] column in the lookup table then that row will be passed to No Match Output.
Sometimes we may have some extra columns in the lookup table which we want to pass to the matched output. In these situations we have check mark that column in Available lookup Columns like we did for Cid column.
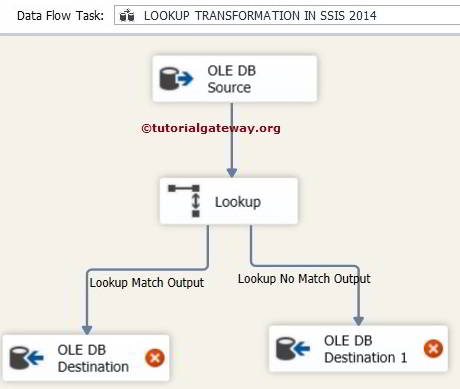
STEP 7: Drag and drop two OLE DB Destinations on to the data flow region and then drag the Output Arrow to this new OLE DB Destination. A pop up window Input Output Selection Window will appear prompting you to select the Input Output type: either Lookup Match Output or Lookup No Match Output. Select Lookup Match Output and click OK.
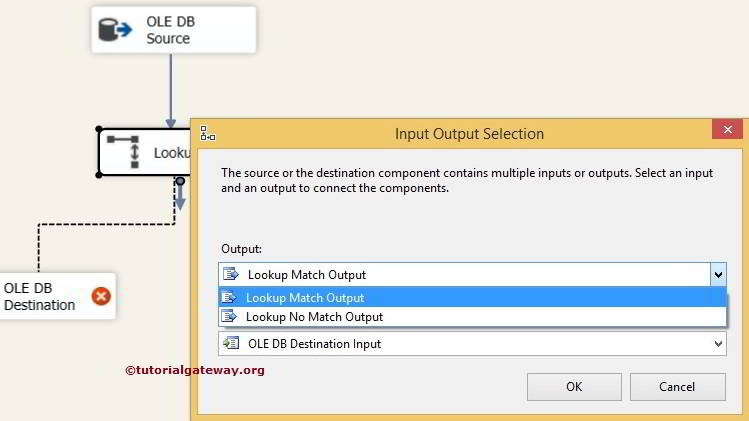
When you drag another Output Arrow to OLE DB Destination 1 then it will automatically allocate Lookup No Match Output to it.
STEP 8: Double click on OLE DB Destination will open the OLE DB Destination Editor. Select the OLE DB Connection manager and select [Lookup Transformation Matched Rows] table tin the [SSIS Tutorials] Database to store the Matched Rows Data.

STEP 9: Click on Mappings tab to check whether the source columns are exactly mapped to the destination columns.

STEP 10: Now Double click on the OLE DB Destination 1 to configure the No match output. Here we are going to select [Lookup Transformation Unmatched Rows] table tin the [SSIS Tutorials] Database to store the Not Matched Row Data.

Repeat STEP 9 and click ok to finish creating Lookup Transformation Package.
Right click on the Lookup Transformation Package in the Solution Explorer and select Execute Package.
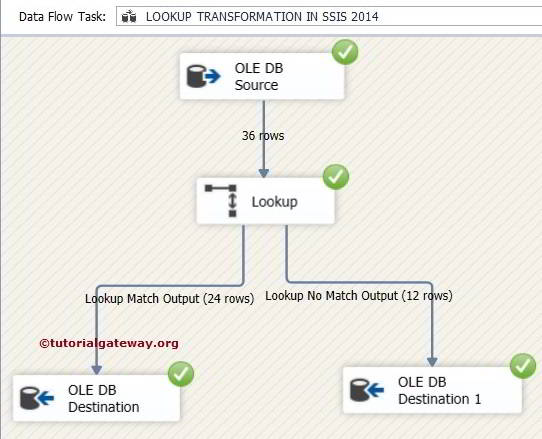
Let’s open the SQL Server Management Studio to view the Lookup Transformation Matched Rows data.

Let’s see the Lookup Transformation Unmatched Rows Data

Thank you for Visiting Our Blog
SSIS Lookup Transformation in Full Cache Mode
In this article we are going to explain, How to perform Lookup Transformation using Cache Connection Manager in SSIS with example. In this example we are going to implement Full Cache Mode in SSIS Lookup Transformation as well.
Please refer Lookup Transformation Using OLE DB Connection Manager in SSIS article to understand, How to Lookup Operations on SQL Server, Oracle, DB2 servers using the OLE DB Connection Manager in SSIS Lookup Transformation.
Let us see the Lookup source table and its data before we start creating the package.
STEP 1: Drag and drop the Data Flow Task from toolbox to control flow region and rename it as Lookup Transformation in Full Cache Mode.

Double click on it and it will open the data flow tab.
STEP 2: Drag and drop OLE DB Source from toolbox to data flow region. Double click on OLE DB source in the data flow region will open the connection manager

From the above screenshot you can observe that, We selected [Lookup Transformation Source] table present in the [SSIS Tutorials] Database
STEP 3: Click on columns tab to verify the columns. In this tab we can uncheck the unwanted columns also.

STEP 4: Add a Lookup Transformation to the Data Flow tab. Right click on Lookup Transformation to configure it.
In the General Tab, Under the connection type section change the connection type from OLE DB connection manager to Cache Connection Manager because we are using cache file (.caw).
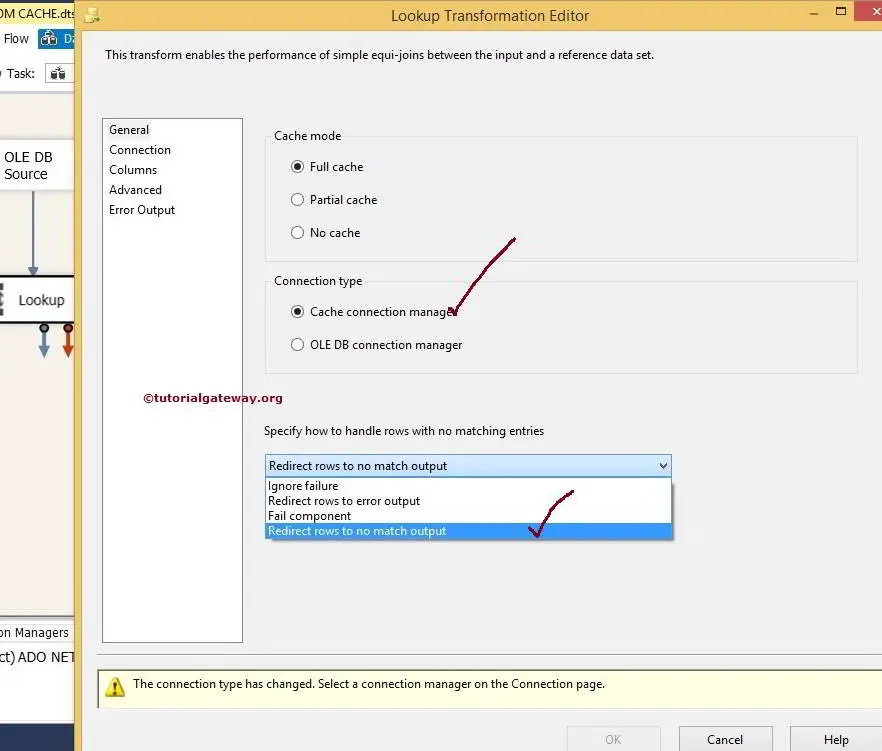
Under “Specify how to handle rows with no matching entries”. Change the default Fail Component to Redirect rows to no match Output option. By changing this option, Unmatched rows will be redirected to No match output otherwise, Package will Fail.
STEP 5: Click on the connection tab to configure the Cache Connection Manager. Click on the new button to select the cache file in the local file system.

By clicking on the New button will open Cache Connection Manager Editor and then click on the Browse button to browse the local hard drive.
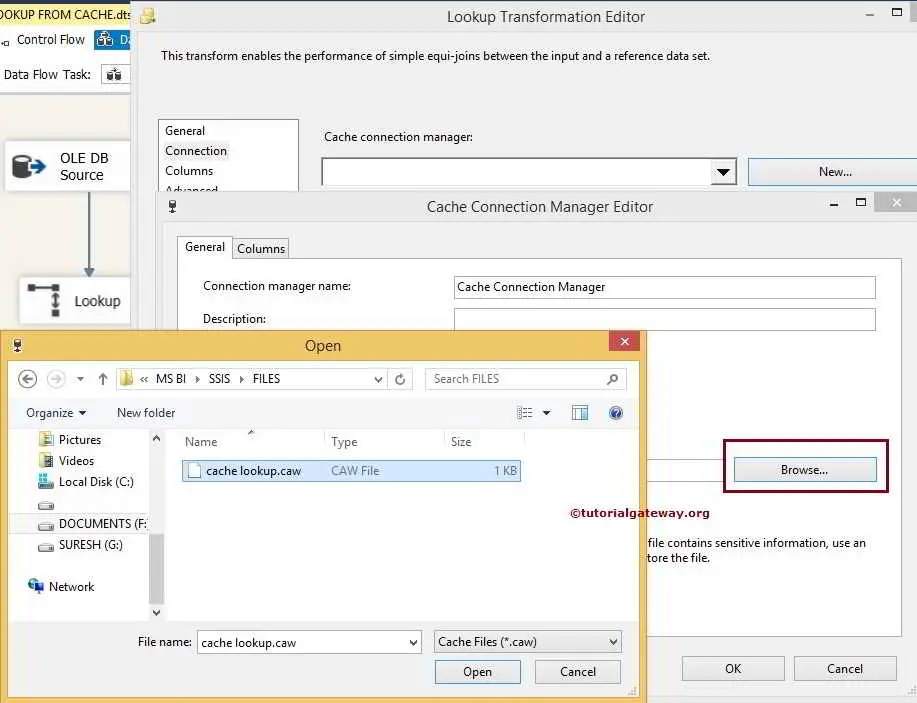
Here we selected the cache lookup.caw file which we created in Cache Transformation in SSIS article from file system.
Click Columns Tab in Cache Connection Manger Editor
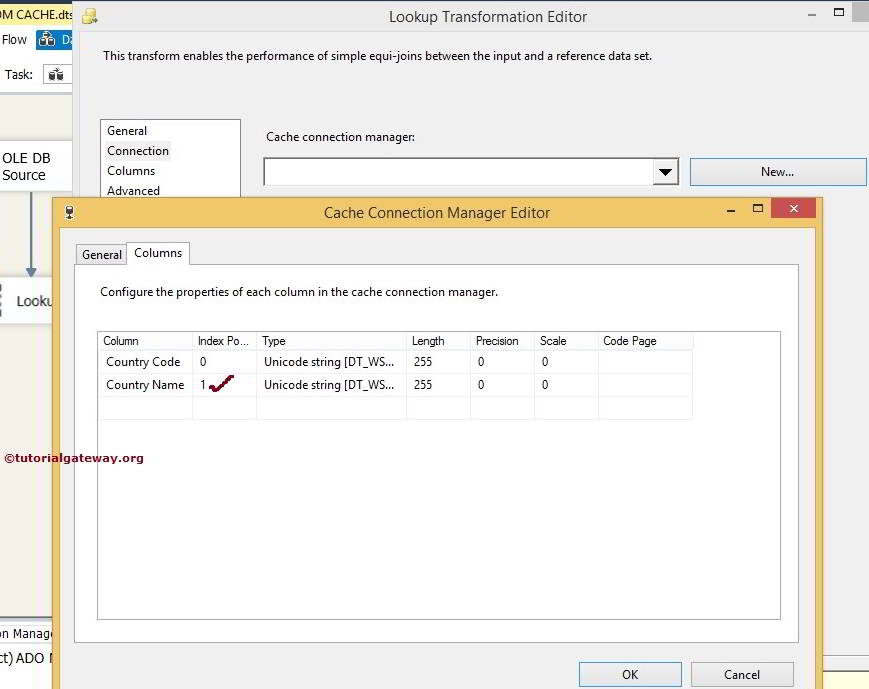
Check the index position of the lookup column (Here it is Country Name). If it is 0 then change it to 1.
Click ok to finish configuring the Cache Connection Manger. Now click on the Column Tab in lookup Transformation Editor
STEP 6: Click on the Available Input columns and drag the source column to the available lookup columns to create a join between the 2 data sets.

From the above you can observe that, Country column in the source data will check against the [Country Name] column in the lookup table.
- If each row of the Country column in the source data match with any one row of the [Country Name] column in the lookup table then that row will be passed to Matched Output.
- If each row of the Country column in the source data does not match with any one row of the [Country Name] column in the lookup table then that row will be passed to No Match Output.
Sometimes we may have some extra columns in the lookup table which we want to pass to the matched output. In these situations we have check mark that column in Available lookup Columns like we did for Country Code column.
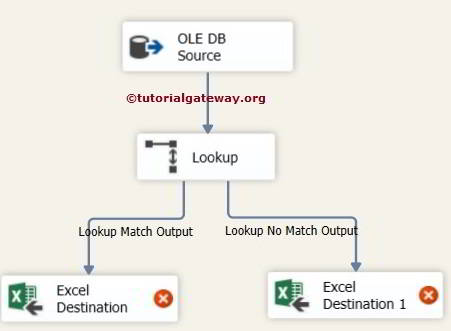
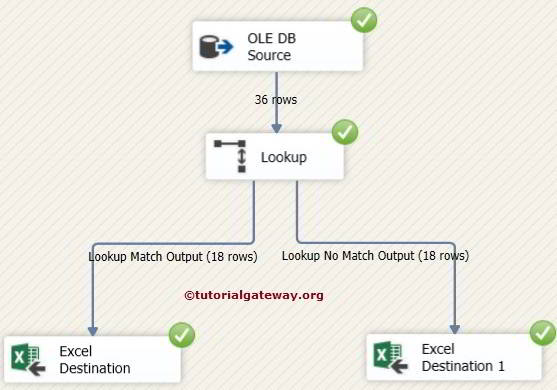
STEP 7: Drag two Excel Destinations on to the Data Flow tab and then drag the Lookup Transformation Output Arrow to one of the Excel Destination.A pop up window Input Output Selection Window will appear prompting you to select the Input Output type: either Lookup Match Output or Lookup No Match Output.
Select Lookup Match Output and click OK.
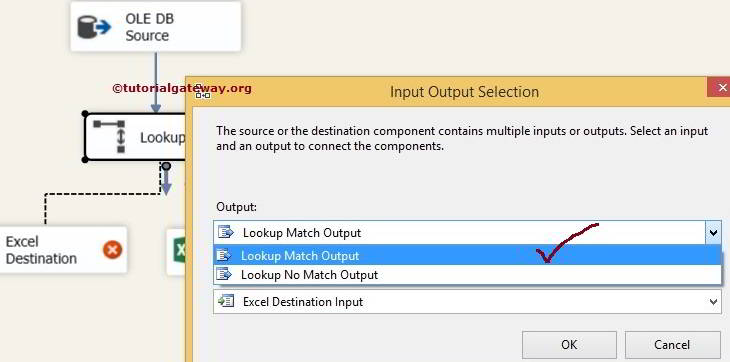
When you drag another Output Arrow to Excel Destination 1 then it will automatically allocate Lookup No Match Output to it.
STEP 8: Double click on the Excel Destination will open Excel Destination Editor. Click on the new button beside the Excel Connection manager to configure the Excel Connection Manager.
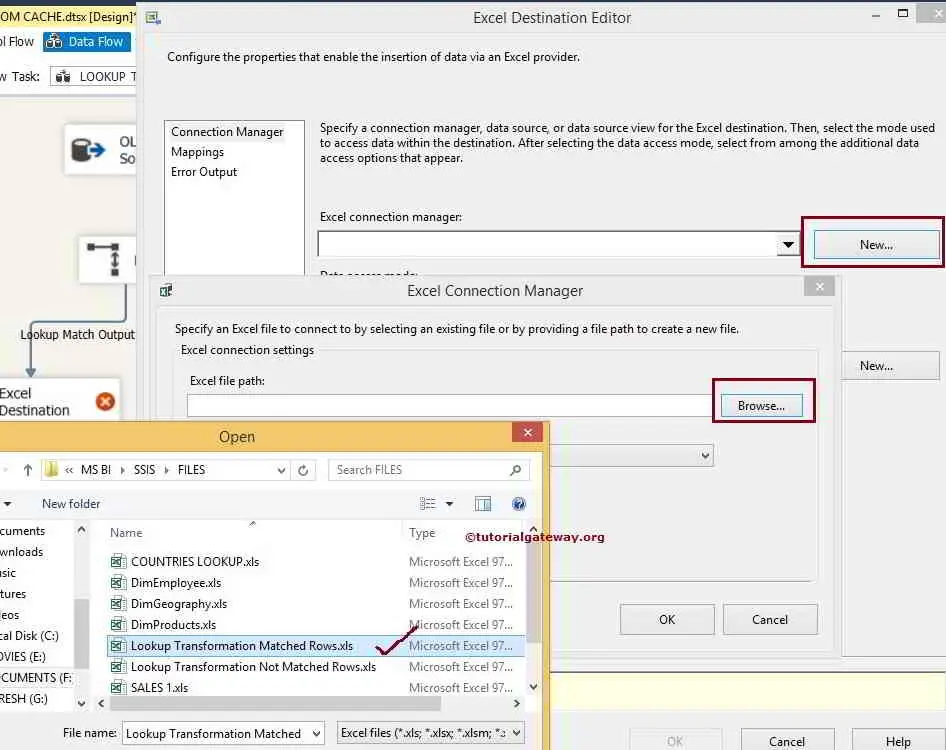
From the above screenshot you can observe that we are browsing the Lookup Transformation Matched Rows.xls file located in our local hard drive as our destination file.

Now configure the table or worksheet if you already created in excel file or click on new button to configure here.

Here we selected the Matched Rows as excel table
STEP 9: Click on Mappings tab to check whether the source columns are exactly mapped to the destination columns.

STEP 10: Now Double click on the Excel Destination 1 to configure the No match output. Here we are going to select the Lookup Transformation Not Matched Rows.xls file located in our local hard drive as our destination file to store the Not Matched Row Data.

Now configure the table if you already created in excel file or click on new button to configure here.

Here we selected the Unmatched Rows table as our destination excel table.
STEP 11: Click on Mappings tab to check whether the source columns are exactly mapped to the destination columns. If they are not already mapped then drag the available Input columns to the Available Destination columns to join.

Right click on the Lookup Transformation Package in the Solution Explorer and select Execute Package.
Open the Excel files after the process completes to view the matched data and the unmatched data. First, Let us open the Lookup Transformation Matched Rows.xls File to see the Matched Rows.

From the above screenshot you can observe that, Country Code column is coming from the lookup table in cache.
Let us open the Lookup Transformation Not Matched Rows.xls File to see the Unmatched Rows.

Thank you for Visiting Our Blog
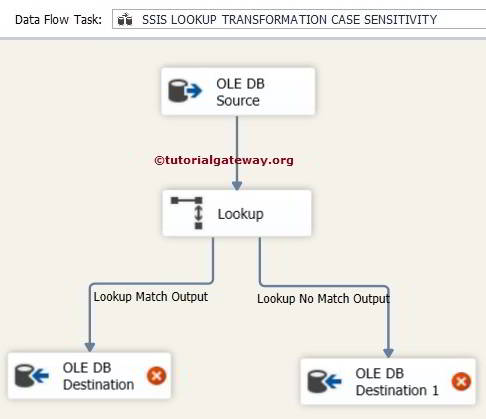
SSIS Lookup Transformation Case Sensitivity
In this article we are going to explain you, the Case Sensitivity problems occur while working with SSIS Lookup Transformation with example. In this example we are going to use OLE DB Connection to connect with SQL Server 2014.
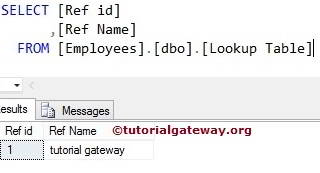
Let us see the Lookup table and its data before we start creating the package.
Now let’s see the source data as well.
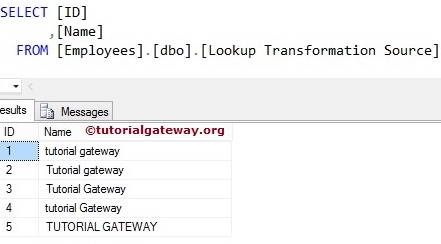
If you observe the lookup and source table, Data is same but they differ in Case.
Configuring Lookup Transformation
STEP 1: Drag and drop the Data Flow Task from toolbox to control flow region and rename it as SSIS Lookup Transformation Case Sensitivity.
Double click on it and it will open the data flow tab.
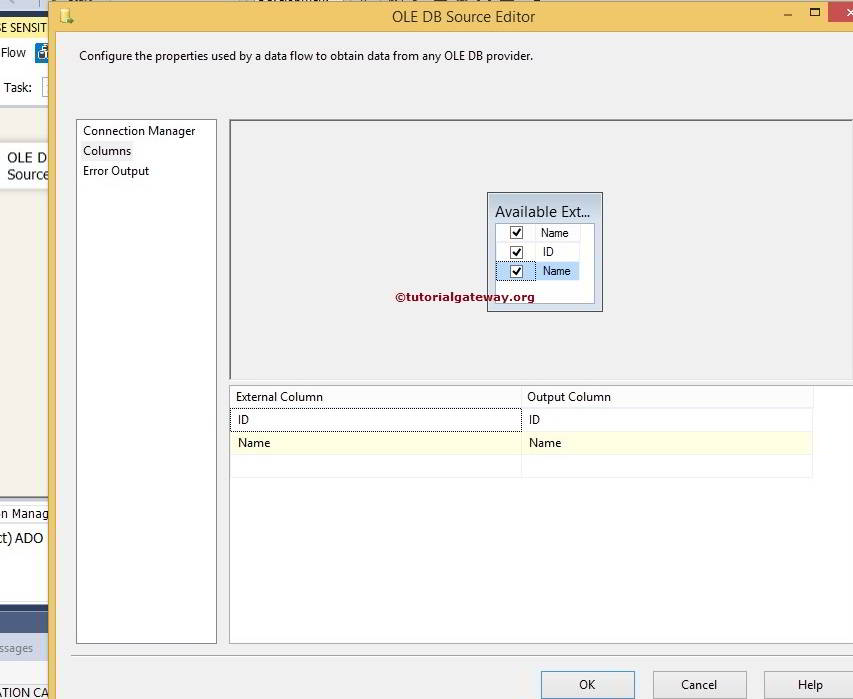
STEP 2: Drag and drop OLE DB Source from toolbox to data flow region. Double click on OLE DB source in the data flow region will open the connection manager settings
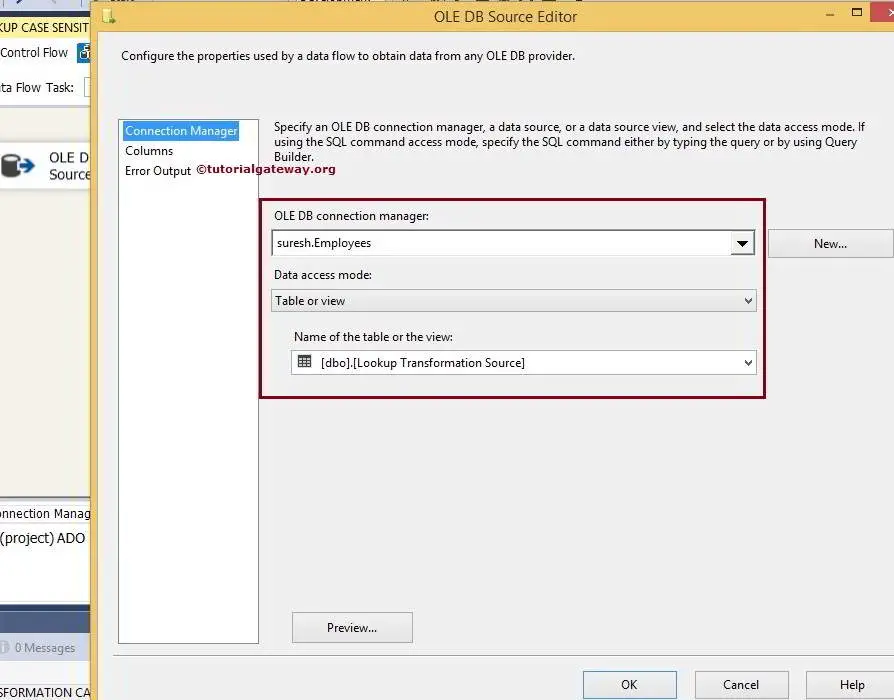
From the above screenshot you can observe that, We selected [Employees] Database as source database and [Lookup Transformation Source] as source table
STEP 3: Click on columns tab to verify the columns. In this tab we can uncheck the unwanted columns also.
Click ok and Drag the Lookup Transformation from toolbox to the Data Flow tab.
STEP 4: Double click on the Lookup Transformation will open the Lookup Transformation Editor to configure the lookup table (reference table).
In the General Tab, under “Specify how to handle rows with no matching entries”. Change the default Fail Component to Redirect rows to no match Output option. By changing this option, Unmatched rows will be redirected to No match output otherwise, Package will Fail.
Under the connection type section we selected the OLE DB Connection manager because we are using SQL Server table as reference table. If you are using any cache file (.caw) then use Cache Connection Manager.
Click on the connection Tab
STEP 5: If you already created the OLE DB connection Manager then select from the list otherwise, Click New button and configure it. Here we selected Employees Database.
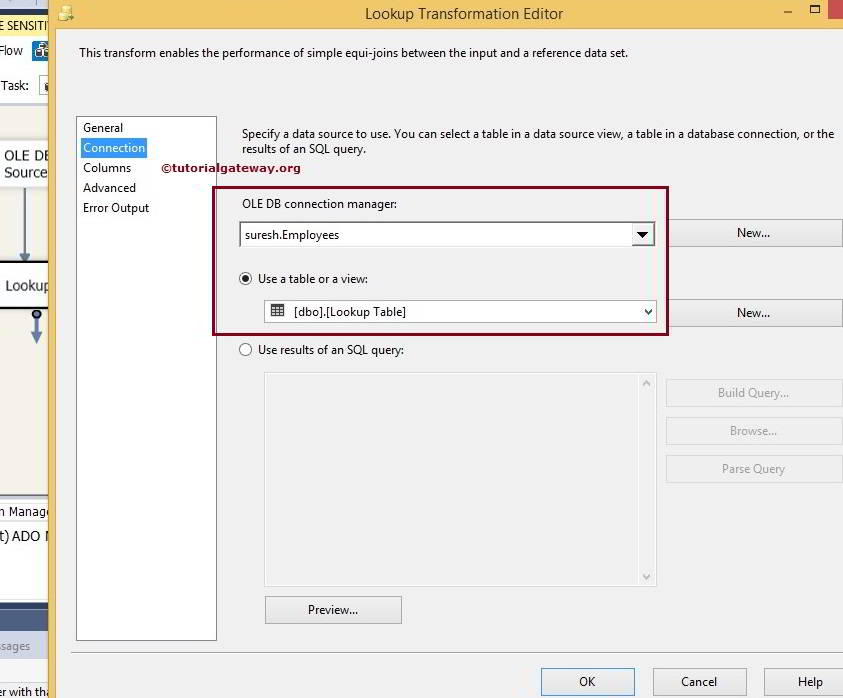
For this example, We are using [Lookup Table] table as the lookup table or reference table. Source data will be compared with the data present in this table.
TIP: We should not use whole table as reference table perhaps you should use SQL command to select the required column name you want to reference.
STEP 6: Click on the Available Input columns and drag to the available lookup columns to create a join between the 2 data sets.

Name column in the source data will check against the [Ref Name] column in the lookup table.
- If each row of the Name column in the source data match with any one row of the [Ref Name] column in the lookup table then that row will be passed to Matched Output.
- If each row of the Name column in the source data does not match with any one row of the [Ref Name] column in the lookup table then that row will be passed to No Match Output.
Sometimes we may have some extra columns in the lookup table which we want to pass to the matched output. In these situations we have to check mark that column in Available lookup Columns.
STEP 7: Drag and drop two OLE DB Destinations on to the data flow region and then drag the Output Arrow to this new OLE DB Destination. A pop up window Input Output Selection Window will appear prompting you to select the Input Output type: either Lookup Match Output or Lookup No Match Output. Select Lookup Match Output and click OK.
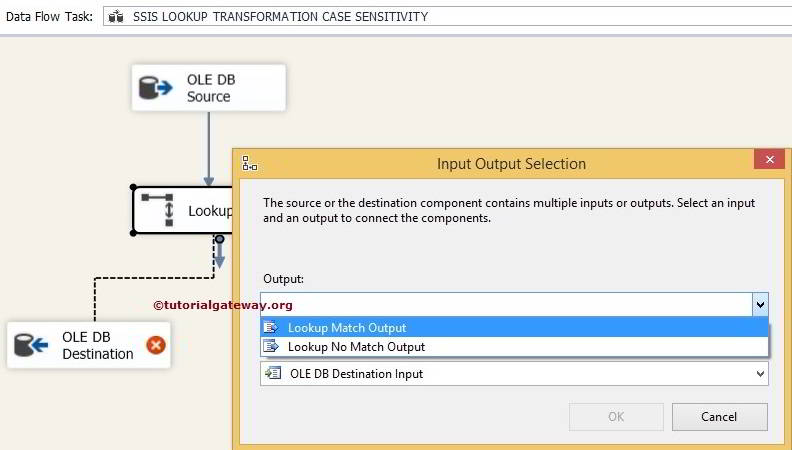
When you drag another Output Arrow to OLE DB Destination 1 then it will automatically allocate Lookup No Match Output to it.
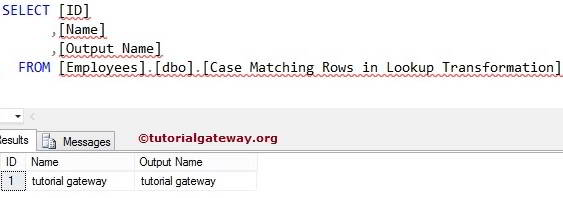
STEP 8: Double click on OLE DB Destination will open the OLE DB Destination Editor. Select the OLE DB Connection manager and select [Case Matching Rows in Lookup Transformation] table in the [Employees] Database to store the Matched Rows Data.
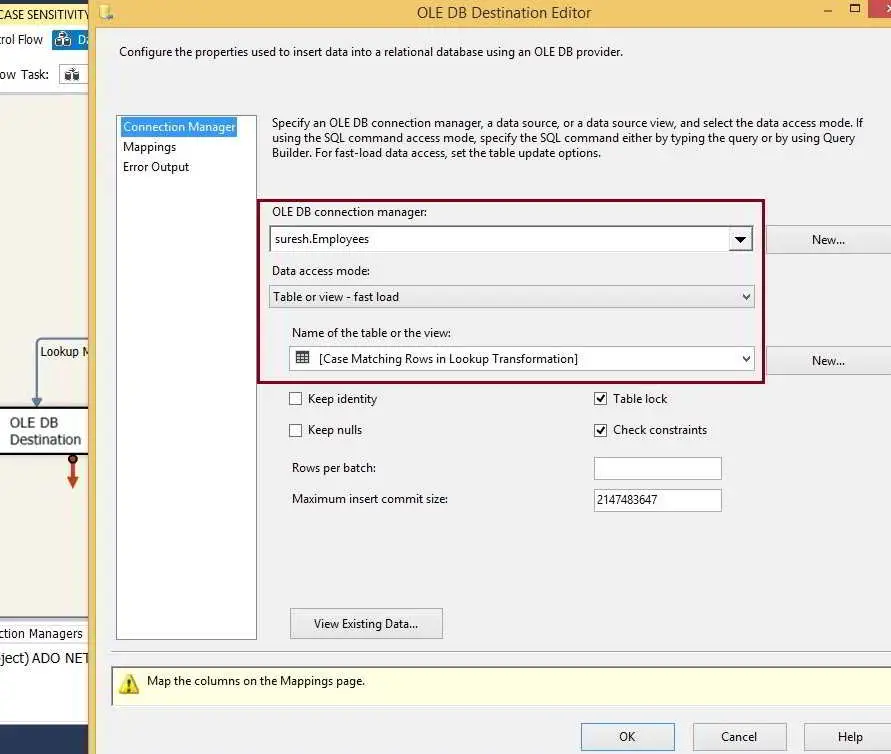
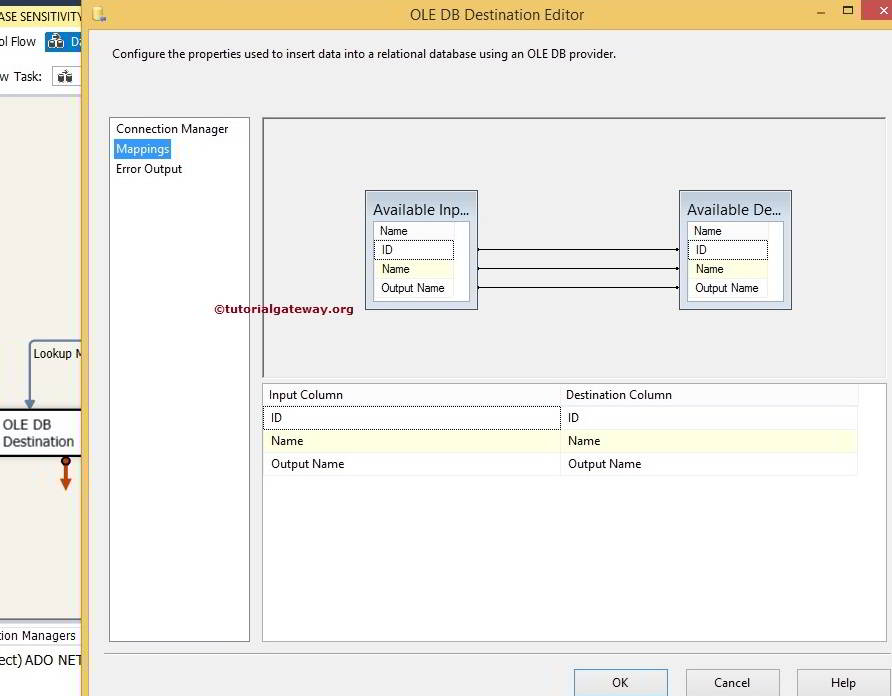
STEP 9: Click on Mappings tab to check whether the source columns are exactly mapped to the destination columns.
STEP 10: Now Double click on the OLE DB Destination 1 to configure the No match output. Here we are going to select [Case Not Matching in Lookup Transformation] table in the [Employees] Database to store the Not Matched Row Data.
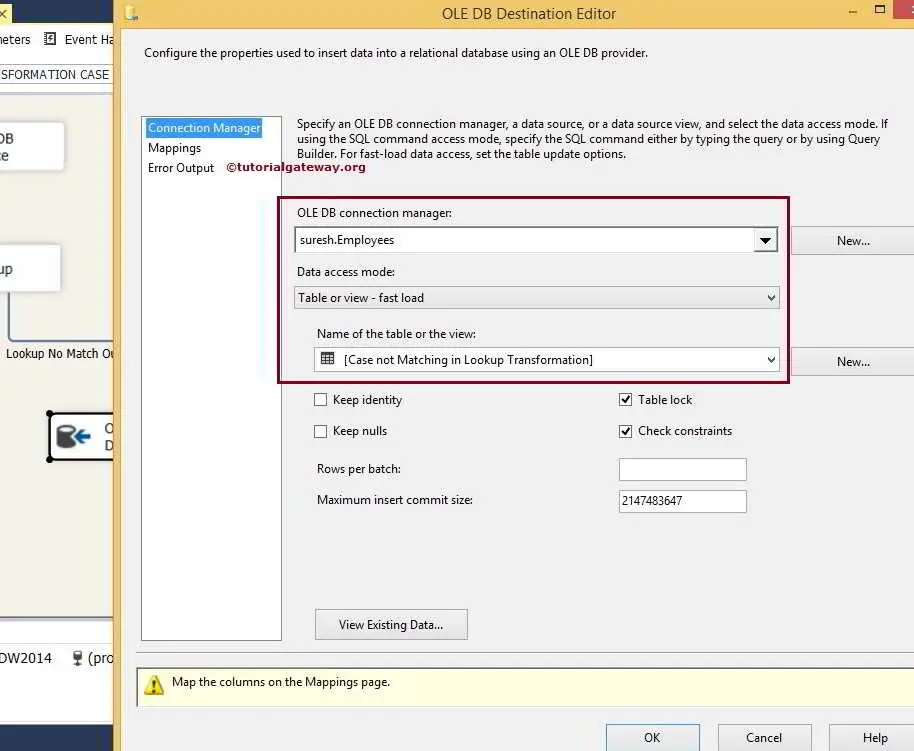
Repeat STEP 9 and click ok to finish creating Lookup Transformation Case Sensitivity Package.
Right click on the SSIS Lookup Transformation Case Sensitivity Package in the Solution Explorer and select Execute Package.
Let’s open the SQL Server Management Studio to view the Matched data. Although, each row in the source data matching with the lookup table, it displayed only one row as match data. To get rid of these situations use Character Map Transformation to convert all the source data into either lowercase or uppercase.
Let’s see the Unmatched Data

If you observe from the above screenshot, all the rows which or not in lower case are treated as non-matching output.
Thank you for Visiting Our Blog
Fuzzy Lookup Transformation in SSIS 2014
Fuzzy Lookup Transformation is used to replace the wrongly typed words with correct words. Unlike Lookup Transformation, Fuzzy Lookup transformation uses fuzzy matching to find one or more close matches in the reference table and replace the source data with reference data.
- Fuzzy Lookup Transformation only use OLE DB Connection Manager to establish connection with the Reference table
- Fuzzy Lookup Transformation uses Reference table to compare wrong word in source data with the correct word in the reference table.
- This transformation allows us to use only DT_WSTR and DT_STR Data type column for Fuzzy Matching.
- Fuzzy Lookup Transformation creates temporary tables and indexes in the SQL Server database at runtime.
In SQL Server Integration Services, Fuzzy Lookup Transformation is very important transformation in real-time. For example, while entering the product information sometimes we may enter the data with spelling mistakes. While doing Lookup Transformation, due to this wrongly typed words we can’t match the source data with lookup table. In these situations Fuzzy Lookup Transformation will look for the nearest matching correct word and replace the wrong value with correct word.
Fuzzy Lookup Transformation in SSIS 2014 Example
In this example we are going to show, how this Fuzzy Lookup transformation works on the source data. Below screenshot is our source data
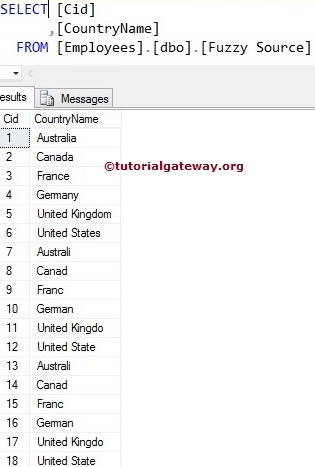
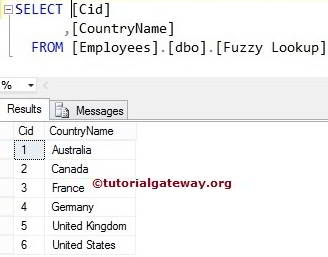
Fuzzy lookup Transformation reference table is
STEP 1: Open BIDS and Drag and drop the data flow task from the toolbox to control flow and rename it as Fuzzy Lookup Transformation in SSIS 2014.
Double click on it and it will open the data flow tab.
STEP 2: Drag and drop OLE DB Source from toolbox to data flow region. Double click on OLE DB source in the data flow region will open the connection manager settings and provides an option to select SQL Table or SQL statement.
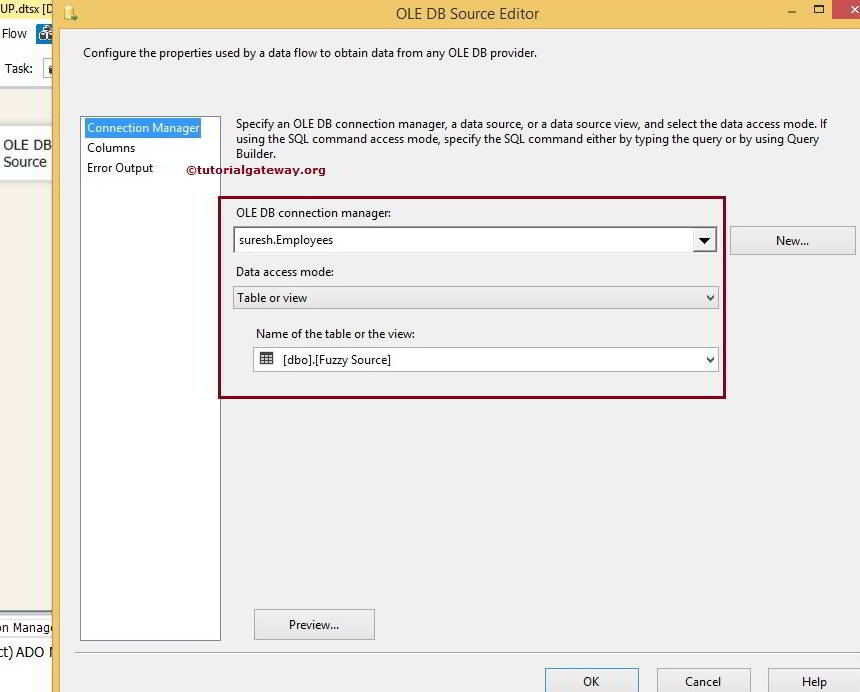
Here we selected the Employees database and previously shown Fuzzy Source table as our OLE DB source database and table.
STEP 3: Click on columns tab to verify the columns. In this tab we can uncheck the unwanted columns also.

Drag and drop the Fuzzy Lookup Transformation from toolbox to data flow region and connect the OLE DB source output arrow to it.
STEP 4: Double click on the Fuzzy Lookup Transformation will open the Fuzzy Lookup Transformation Editor. In the reference table tab, We have to configure the connection manager and also select the fuzzy lookup table. To do so, this tab has multiple options.
- OLE DB Connection Manager: Fuzzy Lookup Transformation only supports OLE DB Connection Manager to establish connection with the Reference table. So create connection using OLE DB Connection Manager.
- Generate new index: Fuzzy Lookup Transformation will generate new index on the reference table to use for the Fuzzy lookup.
- Reference table name: From the drop down list select the reference table from the OLE DB connection
- Store new index: If you want to save the new index on the Fuzzy lookup table then select this option.
- New index name: If you have chosen Store New index option then write the index name here.
- Maintain stored index: If you want the SQL Server to maintain the newly created index using Store New index option then check mark this option.
- Use existing index:If you want to use the existing (already created) index on the fuzzy lookup table then select this option
- Name of an existing index: Please select the existing index from the drop down list

From the above screenshot you can observe that, We configured the OLE DB connection manager to Employees database and then selected the Fuzzy Lookup Table as a reference table.
STEP 5: Check mark the columns if you wish to pass through and Join the source column (Country Name) to the reference table column name (again Country Name in this example). If you want to change the output column then change the alias name like we changed in the below screenshot
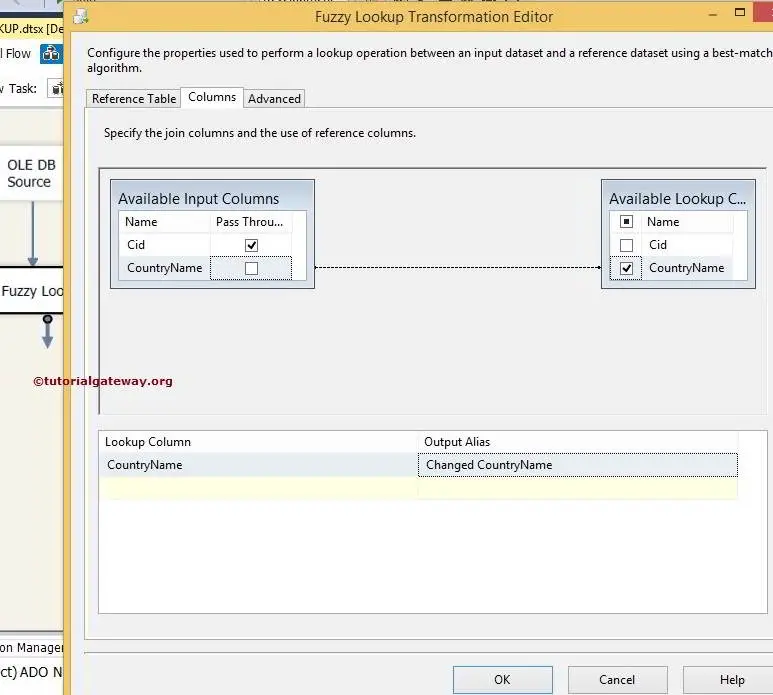
If you required both changed and unchanged country name columns in the destination folder, check mark the pass through option country name column
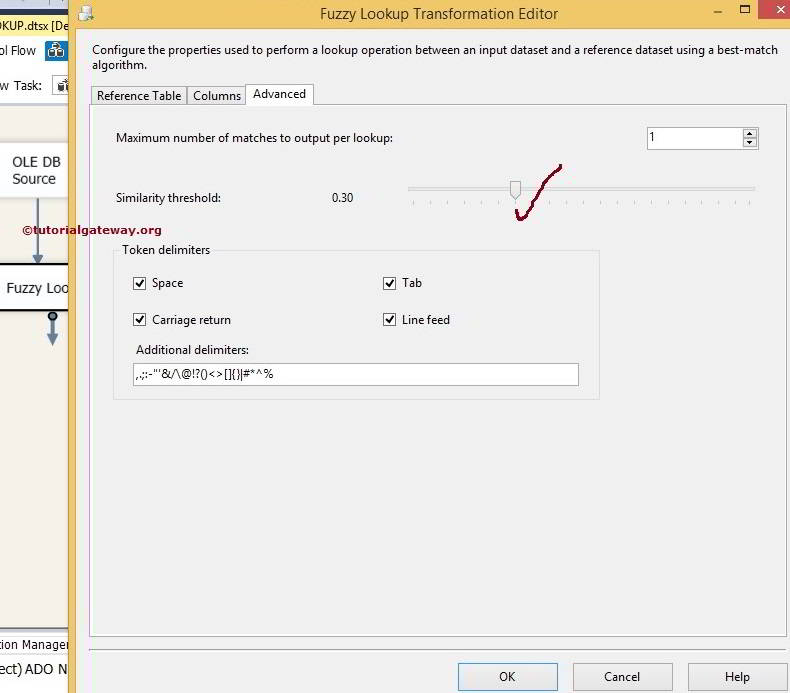
STEP 6: In the advanced tab, we can configure the similarity threshold by dragging the bar pointer to required threshold. Available options in the Advanced tab are as follows:
- Maximum number of matches to output per lookup: Please specify the Maximum number of matches the Fuzzy Lookup Transformation may return. The default is 1.
- Similarity threshold: Similarity threshold ranges between 0 and 1 where 1 is exact match. The Fuzzy Lookup Transformation Editor provides slider to adjust the similarity between 0 and 1. If similarity threshold is closer to 1 then source column should match more accurately to reference data.
Click ok to finish configuring the Fuzzy Lookup Transformation. Now drag and drop the OLE DB destination into the data flow region.
Fuzzy lookup Transformation Editor generated 2 extra columns along with the existing columns
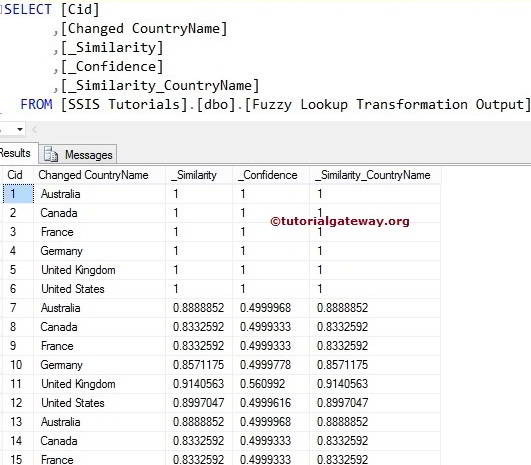
- _Similarity: Similarity score is between 0 and 1. It will show you, How much accurate the source data is matched with the fuzzy lookup data. For instance, 0.80 means source data is 80% matched with destination.
- _Confidence: Confidence Score show you, How much confident Fuzzy lookup Transformation is about the best match in fuzzy lookup table. For instance, 0.50 means Fuzzy lookup Transformation is 50% confident that, Australia is best match for Australi.
STEP 7: Now we have to provide Server, database and table details of the destination. So double click on the OLE DB Destination and provide the required information
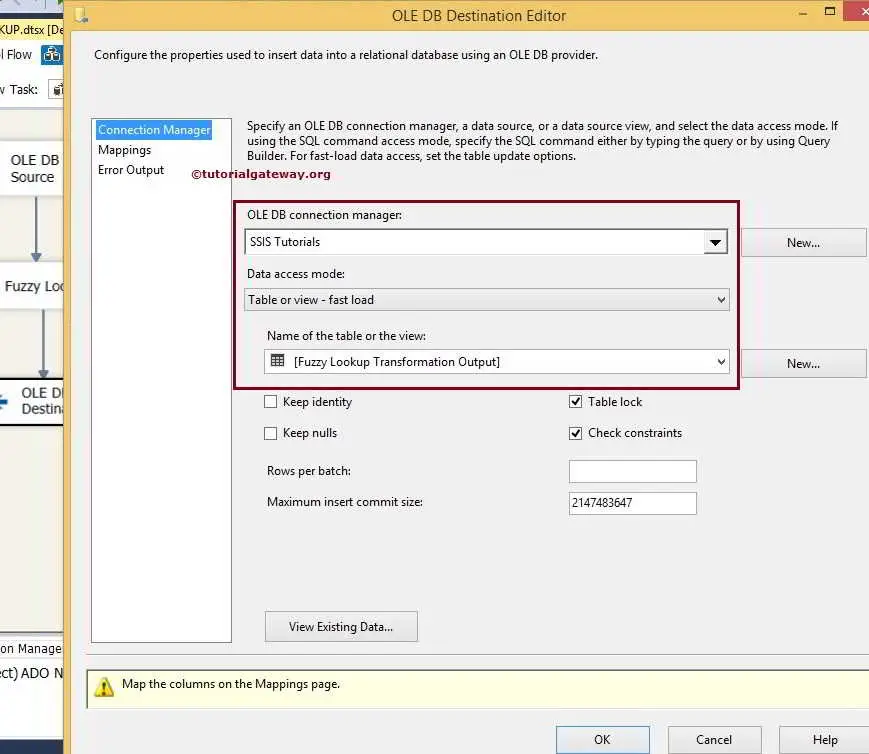
Here we selected the [SSIS Tutorials] database as our destination database and [Fuzzy Lookup Transformation Output] table as destination table.
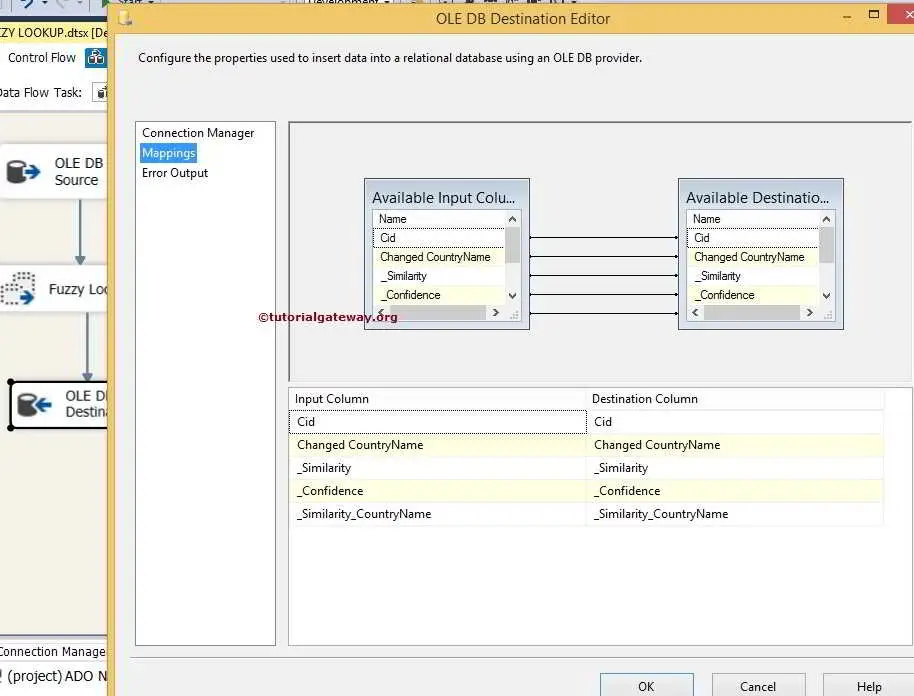
STEP 8: Click on Mappings tab to check whether the source columns are exactly mapped to the destination columns.
Click ok to finish designing the Fuzzy Lookup package. Let us run the package

Let’s open the SQL Server Management Studio and select the [Fuzzy Lookup Transformation Output] to check the results
Thank you for Visiting Our Blog