If a SQL Server Reporting Services report has many columns with text descriptions in a horizontal direction then those headings will need significant space in the report. There are situations where report data will not fit in a single page and the users will have to scroll horizontally to see the data. Unfortunately, this is very irritating and users may ask you to modify the report in such a way that report data can fit in a single page. How can we modify the report and what approach you should follow in this case?
Proper orientation of a Textbox saves a lot of space in a report layout; if a report has 10 columns with text descriptions in a horizontal direction then it will take more space in the report as compared to the same report having those columns in a vertical direction.
Problem
If a SQL Server Reporting Services report has many columns with text descriptions in a horizontal direction then those headings will need significant space in the report. There are situations where report data will not fit in a single page and the users will have to scroll horizontally to see the data. Unfortunately, this is very irritating and users may ask you to modify the report in such a way that report data can fit in a single page. How can we modify the report and what approach you should follow in this case?
Solution
Proper orientation of a Textbox saves a lot of space in a report layout; if a report has 10 columns with text descriptions in a horizontal direction then it will take more space in the report as compared to the same report having those columns in a vertical direction.
This tip assumes that you have previous real world work experience building a simple SSRS Report. In this tip I will describes how to set the orientation of Textbox in a report. To demonstrate the solution, I will useAdventureworksDW2008R2 sample database for SQL Server and SQL Server 2012 Reporting Services.
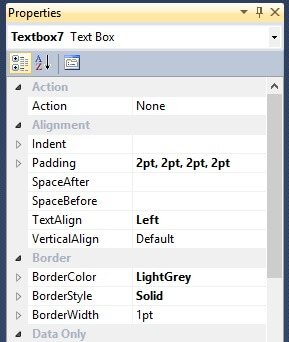
In SQL Server Reporting Services 2008R2 and above, we have out of the box functionality to change the Textbox orientation, but this functionality was not available in previous version of SSRS (2005 and 2008). When we change the Textbox orientation we also need to adjust the height and width of the Textbox, so that rotated text can be accommodated. To change the Textbox orientation we are going to use the WritingMode property of the Textbox. A Textbox can be oriented as follows.
- Horizontal - Default text orientation.
- Vertical - Rotate the text from top to bottom.
- Rotate270 - Rotate the text from bottom to top.
Step 1: Create a New SQL Server Reporting Services Report
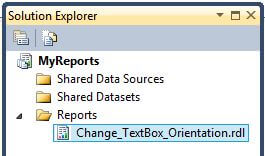
Let's create a sample report for demo purposes. Please change the report name to Change_TextBox_Orientation. You can refer to the below image.
Step 2: Create SSRS Data Source and Dataset
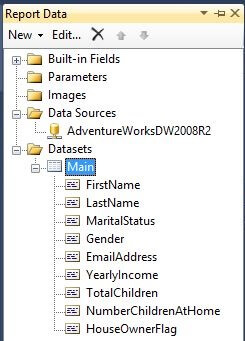
I have already created data source connection to the AdventureworksDW2008R2 sample database and let's create the below dataset for this sample report.
Main Dataset: This dataset will be used for the report body and it returns 9 fields.
SELECT
FirstName, LastName, MaritalStatus, Gender, EmailAddress, YearlyIncome,
TotalChildren, NumberChildrenAtHome, HouseOwnerFlag
FROM  DimCustomer
After creating the Main dataset Report, the Data Pane looks like the below image.
Step 3: Add Tablix to the SSRS Report
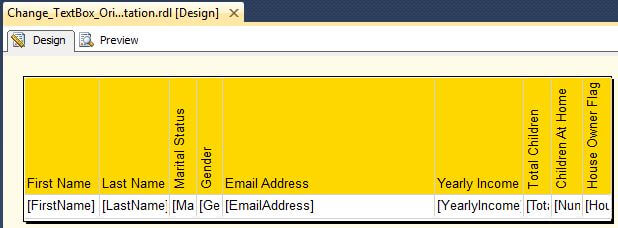
Let's add a Tablix for data viewing purposes. I will pull all 9 data fields from Main dataset into the Tablix. After adding the Tablix, the sample report looks like the below image.

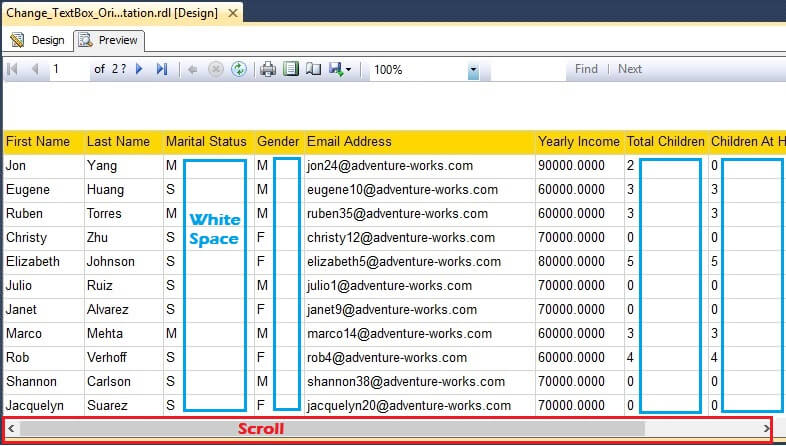
This sample report is showing all columns with horizontal text orientation. As you can see from the below image, users have to scroll horizontally to view the entire report data. Generally, users do not like to have to scroll horizontally in reports. User always want to see the entire report data in a single page.
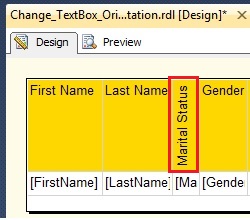
Now our challenge is to display the entire report data in a single page. To achieve this we will change the Textbox orientation, but which Textbox orientation should be changed? Actually we have to look at the report and find out which columns have white space after displaying the data. If you will look below, you will see the Marital Status column has white space after displaying the data. This is because the Marital Status column is only one character (i.e. M and S), but the Marital Status column header Textbox is using more space to display the Marital Status. Due to this, we are wasting space in the report layout. We can save some report space if we rotate the Marital Status header column Textbox either vertically or by 270 degrees. In the below image I have used blue rectangles to highlight all columns which have white space after displaying the data. In the next step we will change the Textbox orientation to reduce the report width.
Step 4: SQL Server Reporting Services Text Box Orientation
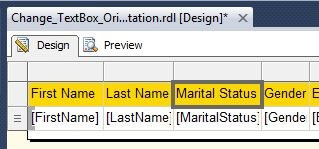
Let's change the Textbox orientation of the column header for the Marital Status. To change the orientation of the Textbox, select the column header for the Marital Status data field as shown below.
Press the F4 key to get the property window.
Go to the WritingMode Property and select the Rotate270 option, you can refer to the below image.
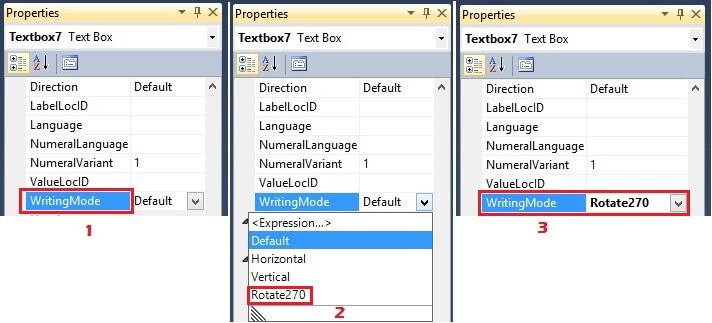
After the above changes, you can see the column header for Marital Status is shown with the text from bottom to top. Please adjust the width and height of the Textbox to accommodate the rotated text.
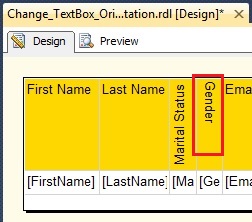
Now we will also see how text looks in a vertical orientation. To change the Textbox orientation to vertical, select theGender column header Textbox and press the F4 key. In the properties window set the WritingMode property toVertical. Please adjust the width and height of the Textbox to accommodate the rotated text. You can see from the below image the column header for Gender is showing text from top to bottom, but it is difficult to read the text in the vertical direction so the Rotate270 orientation is preferable.
Let's change the Textbox orientation for Marital Status, Gender, Total Children, Children At Home and House Owner Flag column header to Rotate270. You can also change the text alignment for the TextAlign property. After the changes my report looks like the below image.
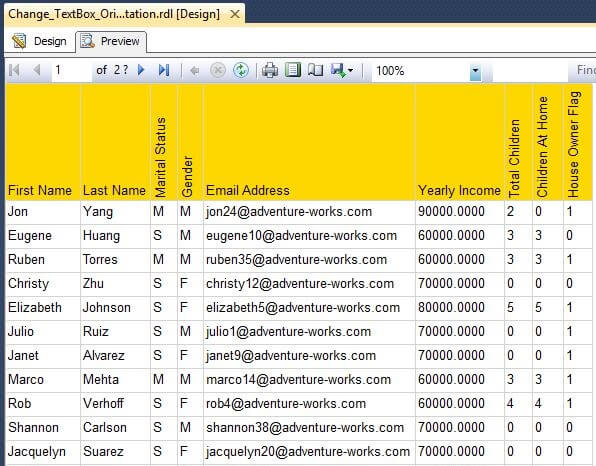
Step 5: Report Preview
We have completed all the necessary changes, now let's preview the report. As you can see from the below image, all 9 columns fit into a single page and the users do not need to scroll the report horizontally.
Conclusion
This approach is useful in the following conditions:
- When a report has numerous columns and due to the number of columns, we need to scroll horizontally while previewing the report.
- When multiple Tablixes are needed in the same report. The textbox orientation can be changed to manage the space in the report layout.
- When you have a requirement to show data for few columns with the vertical or 270 degree orientation in the report.
1. Background
This article describes how to set the orientation of text box in a report using SSRS 2008 R2/2012. A text box can be oriented in below directions:
- Horizontally,
- Vertically (text reading from top to bottom),
- Rotated by 270 degrees (text reading from bottom to top).
Proper orientation of text box saves lot of space in the report layout e.g a report having 10 columns with text description in horizontal direction will take more space in the report as compared to same report having those columns in vertical direction or 270 degree direction. We set the orientation on the text box not the text. We need to adjust the width and height of the text box to accommodate the rotated text. Here we are going to use WritingMode property of the text box to set the text box orientation.
This approach is useful in the following conditions:
- When report is having lot of columns and due to no. of columns, we are getting horizontal scroll while previewing the report.
- When multiple tablixes are using in the same report so to manage the space in report layout, we can change text orientation.
- Many times, we need to show data for few columns in vertical/270 degree in the report.
2. Prerequisite
· We should use SQL Server 2008 R2 or 2012 Server
3. Steps to set the text box orientation in the report:
Below is the sample reseller report showing several columns with horizontal orientation:

I. For setting the orientation of text box, go to the click on the column header’s text box e.g ResellerName and press F4 key to get the property window for ResellerName text box:

II. Go to WritingMode Property and select Rotate 270:

III. Now see the column header ResellerName:

Here we can see the column header showing text from bottom to top:
IV. Now we will see how text looks in vertical orientation. For setting vertical orientation, select Number of Employees column header text box and press F4 to see text box property. Set the WritingMode property of this text box to Vertical:

V. Now see the text box in report layout:

Note: It is difficult to read the text in vertical direction so using 270 degree orientation is preferable.
VI. Set the orientation of all the column header’s text boxes to 270 degree and preview the report.

Here we can see the all the column headers showing text in 270 degree direction (Bottom to Top).
VII. If we want to show 270 degree text in centre align then go to the Text Box and click in front of Text and press enter key 2-3 times to align the text :
Here I have pressed “Enter key” 4 times for this text.

VIII. Now preview the report:
Here we can see that “Reseller Name” showing centre aligned.

4. Conclusion
By using the above steps, we can set the orientation of the text box using SQL Server 2008 R2/ 2012.
----------------------------------------------------End of Document---------------------------------------------------