Showing posts with label SQL Server Integration Services (SSIS). Show all posts

Sunday, October 11, 2015

Execute a SQL Server Reporting Services report from Integration Services Package

You have a requirement where a user does not want to use the SQL Server Reporting Services (SSRS) report subscription service, but wants to execute the SSRS report from a SQL Server Integration Services Package. In this case, whenever the user executes the package, a particular SSRS report will be executed and exported into Excel.  The exported Excel file will be saved in a shared folder. In this tip I will demonstrate how to solve this problem.


Problem
You have a requirement where a user does not want to use the SQL Server Reporting Services (SSRS) report subscription service, but wants to execute the SSRS report from a SQL Server Integration Services Package. In this case, whenever the user executes the package, a particular SSRS report will be executed and exported into Excel.  The exported Excel file will be saved in a shared folder. In this tip I will demonstrate how to solve this problem.
Solution
This tip assumes that you have previous real world work experience building a simple SSRS Report and SSIS package. I will use AdventureworksDW2008R2 sample database and SQL Server 2012 to demonstrate the problem and solution.
I have divided this tip in two parts.

Part 1: I will create a sample SSRS report and deploy it to the Report Server.
Part 2: I will create a SSIS Package which will execute the SSRS report created in Part1.

Part 1: Create SSRS Report and deploy it to Report Server

Step 1: Add Report item in SSRS

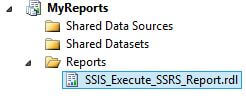
I have added a report item in my report project. My report name is SSIS_Execute_SSRS_REPORT. Refer to the image below.
If you are new to SQL Server Reporting Services, check out this tutorial and these tips.
Adding new SSRS Report

Step 2: Add Data Sources in Reporting Services

I have already created an embedded data source connection to AdventureworksDW2008R2 database. Refer to the image below.
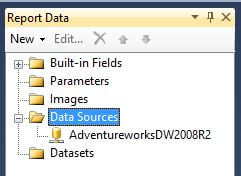
Adding new Data Source

Step 3: Add a Dataset in SSRS

I am creating a new Dataset, this dataset returns two data fields (Productkey and EnglishProductName) and it has one@Productkey Query Parameter. Refer to the image below.
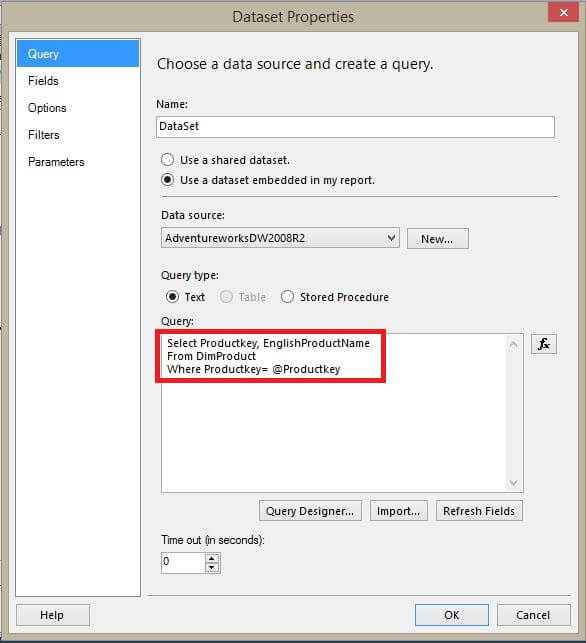
Adding new DataSet

Dataset Query
Select Productkey, EnglishProductName
From DimProduct
Where Productkey= @Productkey
As you can see from the image below, the Dataset has been created with one Report parameter - @Productkey.
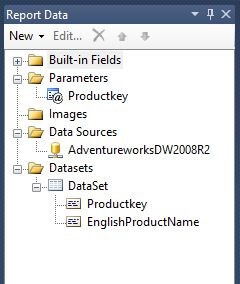
Report Data Pane after adding Data Source and Dataset

Step 4: Add Tablix in SSRS

For data viewing purposes, I am adding a Tablix into my report. This Tablix will show the Productkey and EnglishProductName. Refer to the image below.
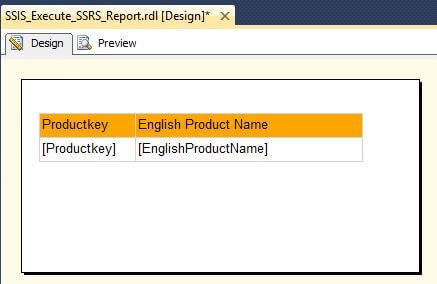
Adding Tablix in Report body

Step 5: Report Deployment

Please follow the steps below to deploy the report on Report Server.
  • Right click on Report Project which contains your report and then click on Properties. Refer to the image below.
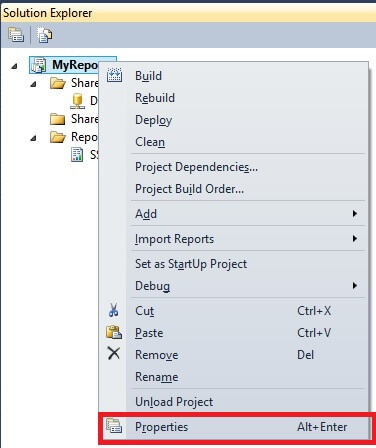
Report Project Property

Once you clicked on Properties; it will open a new Property Pages window. Here you have to enter theTargetReportFolder name and TargetServerURLTargetServerURL is the URL for the Report Server andTargetReportFolder is a folder on the Report Server where the report will be deployed. If the TargetReportFolderfolder is not present on the Report Server then it will be created in the deployment process. As you can see from the image below I have already filled the required information. TargetReportFolder and TargetServerURL may differ in your case, make the changes accordingly and click OK.
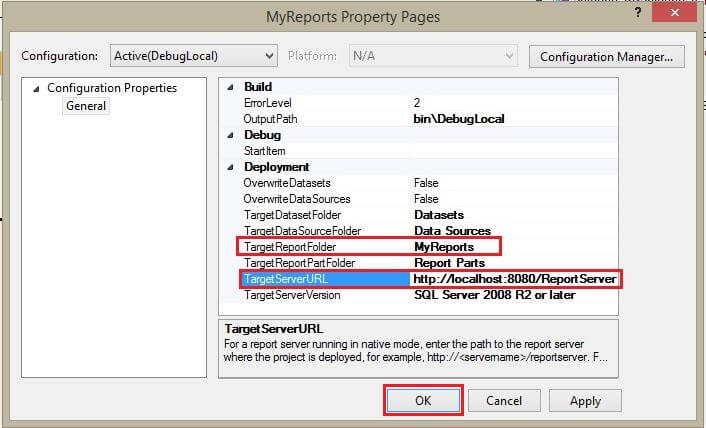
Report Project Page Property Window

  • Right click on the report which you want to deploy on Report Server and click on deploy. It will deploy the report on the Report Server. Refer to the image below.
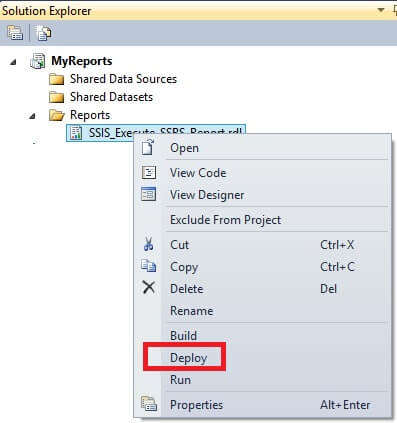
Report Deployment

I am deploying my report; on successful deployment you will get a similar message as shown below.
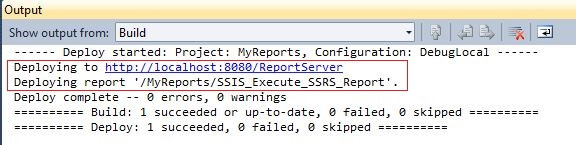
Report Deployment Message
The above message tells that SSIS_Execute_SSRS_REPORT report was deployed to "http://localhost:8080/ReportServer" Report Server under MyReports folder.

Part2: Create SSIS Package to Execute an SSRS Report

In this part of the tip, I will be demonstrate how to create an SSIS Package to execute an SSRS report. Please follow all the steps listed below.

Step 1: Create an SSIS Package

I have already created a new package name as SSRS_Report_Execute. 
If you are new to SQL Server Integration Services, check out this tutorial and these tips.

Step 2: Creates Variables in SSIS

Create two variables with package scope.
  • Folder_Destination - Data Type for this variable is String. Please assign the variable value asC:\SSRS_Report_Execute. This variable holds the folder path where the exported file will be saved. You have to make sure that this folder is present at the defined location, otherwise the SSIS Package will fail.
  • ReportParameter - Data Type for this variable is String. Please assign the variable value as 1. This variable holds the parameter value which needs to be passed into the SSRS report.
I have assigned values for both the variables; refer to the image below.
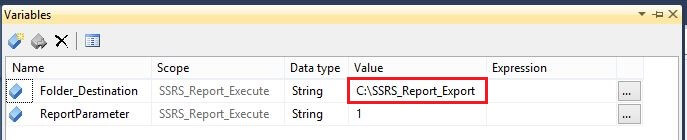
Creating Variables at package scope

Step 3: Create a Windows Folder

Create a folder named SSRS_Report_Execute on the root of the C drive. This folder name and location depends onFolder_Destination variable value. I have assigned the C:\SSRS_Report_Execute value to a Folder_Destinationvariable in the previous step.

Step 4: Drag the SSIS Script Task

Drag the Script Task component from the toolbox into the control flow and then right click on the script task and click on edit.  Refer to the image below.
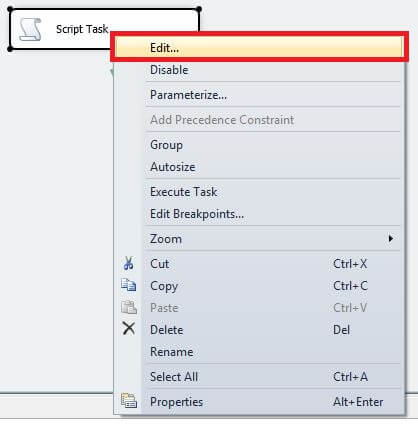
Adding Script task in control flow
Once you click on edit button it will open the Script task editor window. Choose Microsoft Visual Basics 2010 as the Script language and select Folder_Destination and ReportParameter variables as Read only variables. Once the above two selections are done then click on Edit Script.  Refer to the image below.
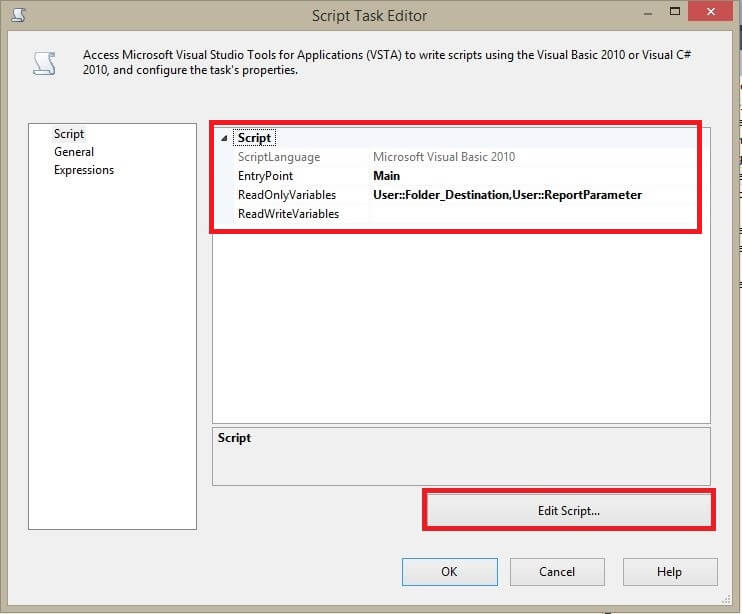
Script Task Editor Window
Once you click on Edit Script task, it will open Script Task editor window. Please replace all auto generated VB code with the below VB Code below and save it.
Script Task VB Code
Imports System
Imports System.Data
Imports System.Math
Imports Microsoft.SqlServer.Dts.Runtime
Imports System.ComponentModel
Imports System.Diagnostics
<Microsoft.SqlServer.Dts.Tasks.ScriptTask.SSISScriptTaskEntryPointAttribute()> _
<System.CLSCompliantAttribute(False)> _
Partial Public Class ScriptMain
    Inherits Microsoft.SqlServer.Dts.Tasks.ScriptTask.VSTARTScriptObjectModelBase
    Enum ScriptResults
        Success = Microsoft.SqlServer.Dts.Runtime.DTSExecResult.Success
        Failure = Microsoft.SqlServer.Dts.Runtime.DTSExecResult.Failure
    End Enum
    Protected Sub SaveFile(ByVal url As String, ByVal localpath As String)
        Dim loRequest As System.Net.HttpWebRequest
        Dim loResponse As System.Net.HttpWebResponse
        Dim loResponseStream As System.IO.Stream
        Dim loFileStream As New System.IO.FileStream(localpath, System.IO.FileMode.Create, System.IO.FileAccess.Write)
        Dim laBytes(256) As Byte
        Dim liCount As Integer = 1
        Try
            loRequest = CType(System.Net.WebRequest.Create(url), System.Net.HttpWebRequest)
            loRequest.Credentials = System.Net.CredentialCache.DefaultCredentials
            loRequest.Timeout = 600000
            loRequest.Method = "GET"
            loResponse = CType(loRequest.GetResponse, System.Net.HttpWebResponse)
            loResponseStream = loResponse.GetResponseStream
            Do While liCount > 0
                liCount = loResponseStream.Read(laBytes, 0, 256)
                loFileStream.Write(laBytes, 0, liCount)
            Loop
            loFileStream.Flush()
            loFileStream.Close()
        Catch ex As Exception
        End Try
    End Sub
    Public Sub Main()
        Dim url, destination As String
        destination = Dts.Variables("Folder_Destination").Value.ToString + "\" + "Report_" + Dts.Variables("ReportParameter").Value.ToString + "_" + Format(Now, "yyyyMMdd") + ".xls"
        url = "http://localhost:8080/ReportServer?/MyReports/SSIS_Execute_SSRS_Report&rs:Command=Render&Productkey=" + Dts.Variables("ReportParameter").Value.ToString + "&rs:Format=EXCEL"
        SaveFile(url, destination)
        Dts.TaskResult = ScriptResults.Success
    End Sub
End Class
Your script task VB code must look like as below image.
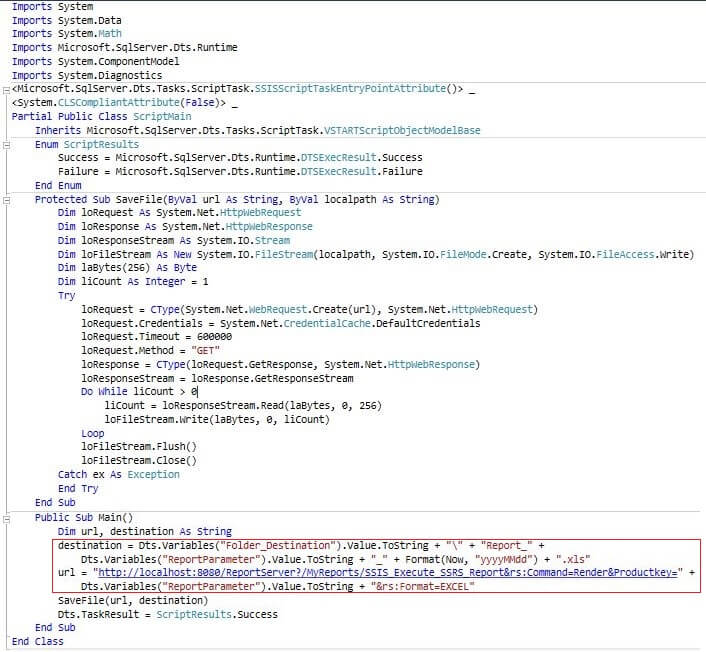
Script Task Script Editor Window
Based on the requirement the user has to modify the URL and Destination variables in the Public Sub Main() function (highlighted in the code with the rectangle box). The URL variable contains the path of the report for the report server and the Destination variable contains the folder path where the file needs to be saved with a dynamic file name.
The URL is a combination of ReportServerurl + TargetReportFolder + ReportName + ReportParameter + ReportRenderingformat.
In my case:
ReportServerurl is http://localhost:8080/ReportServer
TargetReportFolder is MyReports
ReportName is SSIS_Execute_SSRS_Report
ReportParameter is Productkey
ReportRenderingformat is rs:Format=EXCEL
So the URL is "http://localhost:8080/ReportServer?/MyReports/SSIS_Execute_SSRS_Report&rs:Command=Render&Productkey=" + Dts.Variables("ReportParameter").Value.ToString + "&rs:Format=EXCEL"

Step 5: Execute Script Task

Please assign the ReportParameter variable value.  The value assigned in the ReportParameter variable value will be passed into the SSRS report as report parameter value. Let's execute the script task; on a successful execution it will export the file to specified folder location.
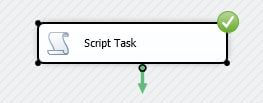
Script Task Execution Window

Friday, August 21, 2015

How to migrate SSIS packages from SQL Server 2005 to 2008

How to migrate SSIS packages from SQL Server 2005 to 2008

In SQL Server 2005 by default SQL Native Client will be installed

1. First Make sure to install SQL Native Client on SQL Server 2008.
2. Using (BI) SSIS Package Upgrade Wizard on SQL Server 2008 to upgrade the SSIS packages.

SQL Server Native client 10.0 will be automatically isntalled when you install sql server.
Once you upgrade the SSIS packages you can easily change to SQL Server Native client 10.0

Errors in SSIS


Tuesday, October 30, 2012

The SSIS Runtime has failed to start the distributed transaction due to error 0x8004D01B

Error: The SSIS Runtime has failed to start the distributed transaction due to error 0x8004D01B "The Transaction Manager is not available.". The DTC transaction failed to start. This could occur because the MSDTC Service is not running.
When you try to run ssis package  you will get this above error only if you are not started Distributed transaction coordinator.

Make sure to start the Distributed Transaction Coordinator via services

Remove Double Quotes in Excel Sheet using SSIS


Remove Double Quotes in Excel Sheet using SSIS transformation is the most common question asked by many of our friends and blog followers. In this article we will show you, How to resolve the issue with live example.
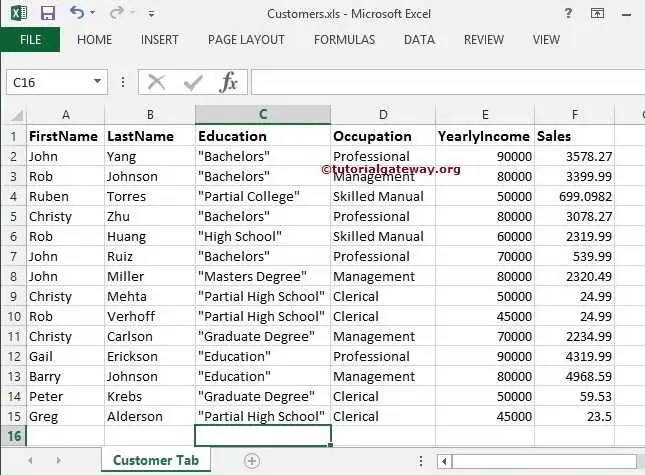
Below screenshot will show you the data present in the Customers.xls Excel file. If you observe closely, every row under the Education column is surrounded by the double quotes (” “). Let us see the steps to resolve it
Remove Double Quotes in Excel Sheet using SSIS 1

Remove Double Quotes in Excel sheet using SSIS 2014 Example

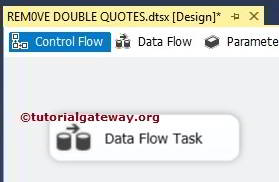
STEP 1: Drag and drop the data flow task from the toolbox to control flow region
Remove Double Quotes in Excel Sheet using SSIS 2
Double click on it and it will open the data flow tab.
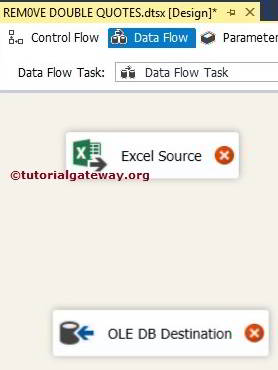
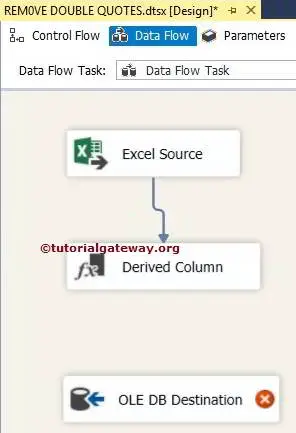
STEP 2: Drag and drop EXCEL Source, OLE DB Destination from toolbox to data flow region.
Remove Double Quotes in Excel Sheet using SSIS 3
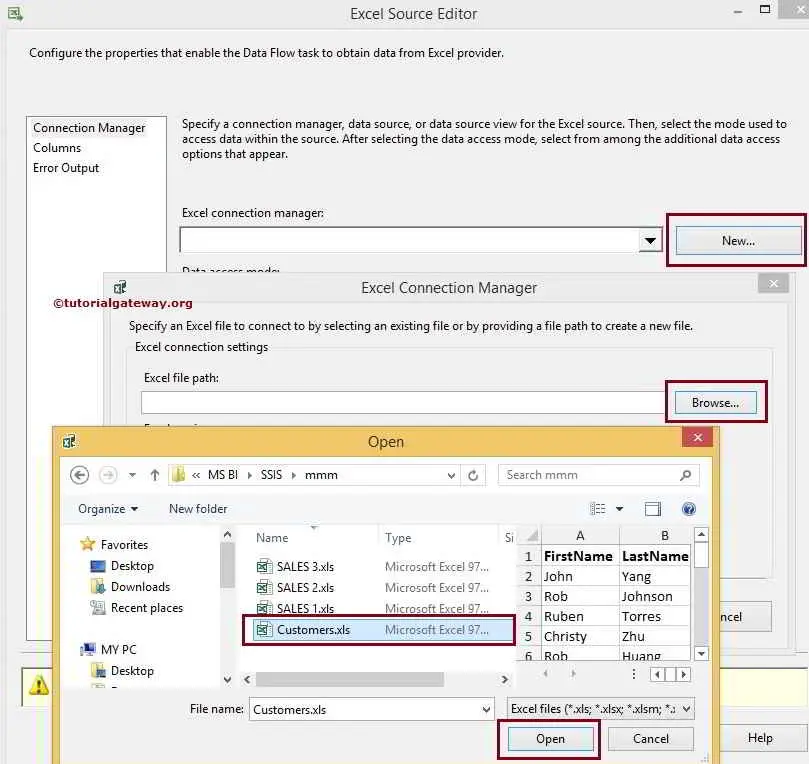
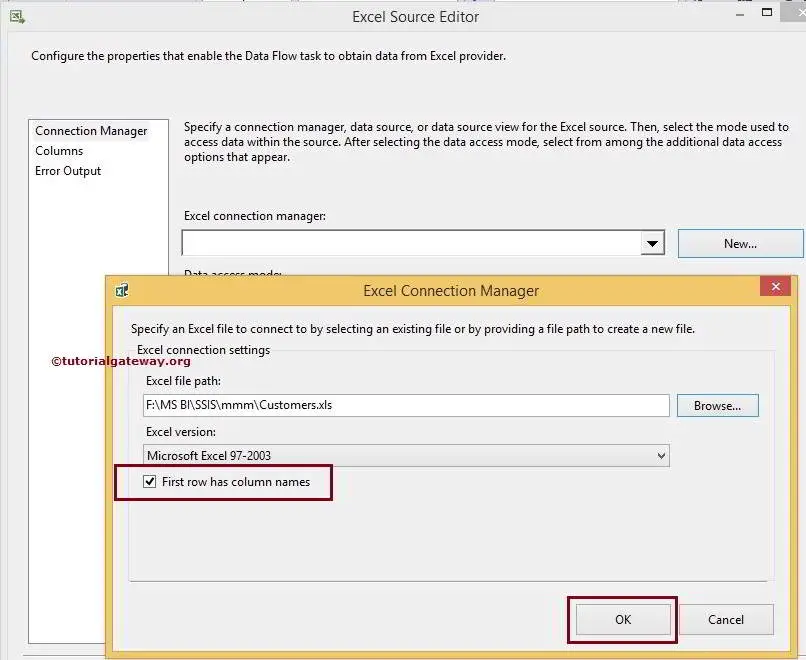
STEP 3: Double click on Excel source in the data flow region will open the connection manager settings and provides option to select the table holding the source data. From the below screenshot you can observe that we are selecting the Customers.xls file present in our local hard drive
Remove Double Quotes in Excel Sheet using SSIS 4
Since our excel sheet holds the column names in the first row, we are check marking theFirst row has column names option. If your excel file is different then don’t select it.
Remove Double Quotes in Excel Sheet using SSIS 5
From the below screenshot you can observe that, we are selecting the Customer tab sheet from Customers.xls excel file.
Remove Double Quotes in Excel Sheet using SSIS 5
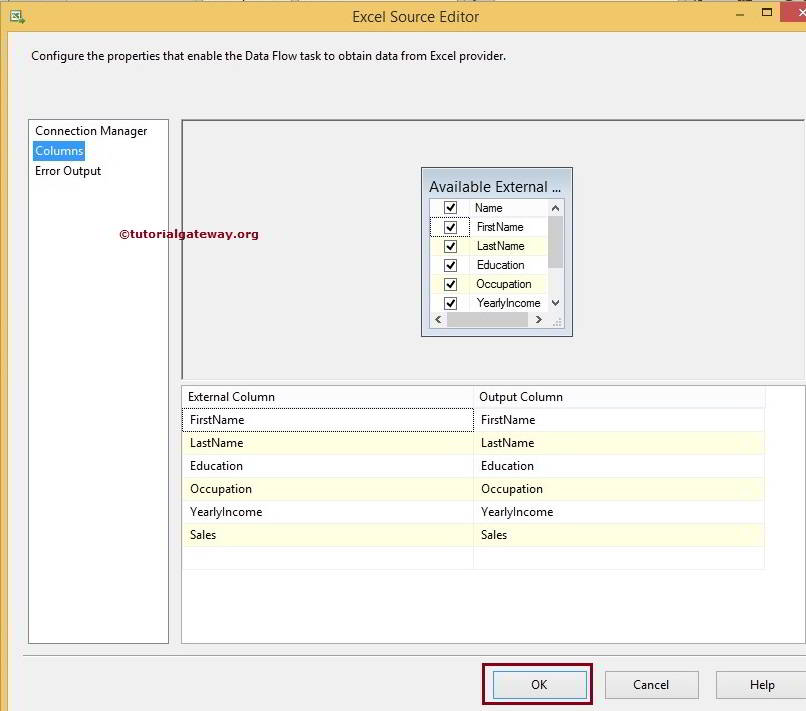
STEP 5: Click on columns tab to verify the columns. In this tab we can uncheck the unwanted columns also.
Remove Double Quotes in Excel Sheet using SSIS 7
TIP: If we don’t want any column then there is no point to add it in to your SQL command.
Click OK and drag and drop the Derived Column Transformation from toolbox to data flow region and connect the excel source output to this.
STEP 5: Double click or right-click on the Derived Column Transformation to edit and convert our source columns data.
Remove Double Quotes in Excel Sheet using SSIS 8
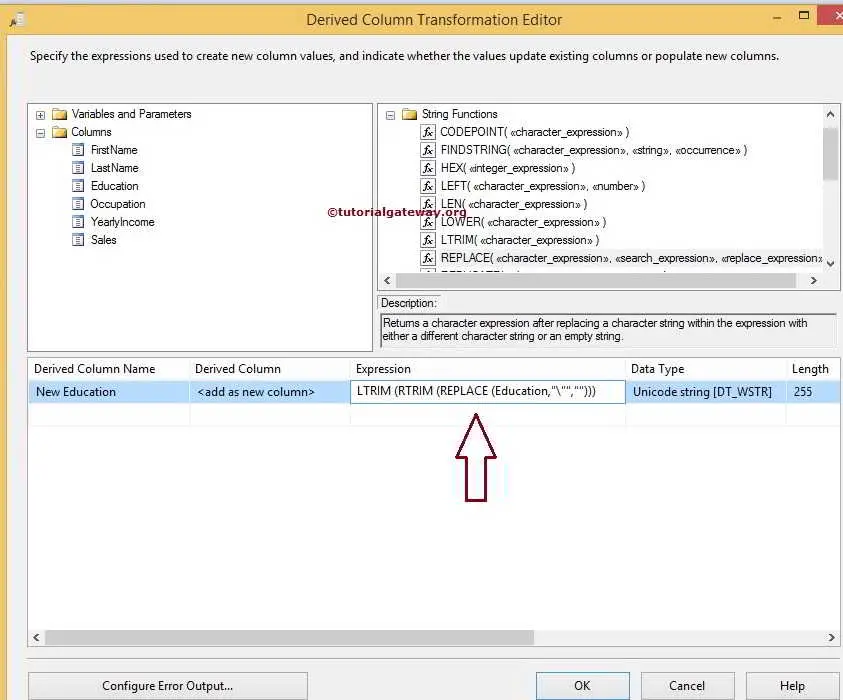
In the Derived Column Transformation editor, we are adding the new column as New Education and added the expression to it.
Remove Double Quotes in Excel Sheet using SSIS 9
If you observe the Expression code, We used the LTRIM and RTRIM to remove the extra spaces and REPLACE function to replace the double quotes.
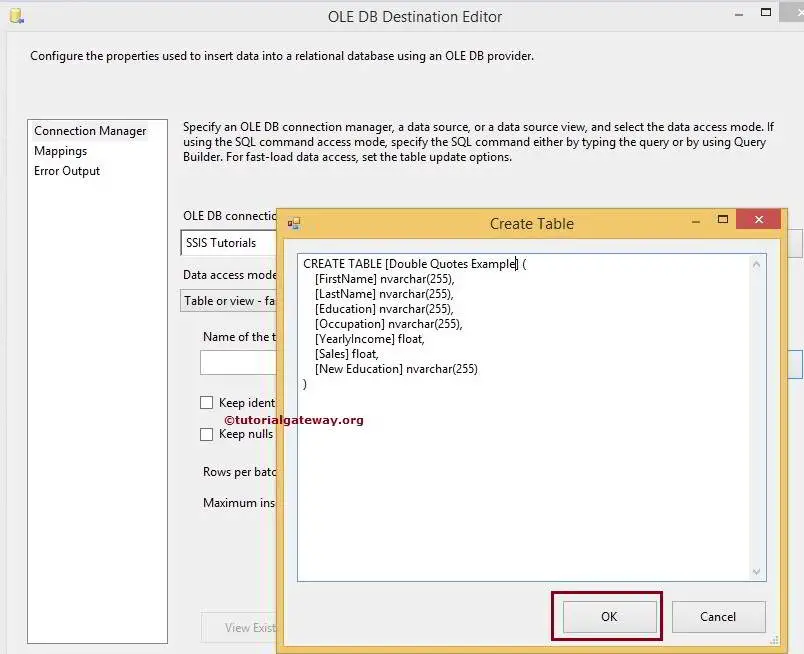
STEP 7: Now we have to provide Server, database and table details of the destination. So double-click on the OLE DB Destination and provide the required information.
Here, we are creating new table
Remove Double Quotes in Excel Sheet using SSIS 10
NOTE: It is always necessary to convert data types while transfer from Excel to SQL server database. Here, we are creating table with NVARCHAR data types but in real-time, scenarios will be different.
Remove Double Quotes in Excel Sheet using SSIS 11
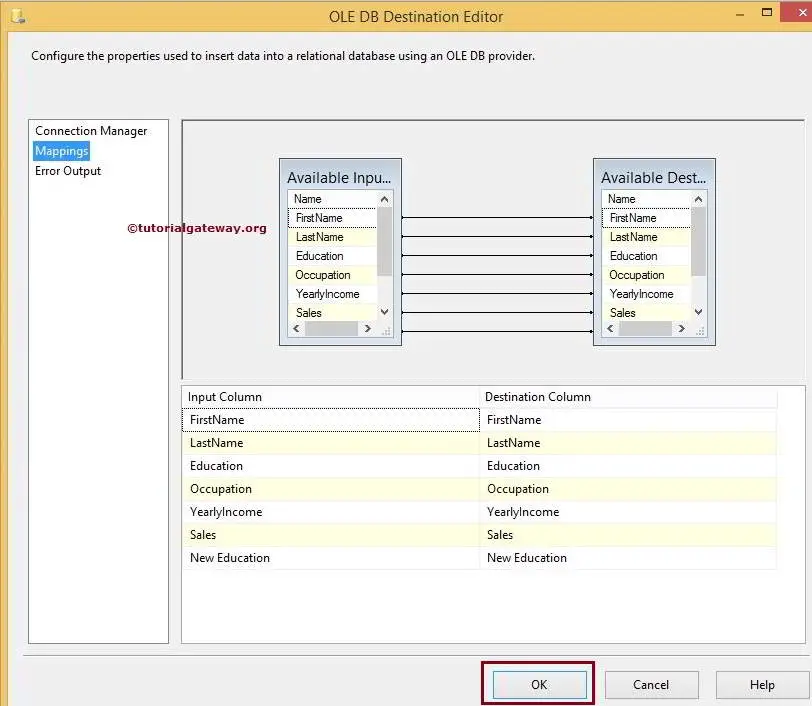
STEP 8: Click on Mappings tab to check whether the source columns are exactly mapped to the destination columns.
Remove Double Quotes in Excel Sheet using SSIS 12
Click OK to finish our package design. Let us run the package and see whether we successfully remove Double Quotes in Excel Sheet using SSIS or not
Remove Double Quotes in Excel Sheet using SSIS 13
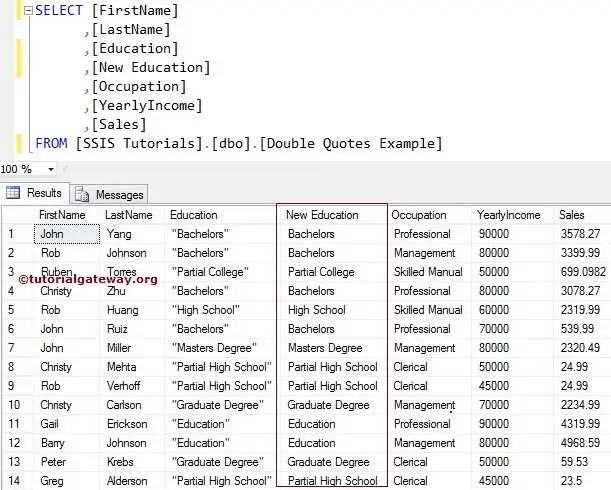
Let us open the SQL Server Management studio and Check the results
Remove Double Quotes in Excel Sheet using SSIS 14
Thank You for Visiting Our Blog

Text Qualifier in SSIS


Text Qualifier in SSIS or How to remove Double Quotes in csv file or How to remove Double Quotes in flat file are the most common question asked in any SSIS Interview. In this article we will show you, How to get rid of Double Quotes in csv file using Text Qualifier in SSIS with live example.
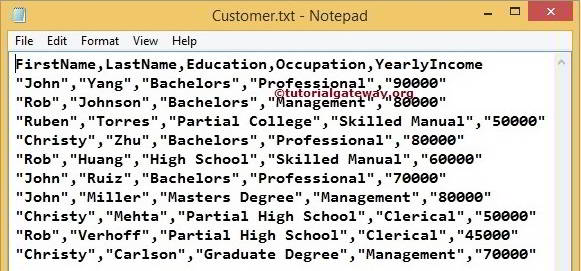
Below screenshot will show you the data present in the Customers.txt flat file. If you observe closely, every row after the header section is surrounded by the double quotes (” “). Let us see the steps to resolve it
Text Qualifier in SSIS 1

Text Qualifier in SSIS 2014 Example

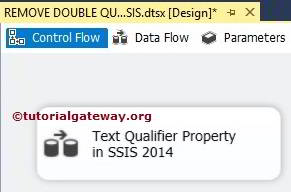
STEP 1: Drag and drop the data flow task from the toolbox to control flow region and rename it as Text Qualifier property in SSIS 2014
Text Qualifier in SSIS 2
Double click on it and it will open the data flow tab.
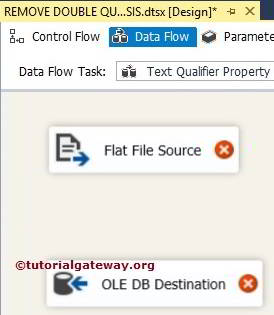
STEP 2: Drag and drop Flat File Source and OLE DB Destination from toolbox to data flow region.
Text Qualifier in SSIS 3
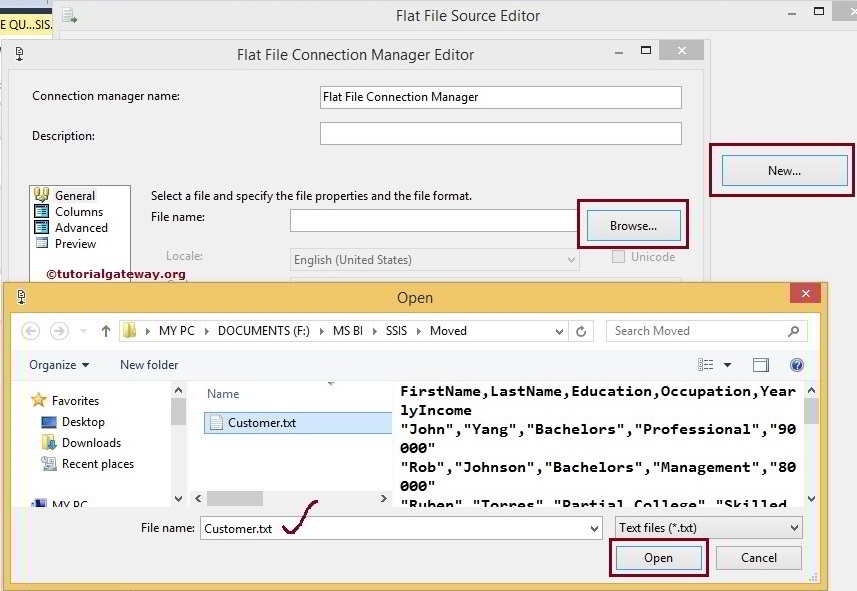
Double click on Flat File Source in the data flow region will open the Flat File Source Editorto configure the connection manager settings. If you haven’t created Flat File Connection Manger before click on the New button.
Once you click on New button, Flat File Connection Manager Editor will be opened. Please click on the Browse button to select required file from our file system. Here, we are selecting the Customers.txt flat file as shown below
Text Qualifier in SSIS 4
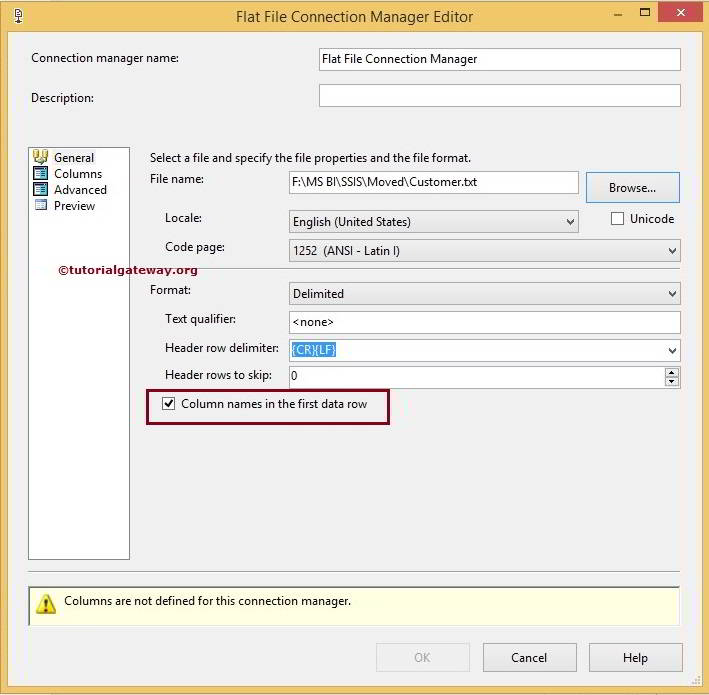
Once you selected the file, we have to specify whether our text file holds column names in the first row or not by check marking Column names in the first data row option.  Since our flat file holds the column names in the first row, we are check marking the option. If your text file is different then don’t select it.
Text Qualifier in SSIS 5
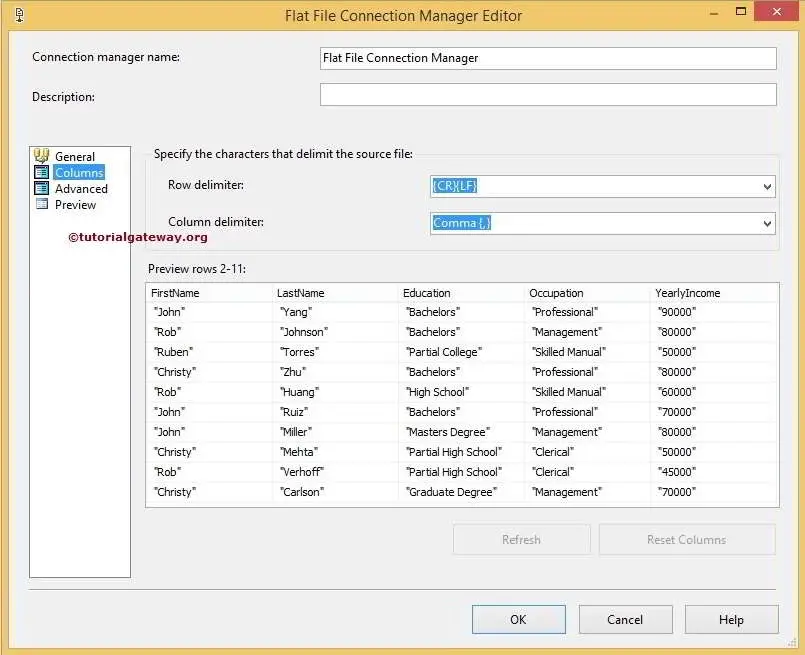
Let us check the data by visiting Columns Tab in Flat File Connection Manger
Text Qualifier in SSIS 6
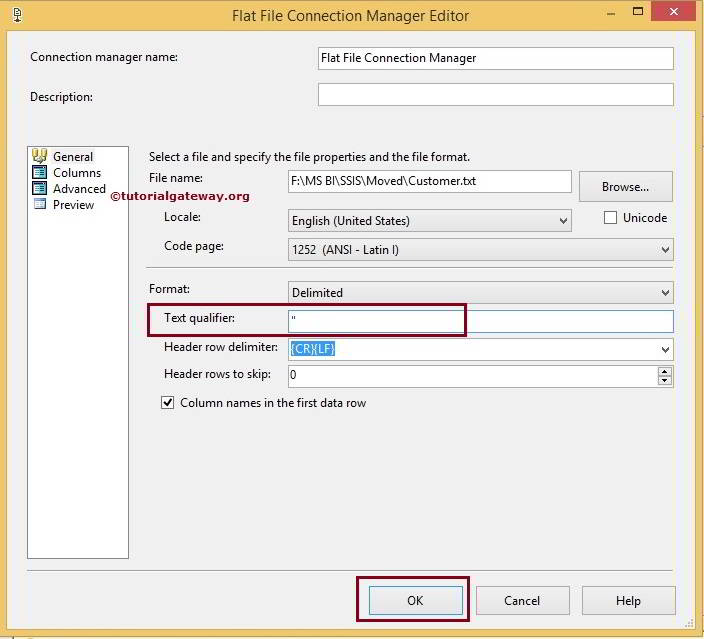
Now, come back to General Tab and place double quotation mark in Text Qualifier property as shown below
TIP: You can replace this double quote mark with any special character to remove those special characters from flat file
Text Qualifier in SSIS 7
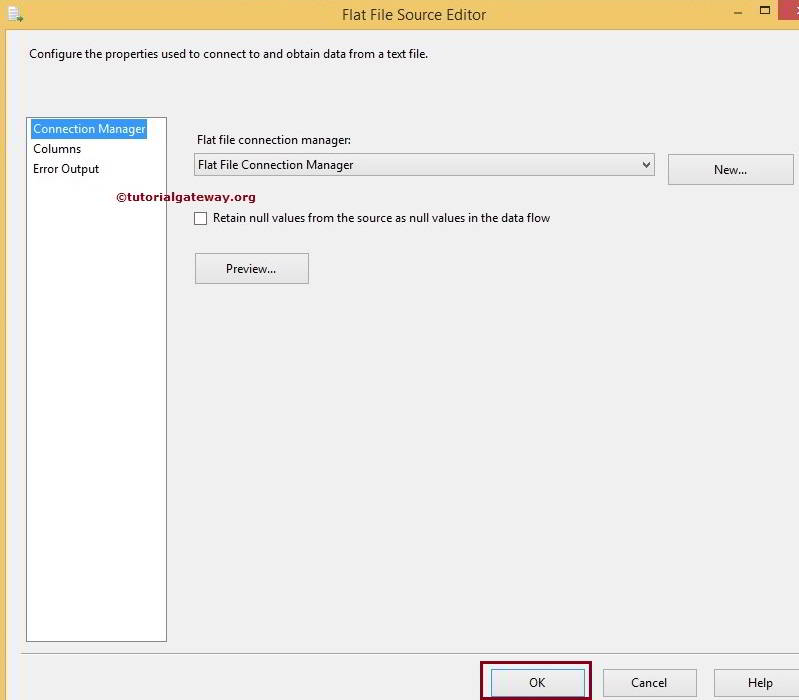
Click OK will close the Flat File Connection Manager Editor. If you want to retain the Null values as Nulls, Please check mark Retain null values from the source as null values in the data flow option.
Text Qualifier in SSIS 8
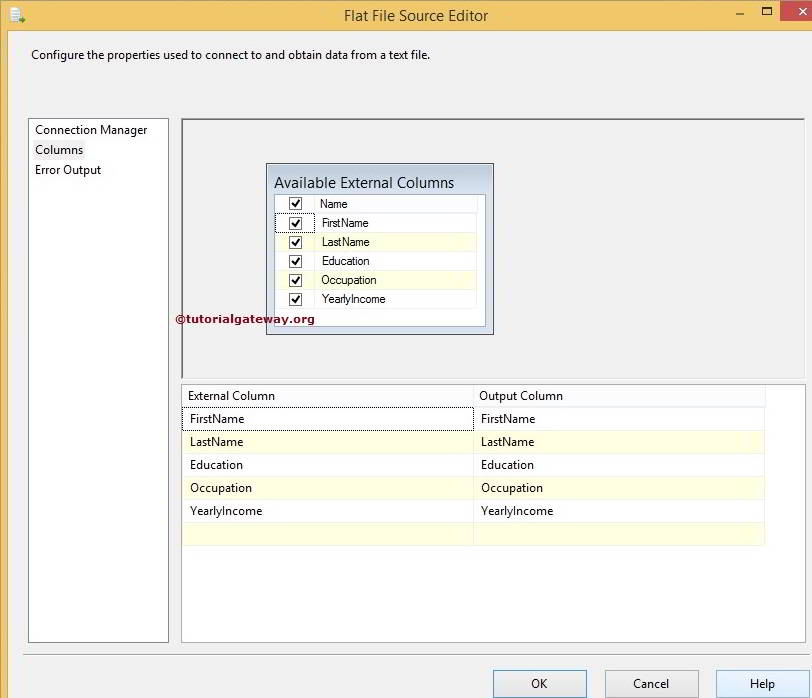
Click on columns tab to verify the columns. In this tab we can uncheck the unwanted columns also.
Text Qualifier in SSIS 9
Click OK and drag and drop the Flat File Source output on to OLE DB Destination.
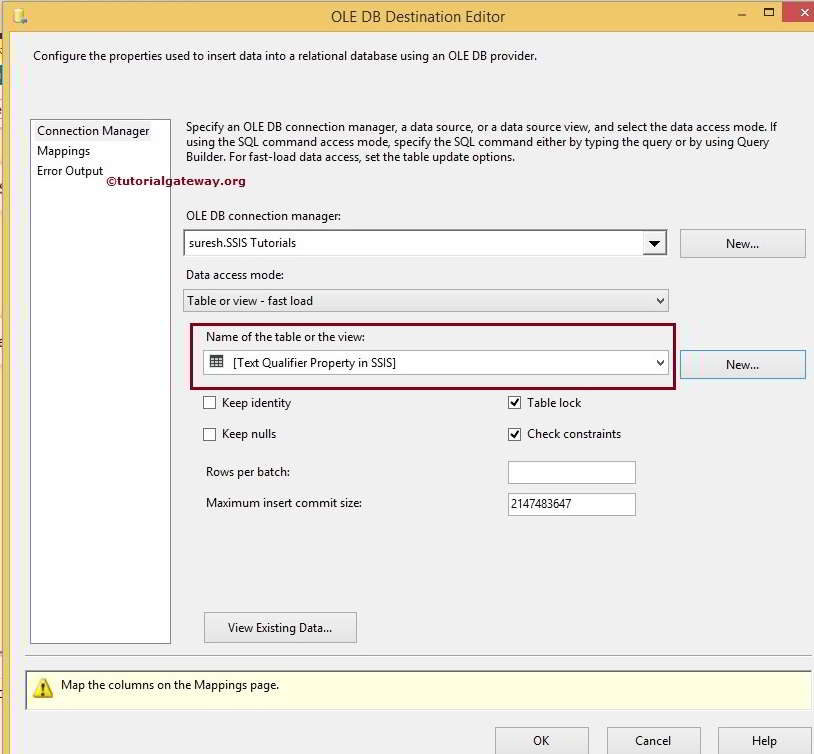
Now we have to provide Server, database and table details of the destination. So double-click on the OLE DB Destination and provide the required information. From the below screenshot you can observe that, we are selecting Text Qualifier in SSIS table present in SSIS Tutorials database
Text Qualifier in SSIS 10
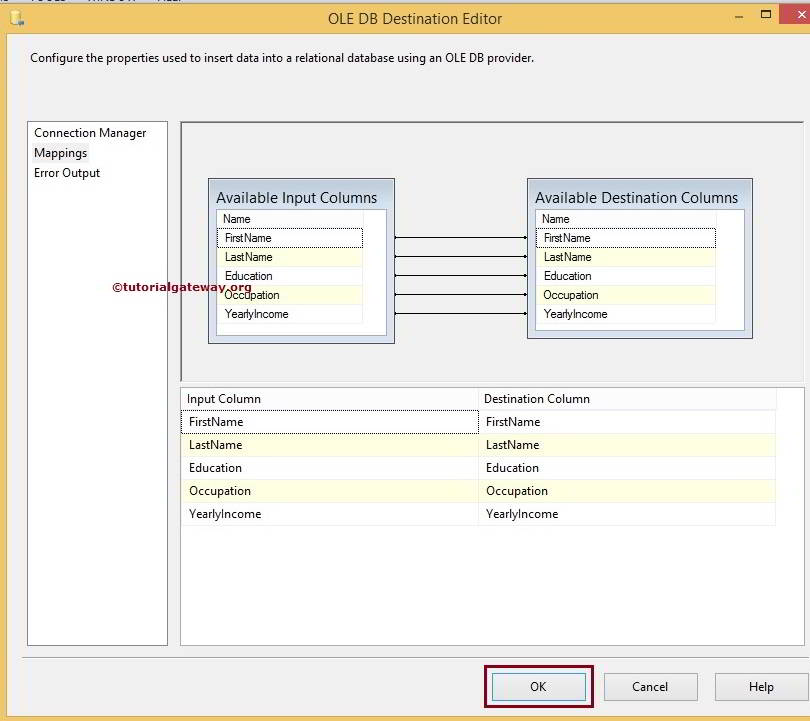
Click on Mappings tab to check whether the source columns are exactly mapped to the destination columns.
Text Qualifier in SSIS 11
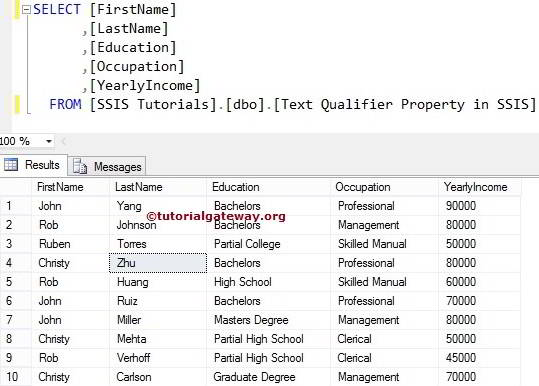
Click OK to finish our package design. Let us run the package and Check the results whether we successfully removed Double Quotes in flat file using text qualifier in SSIS or not
Text Qualifier in SSIS 13
Thank You for Visiting Our Blog

Wednesday, August 19, 2015

Fuzzy Lookup Transform

Fuzzy Lookup Transform


Introduction

Real-world data is "dirty" because of misspellings, truncations, missing or inserted tokens, null fields, unexpected abbreviations, and other irregularities. Fuzzy lookup enable us to match input records with clean, standardize records in a reference table. To understand it properly let's take an example. Suppose we have customer information like customer name and address. During the sales transaction we take the input for customer name and address which may not be matched exactly with records in the customer reference table because of typographical or others error in the input data. Fuzzy lookup returns the best matching records from the customer reference table even if no exact match exists.

So the fizzy lookup is a very useful transform for every SSIS developer in the real-world environment.  In this article we are going to learn about it.

How we use the Fuzzy Lookup Transform

Step-1 [ Create the Fuzzy Lookup Reference Table ]

-- Fuzzy Lookup Reference table
IF OBJECT_ID(N'tbl_FUZZYREFERENCES', N'U') IS NOT NULL
   BEGIN
      DROP TABLE tbl_FUZZYREFERENCES;
   END
GO
CREATE TABLE tbl_FUZZYREFERENCES
       (FIRSTNAME VARCHAR(50)  NOT NULL,
        LASTNAME    VARCHAR(50)  NOT NULL,
        DOB         DATETIME);
GO          
--Inserting Records
INSERT INTO tbl_FUZZYREFERENCES
       (FIRSTNAME, LASTNAME, DOB)
VALUES ('Joydeep', 'Das', '12-17-1974'),
       ('Shipra', 'Roy Chowdhury', '09-22-1974'),  
       ('Deeepasree', 'Das', '01-31-2003');
GO
SELECT * FROM tbl_FUZZYREFERENCES;                  

FIRSTNAME                        LASTNAME                                         DOB
Joydeep                                  Das                                                         1974-12-17 00:00:00.000
Shipra                                     Roy Chowdhury                                      1974-09-22 00:00:00.000
Deeepasree                             Das                                                         2003-01-31 00:00:00.000

Step-2 [ The Source Flat File ]

The flat file name is "FuzzySourceRecords.txt"


Step-3 [ Data Flow ]


Step-4 [ Fuzzy Lookup Transform Editor ]


Step-5 [ Derived Column Transform Editor ]


Step-6 [ Union All Transform Editor ]


Step-7 [ OLE DB Destination Create Table ]


Step-8 [ Running the Package ]


Step-8 [ Final Destination Table ]


Hope you like it.