UNPIVOT IN SSIS
Using Unpivot component in SSIS is a very easy task. Following is the source table which I extracting from a excel source. It shows Application Software categorization and I want to get those categories (Business,Communication and Graphics) in to rows.
Business Communication Graphics
School Administration Software Microsoft Email Software 3D Graphics Software
Time Tracking Software BitTorrent Clients Image Viewers
Cost Analysis Software WordPress
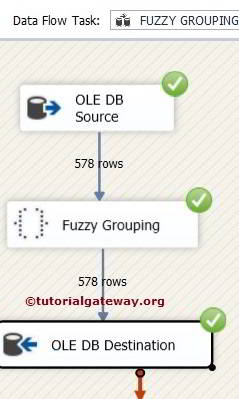
Following figure shows the Data Flow task of the ssis package.

Following is how we have to configure the Unpivot component. In here Destination Column name should be same for every input column. Other destination column name is the pivot key value column name. You can see these column headers in out put.

This is how we have the out put after the unpivot operation.
Category Application Software
Business School Administration Software
Communication Microsoft Email Software
Graphics 3D Graphics Software
Business Time Tracking Software
Communication BitTorrent Clients
Graphics Image Viewers
Business Cost Analysis Software
Communication WordPress
Make any comments about this post.
Fuzzy Grouping Transformation in SSIS 2014
Fuzzy Grouping Transformation is used to replace the wrongly typed words with correct words. This transformation is same as Fuzzy Lookup Transformation but Fuzzy Grouping Transformation does not require any reference table to correct the data. It will use the grouping technique to check for the wrongly typed words (type mistakes) and correct them. For example, if 98 people typed country name as India and 2 people types as Indi then Fuzzy Grouping Transformation will replace the Indi with India.
Before we start configuring the Fuzzy Grouping Transformation, let us see some important properties of this:
- Fuzzy Grouping Transformation uses Grouping technique to replace the wrong word in source data with the correct word.
- This transformation allows us to use only DT_WSTR and DT_STR Data type column for Fuzzy Matching and Exact matching can be applied to any data type except DT_TEXT, DT_NTEXT, and DT_IMAGE.
- Fuzzy Grouping Transformation creates temporary tables and indexes in the SQL Server database at runtime.
- Fuzzy Grouping Transformation only use OLE DB Connection Manager to establish connection to store the temporary tables and indexes.
- To configure the transformation, you must select the Match Type (Fuzzy or Exact) for an input columns
TIP: Fuzzy Grouping Transformation has one input and one output. It does not support an error output.
Fuzzy Grouping Transformation in SSIS 2014 Example
In this example we are going to show you, How to configure Fuzzy Grouping Transformation in SQL Server Integration Services to correct the wrongly typed words (Typo mistakes)
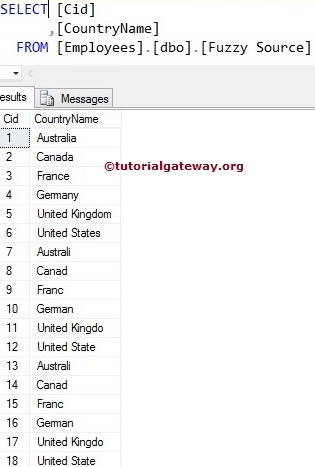
Data we are going to use for this Fuzzy Grouping Transformation is:
STEP 1: Open BIDS and Drag and drop the data flow task from the toolbox to control flow and rename it as Fuzzy Grouping Transformation in SSIS 2014.

Double click on it and it will open the data flow tab.
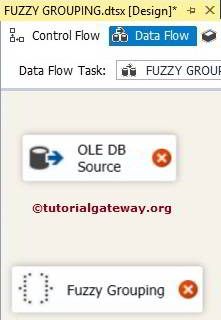
STEP 2: Drag and drop OLE DB Source, Fuzzy Grouping transformation from toolbox to data flow region
STEP 3: Double click on OLE DB source in the data flow region will open the connection manager settings and provides an option to select SQL Table or space to write our SQL statement.

Here we selected the Employees database as our source database and [Fuzzy Source] as SQL table.
STEP 4: Click on columns tab to verify the columns. In this tab we can uncheck the unwanted columns also.

TIP: If we don’t want any column then there is no point to add it in to your SQL command.
STEP 5: Right click on the Fuzzy Grouping Transformation will open the Fuzzy Grouping Transformation Editor window to configure it.
Within the Connection Manager tab we have to configure the OLE DB connection Manager setting. Within this source, Fuzzy Grouping Transformation will create temporary table and indexes to perform the Fuzzy Grouping operation.

STEP 6: Within the Columns Tab, We have to configure the match Type. You will need to select the columns that you want to group as Fuzzy Match Type and other columns as Exact match. For this example, Country name is string and we want to find the wrong values in this column. So, change the match type to Fuzzy and Cid is the Int value so the match type is Exact.

There are two parameters which are very important when you are Configuring fuzzy grouping Transformation and they are: Numerals and Comparison Flags.
Comparison Flags
From the below screenshot you can see the available options in this.
- Ignore case: If we check mark this option then Fuzzy Grouping will ignore the case. Both XYZ and xyz will be same.
- Ignore kana type: If we check mark this option then Fuzzy Grouping will ignore the difference between the hiragana and katakana in Japanese.
- Ignore non spacing characters: If we check mark this option then Fuzzy Grouping will ignore the difference between the diacritics and character
- Ignore character width: If we check mark this option then Fuzzy Grouping will ignore the difference between single-byte character and double-byte character.
- Ignore symbols: If we check mark this option then Fuzzy Grouping will ignore the difference between the letters and symbols (white spaces, punctuations, currency symbols and mathematical symbols). For example, *xy is treated same as xy
- Sort punctuation as symbols: If we check mark this option then Fuzzy Grouping will all the punctuation symbols (except apostrophe and hyphen) write before the letters. For example .xyz will sort before the xyz

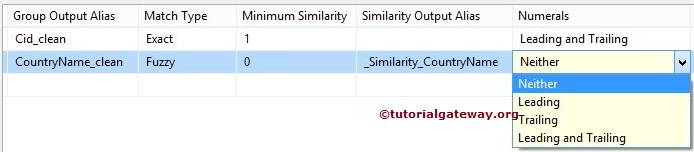
Numerals
In this option, We have to specify the significance of starting and ending numerals while comparing the column data. For example, if leading numerals are significant, “93 New lands Street” will not be grouped with “99 New lands Street”
| Value | Description |
|---|---|
| Neither | Numerals at the starting and ending position will be ignored while grouping. |
| Leading | Numerals at the starting position will be ignored while grouping. |
| Trailing | Numerals at the ending position will be ignored while grouping. |
| LeadingAndTrailing | Numerals at the starting and ending position will not be ignored while grouping. |
STEP 7: Within the Advanced Tab we have to configure the Similarity Threshold. Similarity threshold ranges between 0 and 1 where 1 is exact match. The Fuzzy Grouping Transformation Editor provides slider to adjust the similarity between 0 and 1. If similarity threshold is closer to 1 then source column should match more accurately to reference data. In this example, We are doing Fuzzy Grouping on Country Name and find the fuzzy match. If we give Similarity threshold as 0.76 the string column values should match more than 76% then only it will treat as a valid record.
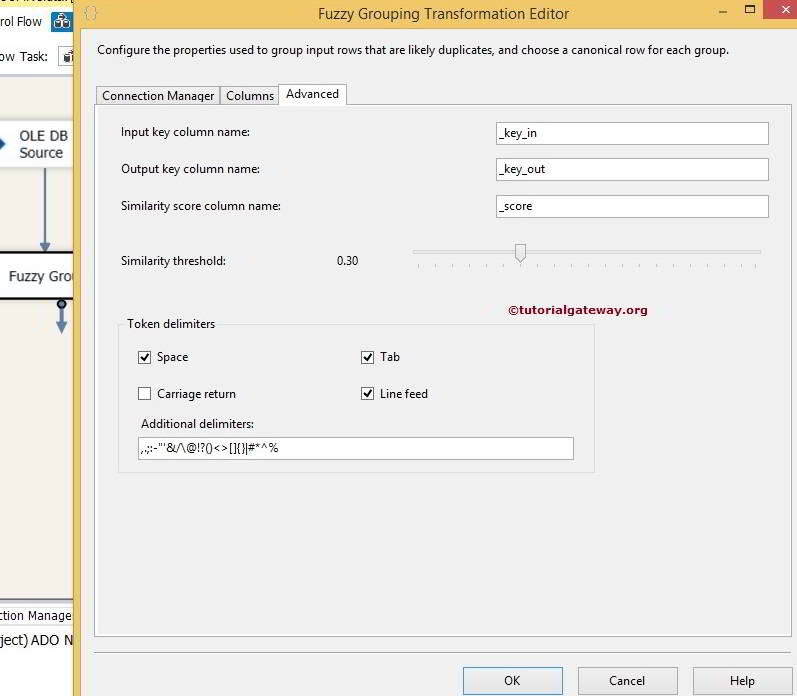
The Fuzzy Grouping Transformation produces additional columns along with existing columns and they are:
- Input key column name: Provide the Unique name for Input Key Column. key_inis the default name.
- Output key column name: Provide the Unique name for Output Key Column. key_Outis the default name.
- Similarity score column name: Provide the Unique name for the similarity score column._score is a value between 0 and 1. This will indicate the similarity of the input row to the canonical row.
For the time being we left them to default values and Click ok to finish configuring the Fuzzy Grouping Transformation. Now drag and drop the OLE DB destination into the data flow region.
STEP 8: Now we have to provide Server, database and table details of the destination. So double-click on the OLE DB Destination and provide the required information

Here we selected the [SSIS Tutorials] database as our destination database and [Fuzzy Grouping Transformation Output] table as our destination table.
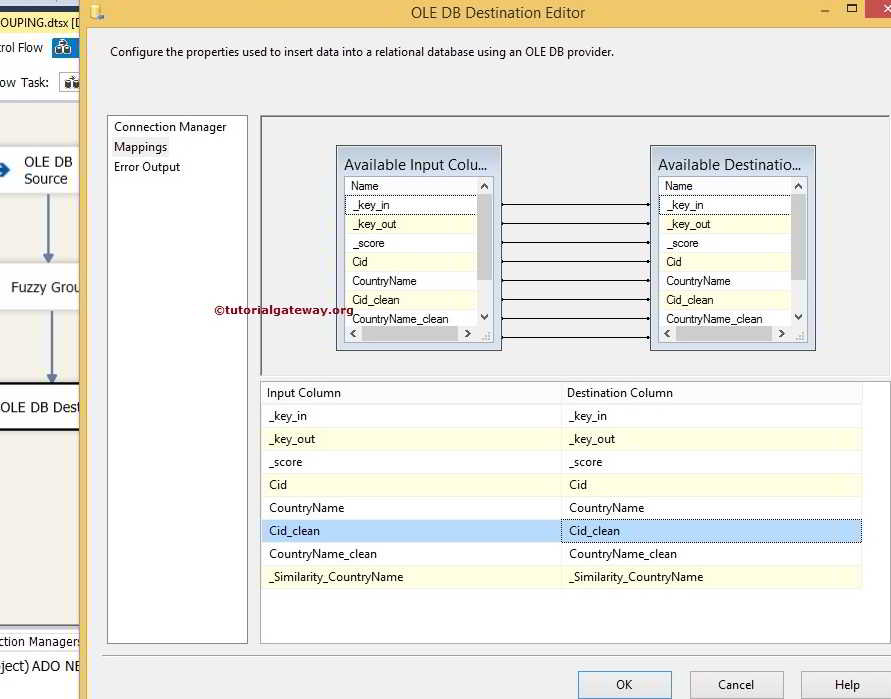
STEP 9: Click on Mappings tab to check whether the source columns are exactly mapped to the destination columns.
STEP 10: Click ok to finish designing Fuzzy Grouping Transformation package. Let us run the package
Thank you for Visiting Our Blog
Term Lookup Transformation in SSIS 2014
The Term Lookup Transformation is used to find terms with in the string or text. It uses the reference table (contains terms) to find the matched sentences from the source data and also counts the number of times a term is repeated in the source data row.
The Term Lookup transformation adds two extra columns to the transformation output called as Term and Frequency by default. Term contains a term from the lookup table and Frequency contains the number of times the term is repeated or occurred in the input data set.
TIP: In SQL Server integration services, Term Lookup Transformation only allows the columns with DT_WSTR and DT_NTEXT data type to perform term lookup. If your input column is different from these two then Please use the Data Conversion Transformation to convert other Data Types to DT_WSTR and DT_NTEXT data type.
For example, if your company has 100 products and it is allowing users to write reviews on your products. Imagine you are getting 2000 reviews per day then, how will you find which review belongs to which product? To resolve these type of issues SSIS introduced Term Lookup Transformation. Using this you can find which row has product 1 review and which row has product 90 review.
Term Lookup Transformation Matching Techniques
Term Lookup Transformation uses following rules to perform Term lookup on the source Data:
- If the reference table contains singular form of the word then Term Lookup Transformation consider both the singular and plural forms of the word in the source data as singular form. For example, if the term lookup table contains Employee and we have Employee and Employees terms in source data then Term Lookup Transformation would count both of them as a match for the lookup term
- If the reference table contains plural form of the word then Term Lookup Transformation consider both the singular and plural forms of the word in the source data as separate Terms. For example, if the term lookup table contains Employees and we have Employee and Employees terms in source data then Term Lookup Transformation would count Employee separately and Employees separately.
- If we configured the Term Lookup Transformation to perform case-sensitive matches then employee is treated separately from EMPLOYEE. If we have Employee as a first word in the sentence then Term Lookup Transformation will count Employee and employee as same term.
Term Lookup Transformation in SSIS 2014 Example
In this example we are going to show you, How to configure Term Lookup Transformation in SSIS 2014 with sample data.
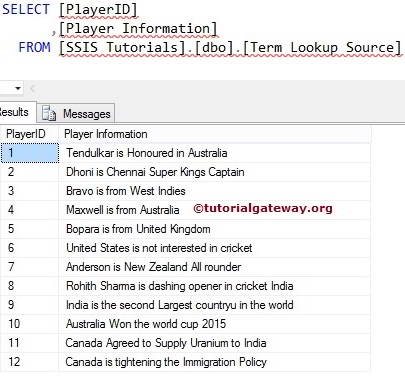
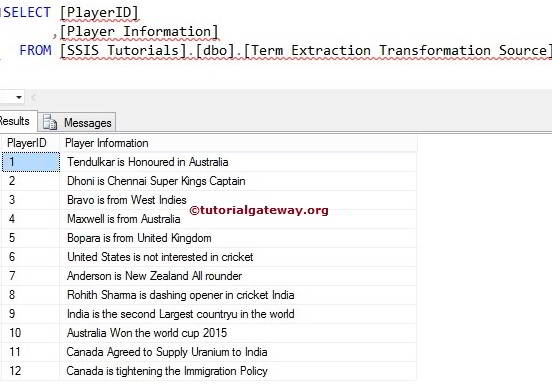
Here is our [Term Lookup Source] table
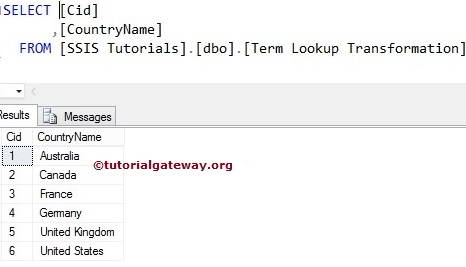
Here is our term lookup table (Term Lookup Transformation Table from the [SSIS Tutorials] Database).
STEP 1: Create new project in BIDS with Integration Service Project Template. Drag the Dataflow task to Control flow region and rename it as Term Lookup Transformation in SSIS 2014.

Double click on it and it will open the data flow tab.
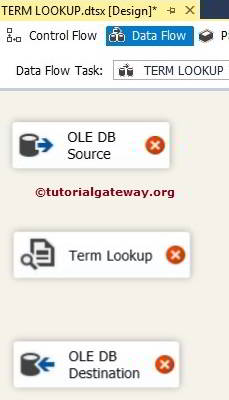
STEP 2: Drag and drop OLE DB Source, Term Lookup Transformation and OLE DB destination from toolbox to data flow region
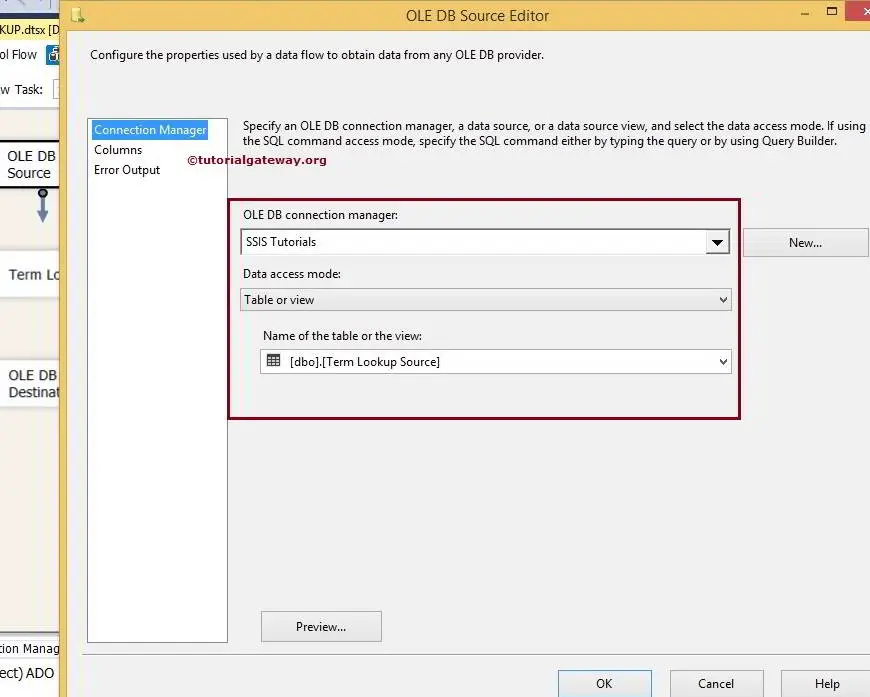
STEP 3: Double click on OLE DB source in the data flow region will open the connection manager settings and provides space to write our SQL statement or we can select the table from Drop down list.
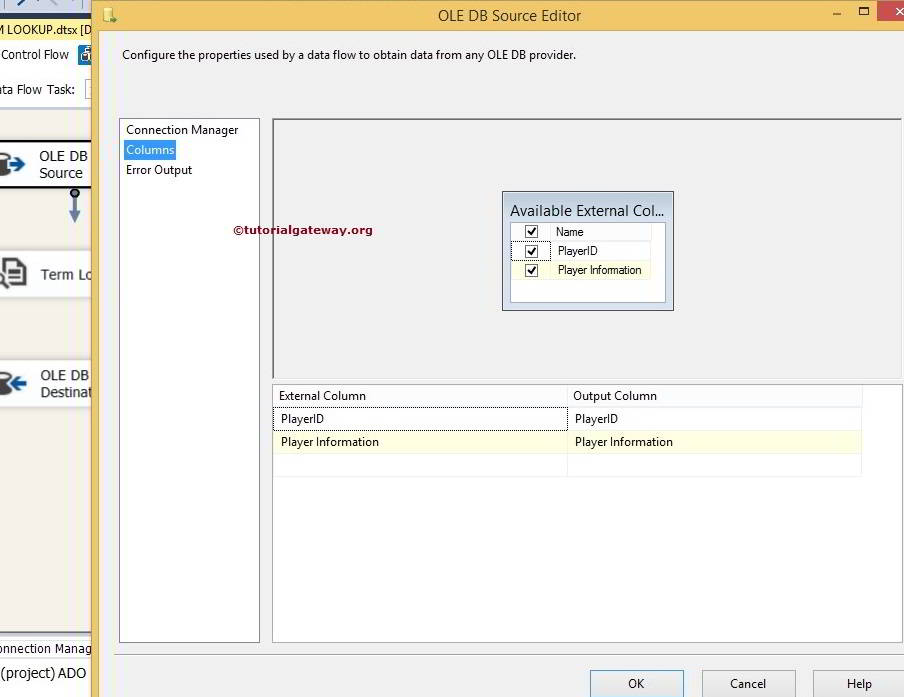
STEP 4: Click on columns tab to verify the columns. In this tab we can uncheck the unwanted columns also.
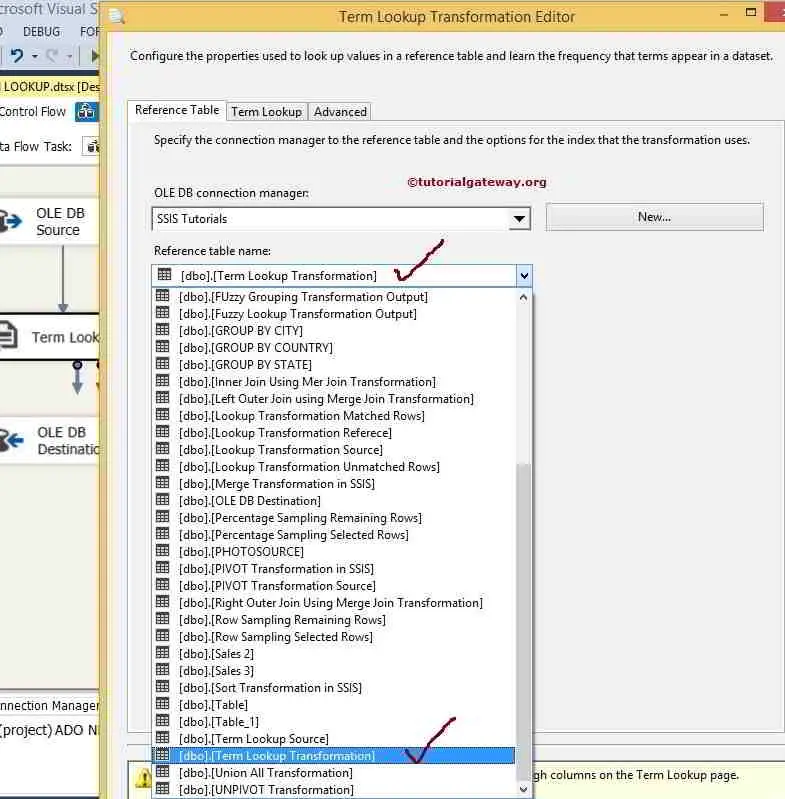
STEP 5: Click ok and edit the Term Lookup Transformation
In the reference table tab, Configure the OLE DB connection manager to reference database (Here it is [SSIS Tutorials]) and then select the table you wish to add as reference table (Here it is Term Lookup Transformation table).
TIP: Term Lookup Transformation only supports OLE DB Connection Manager to connect with the reference table.
NOTE: Term Lookup transformation will accept only Unicode String [DT_WSTR] or Unicode text stream [DT_NTEXT] as its data type.
Step 6: Use the Term Lookup tab to map an input column to a lookup column in a reference table and to provide an alias for each output column.

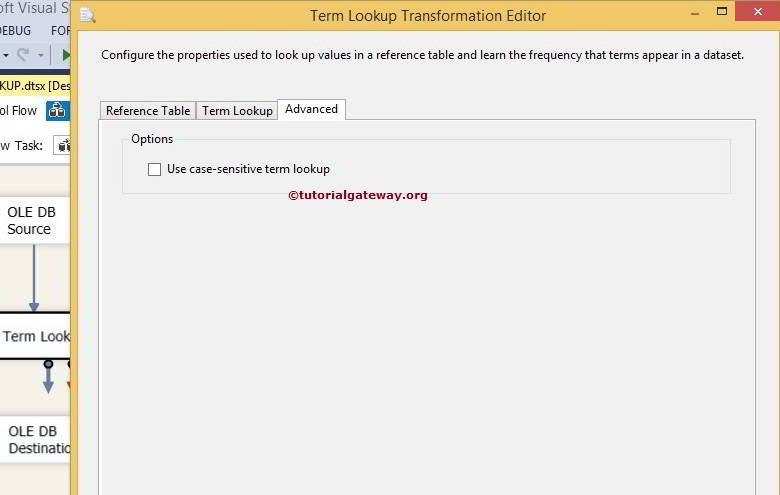
Use the Advanced tab of the Term Lookup Transformation Editor Dialog box to specify whether Term lookup should be case-sensitive or not.
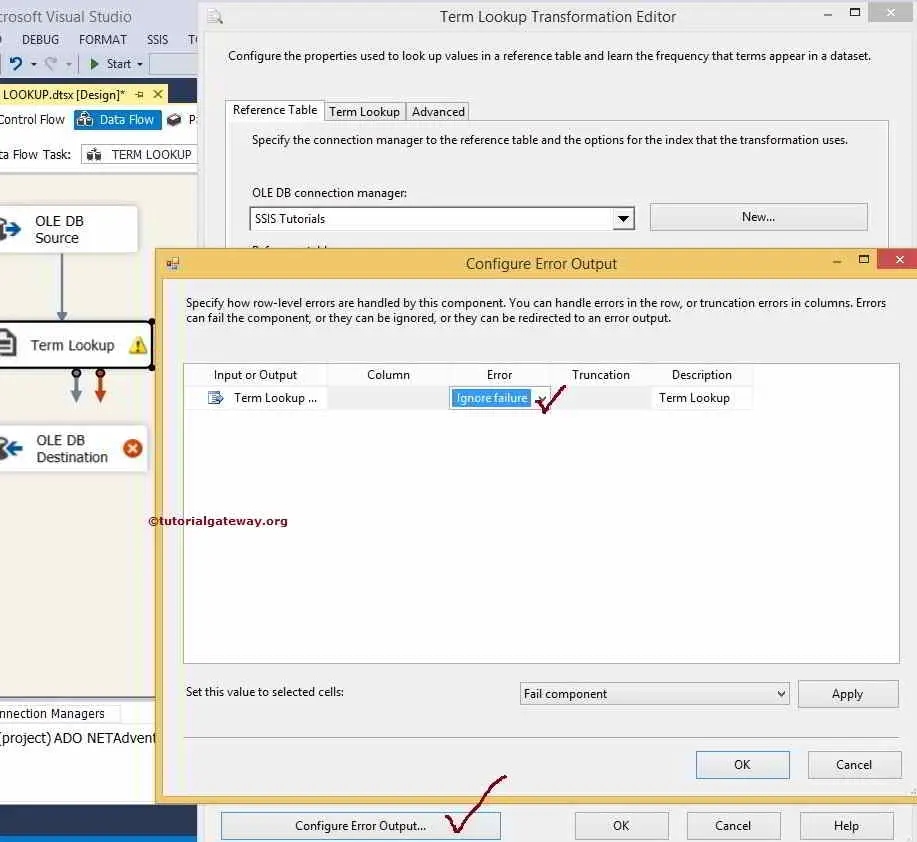
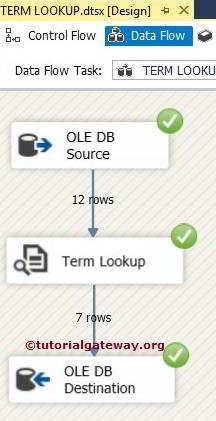
From the below screenshot you can see, there is a warning symbol on the Term Lookup Transformation and it is telling that error output is not connected. You can remove the warning symbol by configuring the error output of Term Lookup Transformation. So double click on the Configure Error Output button will open new window to configure the error output.
The default configuration of a Term Lookup Transformation is to redirect error rows. You can get rid of this warning by connecting the error output or by changing the default behavior toIgnore Failure or Fail Component. Let me change to Ignore Failure
Click ok to finish configuring the Term Lookup Transformation.
STEP 7: Now we have to provide Server, database and table details of the destination. So double click on the OLE DB Destination and provide the required information
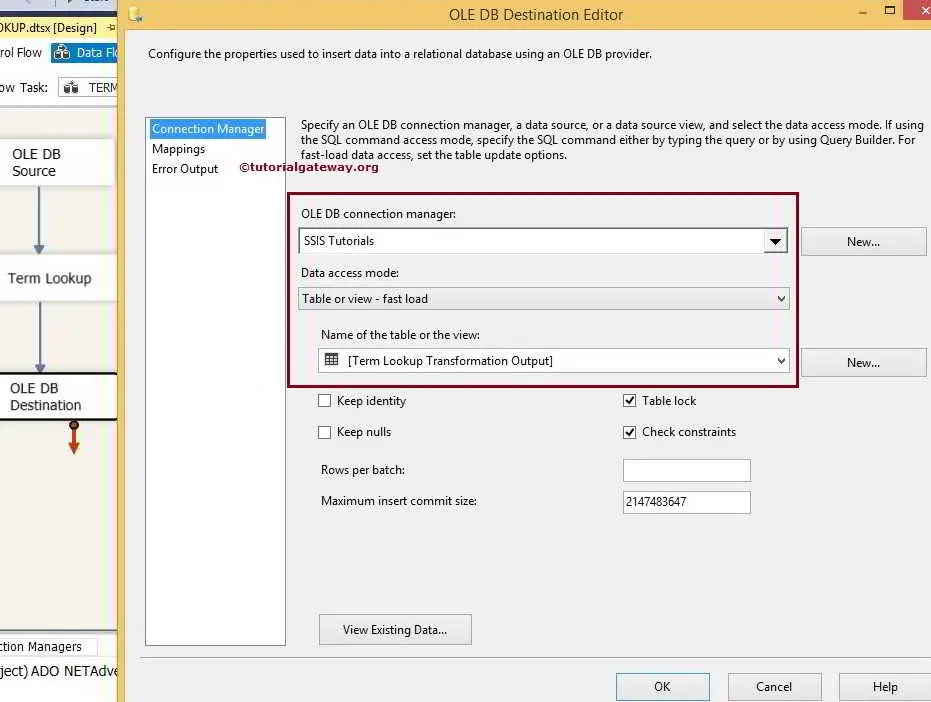
From the above screenshot you can observe that, We selected the [SSIS Tutorials] database as our destination database and [Term Lookup Transformation Output] table as destination table.
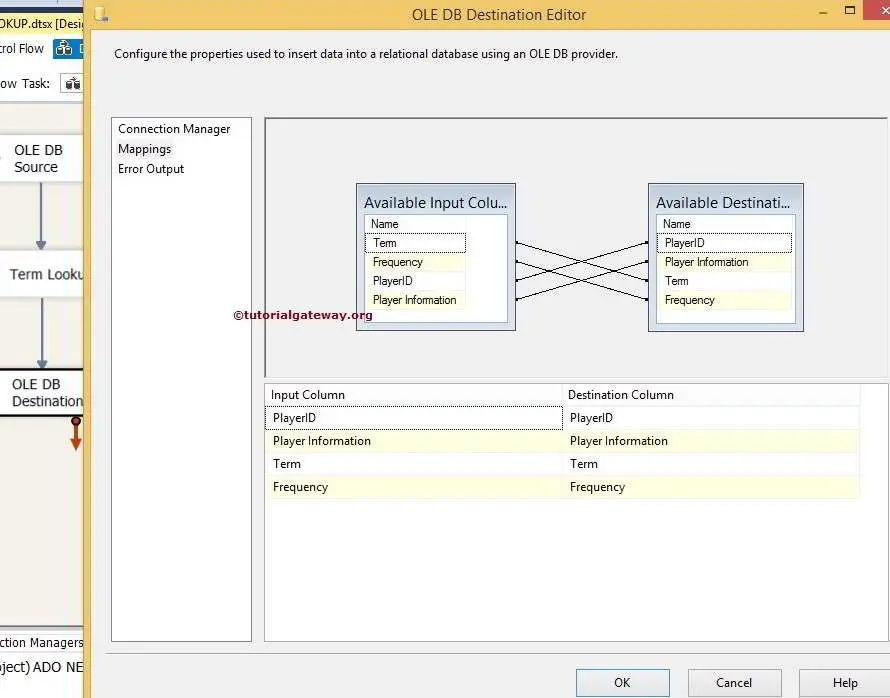
STEP 8: Click on Mappings tab to check whether the source columns are exactly mapped to the destination columns.
Click ok to finish designing our Term Lookup Transformation package. Let us run the package
Let’s open the SQL Server Management Studio and check the results

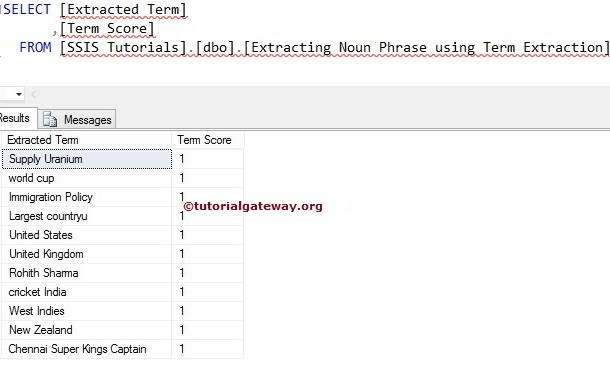
From the above screenshot you may see, Term lookup is displaying the Term and Frequency (number of times term is repeating) of the Term in a sentence.
Thank you for Visiting Our Blog
Term Extraction Transformation in SSIS
In SQL Server Integration Services, Term Extraction transformation first extracts terms from the text present in the source data and then writes the extracted terms to a Transformation output column.
For example, people are writing reviews on your products, and you want to contact them for further assistance. In these situations you can use Term Extraction transformation to extract the email address and name of the user from the reviews.
NOTE: Term Extraction transformation uses its own English dictionary and linguistic setting to extract the Term from the source data.
In SSIS, We can perform Term Extraction Transformations only on the column with the DT_WSTR and DT_NTEXT data type. If your input column is different from these two then Please use the Data Conversion Transformation to convert other Data Types to DT_WSTR and DT_NTEXT data type
Configuring Term Extraction Transformation in SSIS
When you double-click on this transformation a Term Extraction Transformation Editor window will be opened to configure it. It contains three Tabs such as Term Extraction,Exclusion and Advanced Tab.
Term Extraction Tab
Within the Term Extraction tab, We have to select the column name of the Source data , from the Available Input Columns option as we shown in the below screenshot.
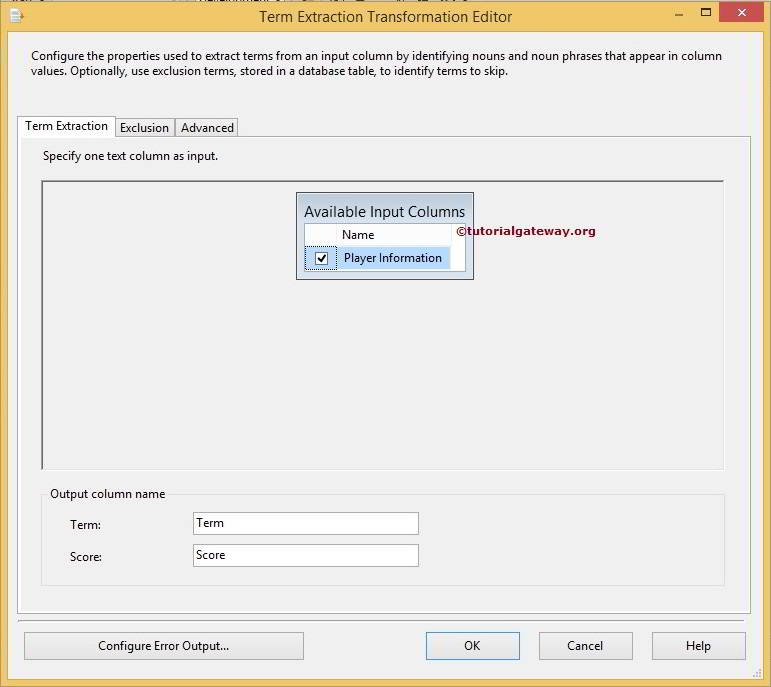
Term Extraction transformation produce only two output columns. The default names of the columns are Term and Score but you can change them as per your requirement.
- Term: This column contains the extracted terms from the text. For example, if we are extracting the Nouns then all the nouns will be stored in this column.
- Score: This column contains the number of times a term is repeated in the input column. For example, India is the first term extracted from the text then Term Extraction Transformation will check all the rows and counts the number of times Term India is repeated in all the rows available in that input column.
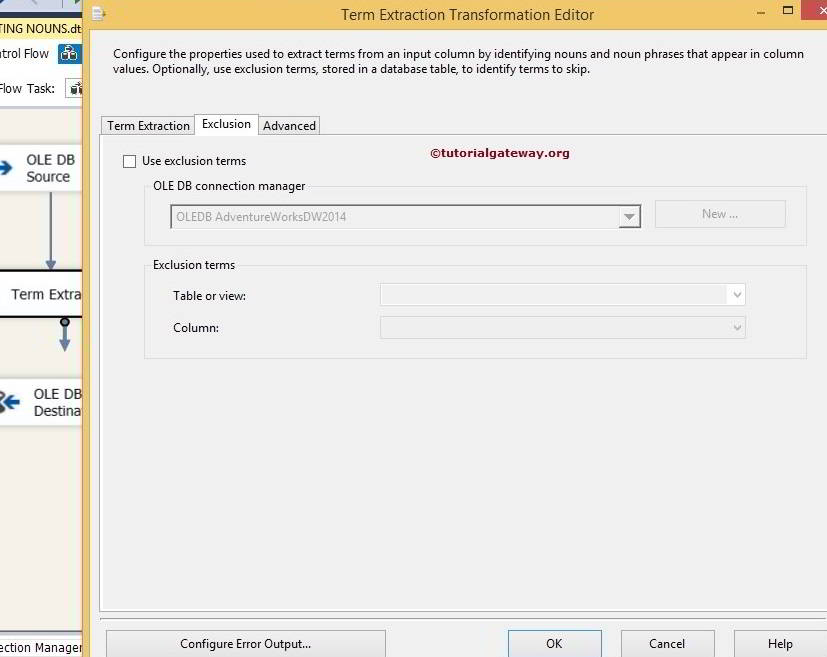
Exclusion Tab in Term Extraction Transformation
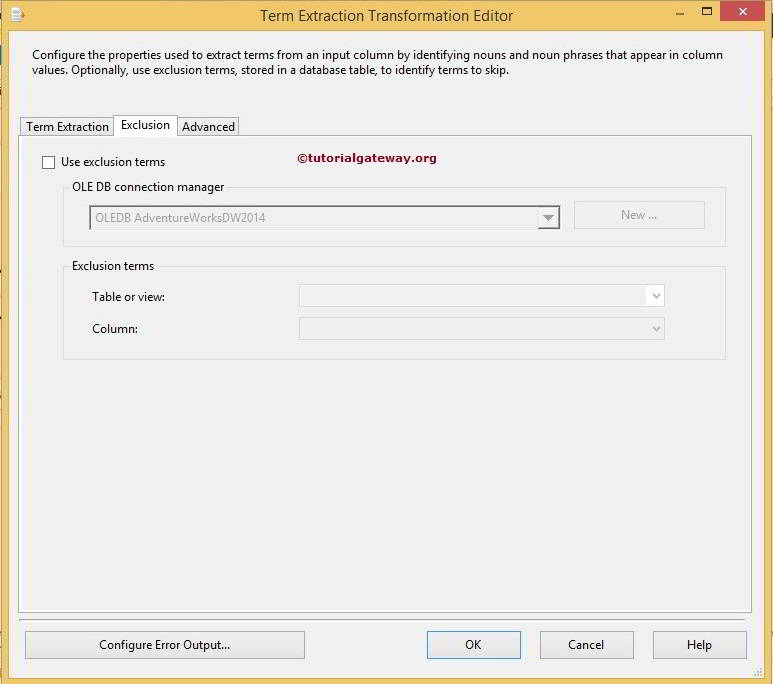
This tab is used to exclude unwanted terms from the extraction. For example, when we are extracting terms from a source data that contains product reviews about all our company products then we don’t need to extract our own Product name from the input text. To add the Exclusion Terms to the Term Extraction Transformation please check mark the Use Exclusion Terms option from the below screenshot
List of options available in Exclusion Tab to configure the exclusion list are:
- OLE DB connection manager: Term Extraction Transformation only supports OLE DB connection manager to connect with the server holding the exclusion list. So, select an existing one from the drop down list if you already created or if you want to create new connection then click on the New button.
- New: Create New connection to a database using OLE DB Connection Manager dialog box.
- Table or view: Select the table or view from the drop down list which contains the exclusion terms.
- Column: Select the column name from the table or view which contains the exclusion terms.
- Configure Error Output: Click on this button to configure the errors.
Advanced Tab
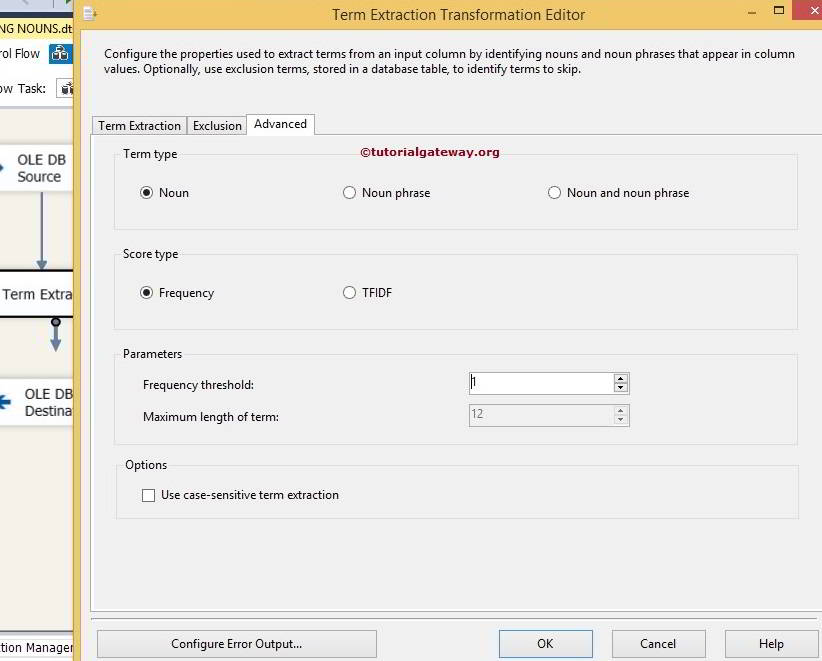
Use the Advanced tab in the Term Extraction Transformation Editor to configure the extraction properties.

From the above screenshot you can observe that, Following are the list of options available in the Advanced Tab
- Noun: If you select this option then, Term Lookup Transformation will extract only Nouns from the input text.
- Noun phrase: If you select this option then, Term Lookup Transformation will extract only Noun Phrases from the input text.
- Noun and noun phrase: If you select this option then, Term Lookup Transformation will extract both Nouns and Noun Phrases from the input text.
- Frequency: If you select this option then Score column will store the information of, Frequency of the Term repeated in input column.
- TFIDF: If you select this option then Score column will store the information of, TFIDF value of the Term.
- Frequency threshold: If we specify 3 then Term Extraction Transformation will extract the Terms, if they are repeated at least 3 times in the column and it will ignore the terms repeated less than 3 times.
- Maximum length of term: Please provide the maximum length of a word or phrase. This option is available if we selected the Noun Phrases only option.
- Use case-sensitive term extraction: Please check mark this option if you want to perform the Case-Sensitive extraction.
Thank you for Visiting Our Blog
Extract Nouns Using Term Extraction Transformation in SSIS
In this article We are going to show you, How to extract the Nouns using SSIS Term Extraction Transformation. Please refer Extract Noun Phrases Using Term Extraction Transformation in SSIS article to understand, How to Extract Noun Phrases from the Source Data.
Before reading this article, Please refer Term Extraction Transformation in SSIS article for the definition and the functionality of this Transformation.
Below screenshot shows our source data
STEP 1: Open BIDS and Drag and drop the data flow task from the toolbox to control flow and rename it as Extracting Nouns Using Term Extraction Transformation in SSIS 2014.
Double click on it and it will open the data flow tab.
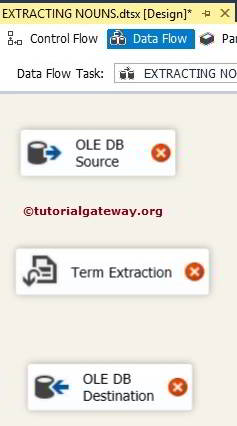
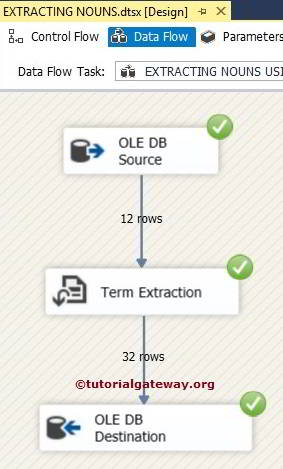
STEP 2: Drag and drop OLE DB Source, Term Extraction Transformation and OLE DB Destination from toolbox to data flow region
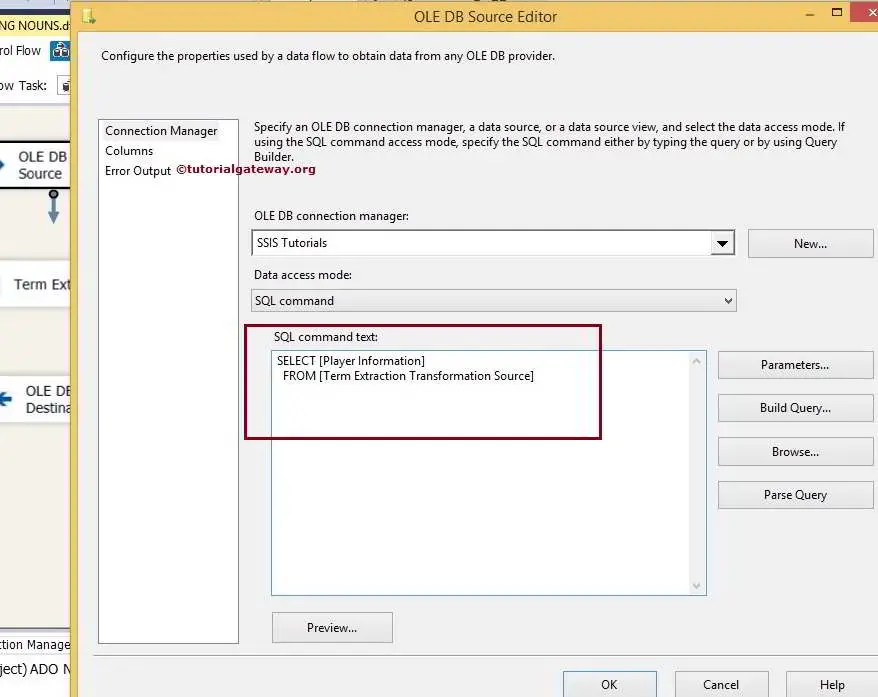
STEP 3: Double click on OLE DB source in the data flow region will open the connection manager settings and provides space to write our SQL statement.
Here we are going to select the [SSIS Tutorials] Database as our source database and SQL Command we are going to use is:
STEP 4: Click on columns tab to verify the columns. In this tab we can uncheck the unwanted columns also.

TIP: If we don’t want any column then there is no point to add it in to your SQL command.
Drag the OLE DB source output arrow on to the Term Extraction Transformation to perform transformation on the source Data.
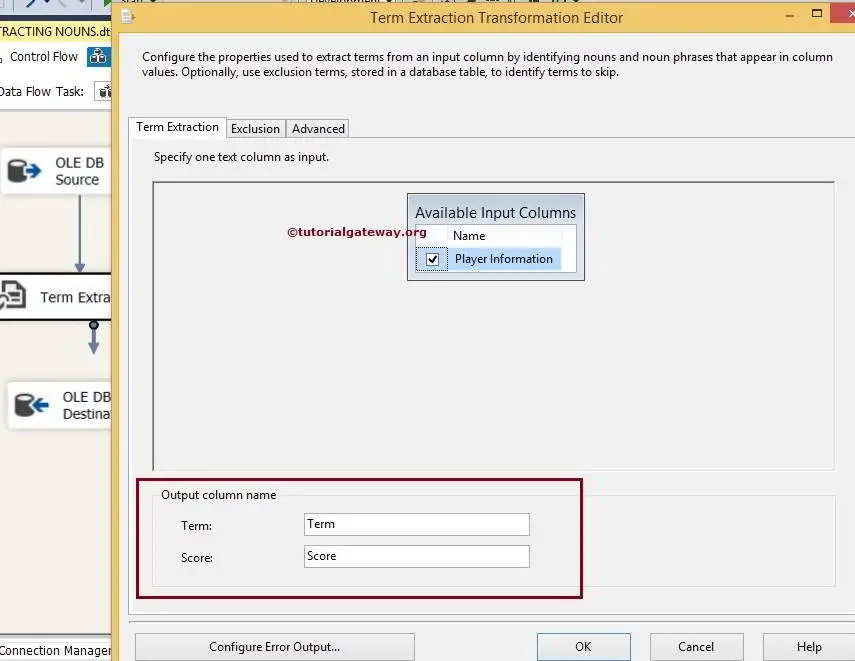
STEP 5: Double click on the Term Extraction Transformation will open the Term Extraction Editor to configure it. Within the Term Extraction tab, You simply need to choose the column you want to use for the Term Extraction from the available input columns. We left the output column names to default Term and Score.
Exclusion Tab: If you want to exclude specific terms during term extraction then, configure this Tab by specifying a column that contains exclusion terms.
In this example let us leave this because we want to extract all the Nouns from source data.
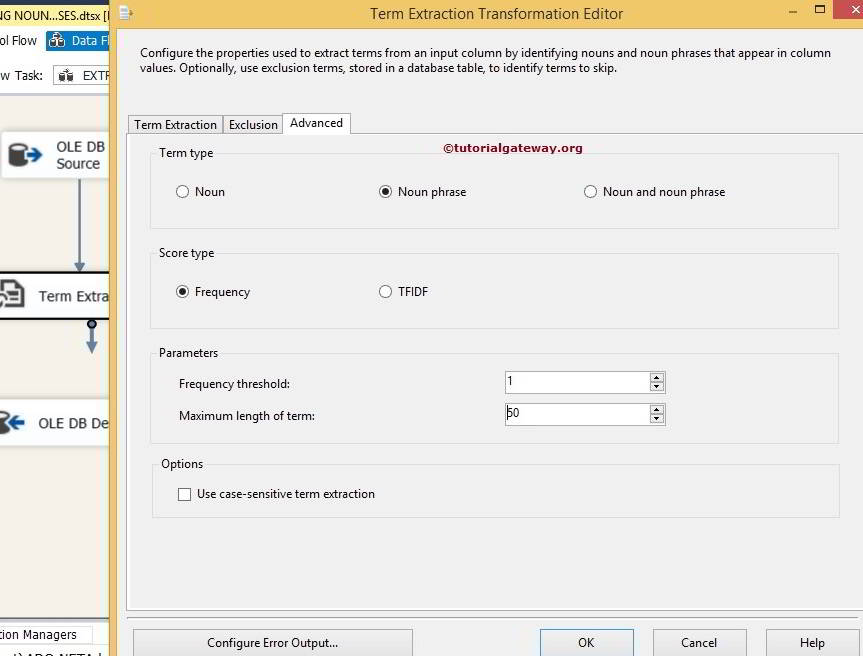
STEP 6: Advanced tab of the Term Extraction Transformation Editor Dialog box is very important to select Term Type, Source Type and Frequency Threshold. In this example we are extracting Noun only so, we selected Noun as term type and selecting Frequency Threshold as 1.
From the below screenshot you can see, there is a warning symbol on the Term Extraction Transformation and it is telling that error output is not connected. You can remove the warning symbol by configuring the error output of Term Extraction Transformation. So double-click on the Configure Error Output button will open new window to configure the error output.
The default configuration of a Term Extraction Transformation is to redirect error rows. You can get rid of this warning by connecting the error output or by changing the default behavior to Ignore Failure or Fail Component. Let’s change to Ignore Failure

Click ok to finish configuring the Term Extraction Transformation.
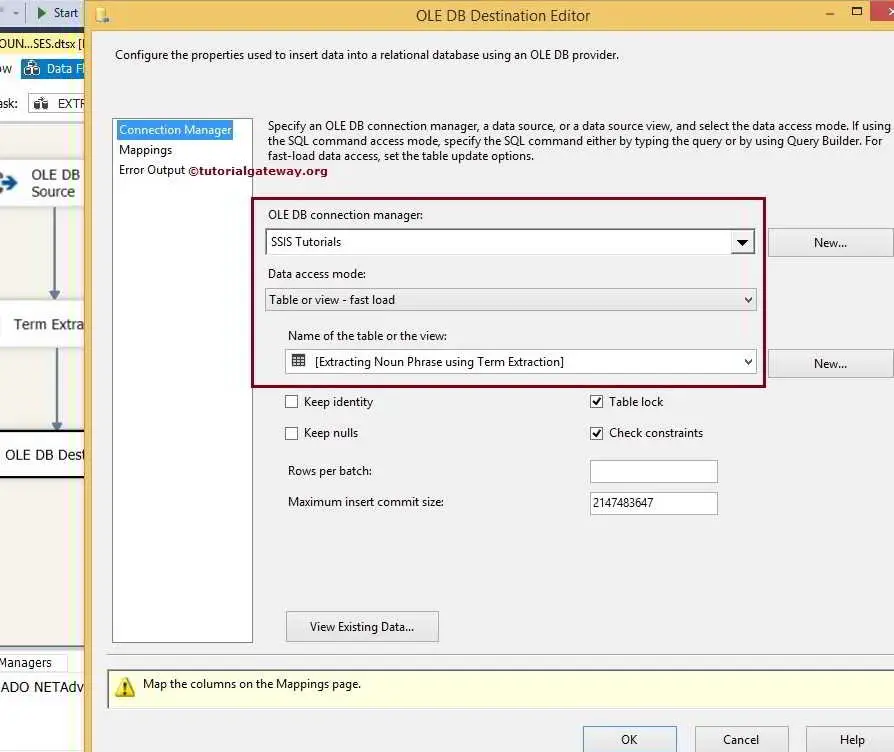
STEP 7: Now we have to provide Server, database and table details of the destination. So double-click on the OLE DB Destination and provide the required information.
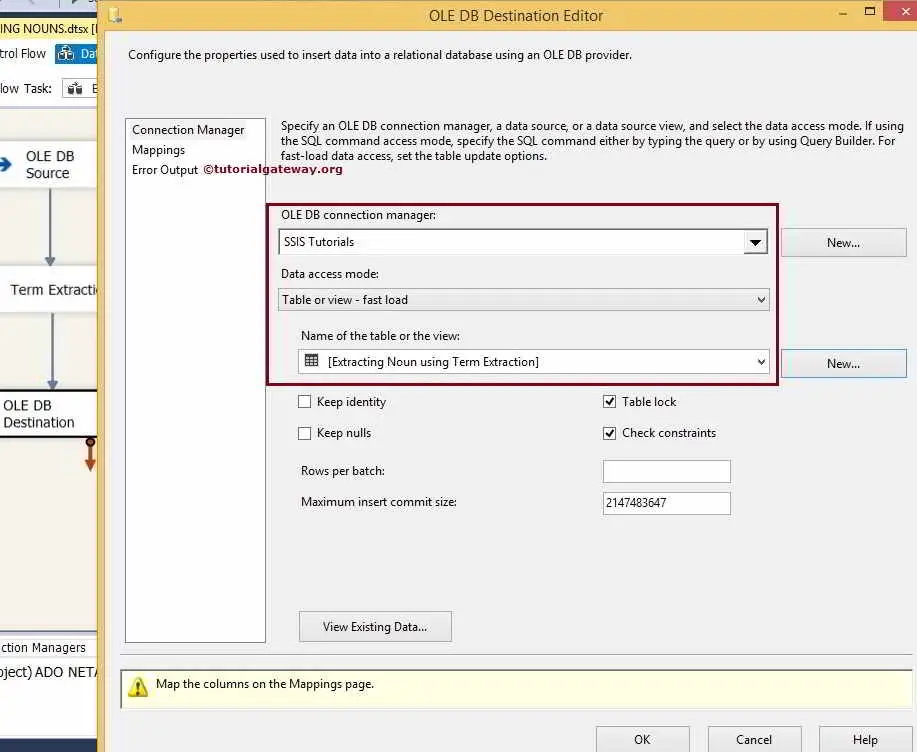
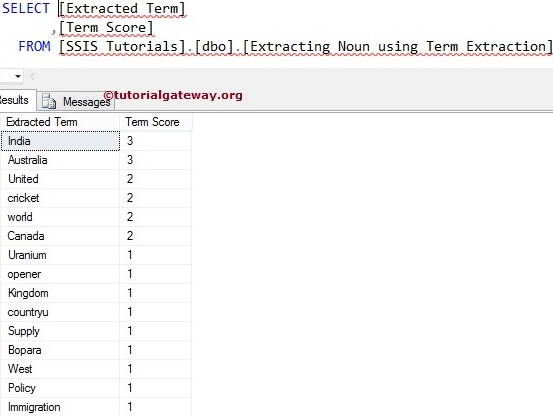
Here we selected [SSIS Tutorials] database as destination data source (localhost as server instance) and [Extracting Nouns using Term Extraction] table as our destination table
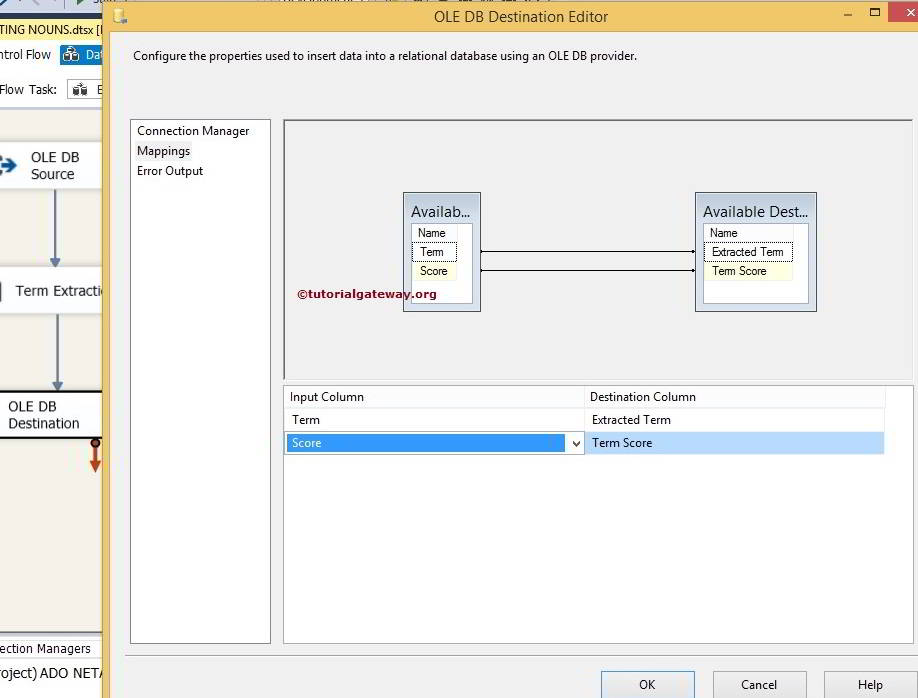
STEP 8: Click on Mappings tab to check whether the source columns are exactly mapped to the destination columns. If not, Please assign them to appropriate destination column
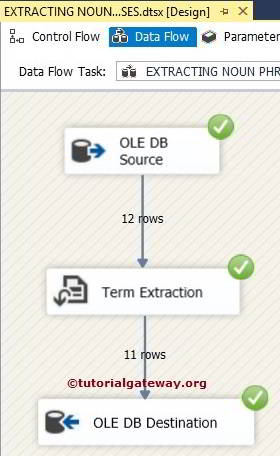
Click ok to finish designing our Extracting Nouns using Term Extraction Transformation package. Let us run the package
Let’s open the SQL Server Management Studio and check the results
TIP: If we are extracting terms from any product description then the product name will be repeated number of times but we don’t require the product name in the output. In these situations we add these product names table in the exclusion list.
Thank you for visiting Our Blog
Extract Noun Phrases Using Term Extraction Transformation in SSIS
In this article We are going to show you, How to extract the Noun Phrases using SSIS Term Extraction Transformation. Before reading this article, Please refer Term Extraction Transformation in SSIS article for the definition and the functionality of this Transformation.
Below screenshot shows our source data
STEP 1: Open BIDS and Drag and drop the data flow task from the toolbox to control flow and rename it as Extracting Noun Phrases Using Term Extraction Transformation in SSIS 2014.
Double click on it and it will open the data flow tab.
STEP 2: Drag and drop OLE DB Source, Term Extraction Transformation and OLE DB Destination from toolbox to data flow region
STEP 3: Double click on OLE DB source in the data flow region will open the connection manager settings and provides space to write our SQL statement.
Here we selected the [SSIS Tutorials] Database as our source database and SQL Command we used in the above screenshot is:
STEP 4: Click on columns tab to verify the columns. In this tab we can uncheck the unwanted columns also.
TIP: If we don’t want any column then there is no point to add it in to your SQL command.
Drag the OLE DB source output arrow on to the Term Extraction Transformation to perform transformation on the source Data.
STEP 5: Double click on the Term Extraction Transformation will open the Term Extraction Editor to configure it. Within the Term Extraction tab, You simply need to choose the column you want to use for the Term Extraction from the available input columns. We left the output column names to default Term and Score.
Exclusion Tab: If you want to exclude specific terms during term extraction then, configure this Tab by specifying a column that contains exclusion terms.
In this example let us leave this because we want to extract all the Noun Phrases from source data.
STEP 6: Advanced tab of the Term Extraction Transformation Editor Dialog box is very important to select Term Type, Source Type and Frequency Threshold. In this example we are extracting Noun Phrases only so, we selected Noun Phrases as term type and selecting Frequency Threshold as 1. Please refer Extract Nouns Using Term Extraction Transformation in SSIS article to understand, How to Extract Nouns from the Source Data.
From the below screenshot you can see, there is a warning symbol on the Term Extraction Transformation and it is telling that error output is not connected. You can remove the warning symbol by configuring the error output of Term Extraction Transformation. So double-click on the Configure Error Output button will open new window to configure the error output.
The default configuration of a Term Extraction Transformation is to redirect error rows. You can get rid of this warning by connecting the error output or by changing the default behavior to Ignore Failure or Fail Component. Let’s change to Ignore Failure
Click ok to finish configuring the Term Extraction Transformation.
STEP 7: Now we have to provide Server, database and table details of the destination. So double-click on the OLE DB Destination and provide the required information.
Here we selected [SSIS Tutorials] database as destination data source (localhost as server instance) and [Extracting Noun Phrases using Term Extraction] table as our destination table
STEP 8: Click on Mappings tab to check whether the source columns are exactly mapped to the destination columns. If not, Please assign them to appropriate destination column
Click ok to finish designing our Extracting Noun Phrases using Term Extraction Transformation package. Let us run the package
Let’s open the SQL Server Management Studio and check the results
Thank you for Visiting Our Blog
Extract Nouns and Noun Phrases Using Term Extraction Transformation in SSIS
In this article We are going to show you, How to extract the Nouns and Noun Phrases using SSIS Term Extraction Transformation. Before reading this article, Please refer Term Extraction Transformation in SSIS article for the definition and the functionality of this Transformation.
Below screenshot shows our source data
STEP 1: Open BIDS and Drag and drop the data flow task from the toolbox to control flow and rename it as Extracting Nouns and Noun Phrases Using Term Extraction Transformation in SSIS 2014.
Double click on it and it will open the data flow tab.
STEP 2: Drag and drop OLE DB Source, Term Extraction Transformation and OLE DB Destination from toolbox to data flow region
STEP 3: Double click on OLE DB source in the data flow region will open the connection manager settings and provides space to write our SQL statement.
Here we selected the [SSIS Tutorials] Database as our source database and SQL Command we used in the above screenshot is:
STEP 4: Click on columns tab to verify the columns. In this tab we can uncheck the unwanted columns also.
Drag the OLE DB source output arrow on to the Term Extraction Transformation to perform transformation on the source Data.
STEP 5: Double click on the Term Extraction Transformation will open the Term Extraction Editor to configure it. Within the Term Extraction tab, You simply need to choose the column you want to use for the Term Extraction from the available input columns. We left the output column names to default Term and Score.
Exclusion Tab: If you want to exclude specific terms during term extraction then, configure this Tab by specifying a column that contains exclusion terms.
In this example let us leave this because we want to extract all the Noun Phrases from source data.
STEP 6: Advanced tab of the Term Extraction Transformation Editor Dialog box is very important to select Term Type, Source Type and Frequency Threshold. In this example we are extracting Nouns and Noun Phrases so, we selected Nouns and Noun Phrases option as term type and selecting Frequency Threshold as 1. Please refer Extract Nouns Using Term Extraction Transformation in SSIS article to understand, How to Extract Nouns from the Source Data and Extract Noun Phrases Using Term Extraction Transformation article to understand, How to extract Noun Phrases from the data Source.
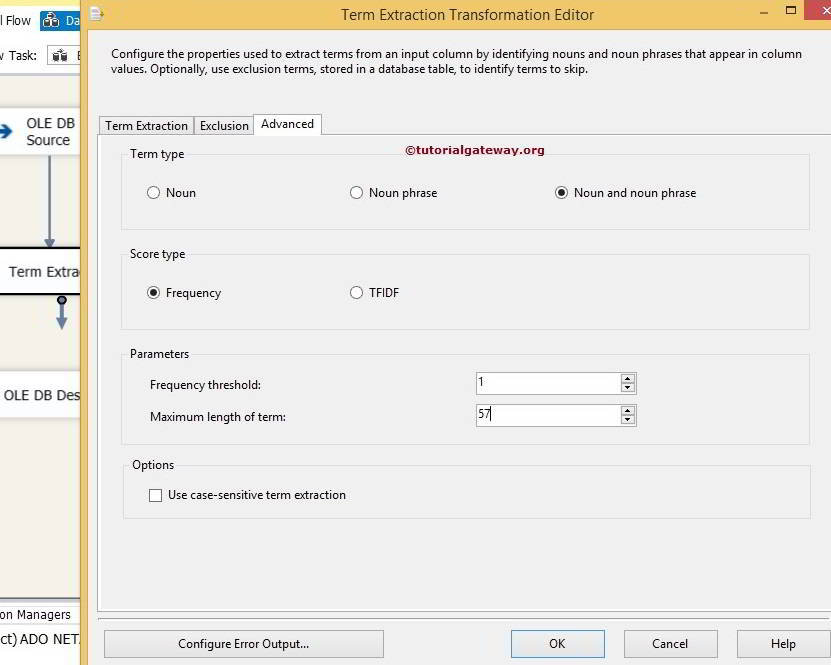
From the below screenshot you can see, there is a warning symbol on the Term Extraction Transformation and it is telling that error output is not connected. You can remove the warning symbol by configuring the error output of Term Extraction Transformation. So double-click on the Configure Error Output button will open new window to configure the error output.
The default configuration of a Term Extraction Transformation is to redirect error rows. You can get rid of this warning by connecting the error output or by changing the default behavior to Ignore Failure or Fail Component. Let’s change to Ignore Failure
Click ok to finish configuring the Term Extraction Transformation.
STEP 7: Now we have to provide Server, database and table details of the destination. So double-click on the OLE DB Destination and provide the required information.
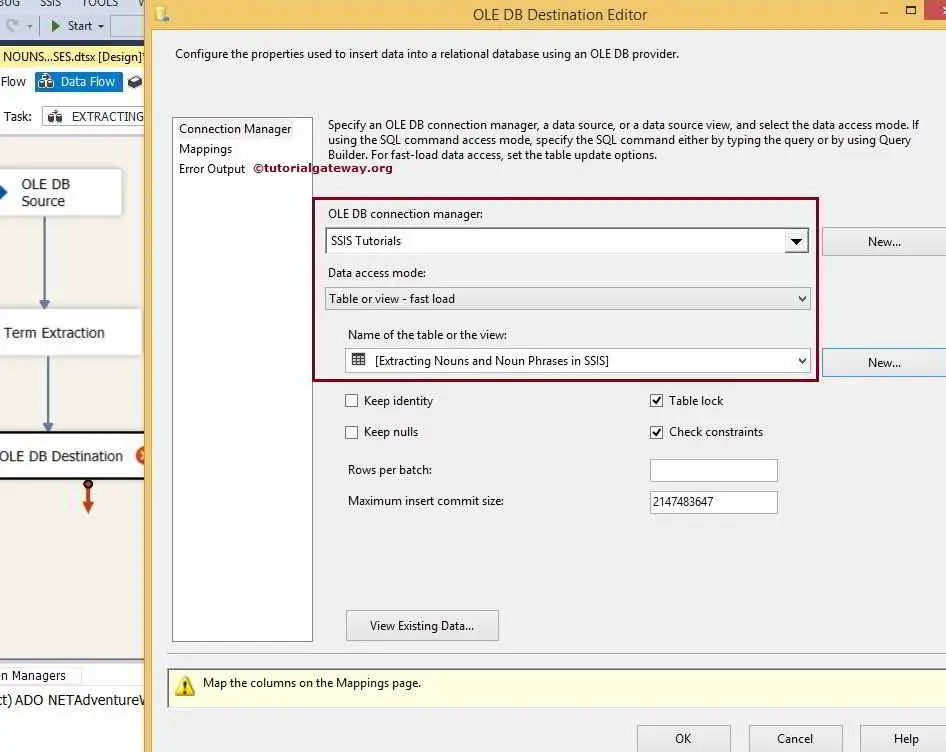
Here we selected [SSIS Tutorials] database as destination data source (localhost as server instance) and [Extracting Nouns and Noun Phrases in SSIS] table as our destination table
STEP 8: Click on Mappings tab to check whether the source columns are exactly mapped to the destination columns. If not, Please assign them to appropriate destination column

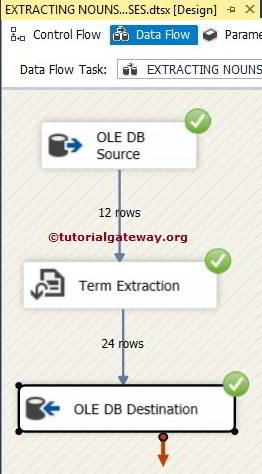
Click ok to finish designing our Extract Nouns and Noun Phrases using Term Extraction Transformation package. Let us run the package
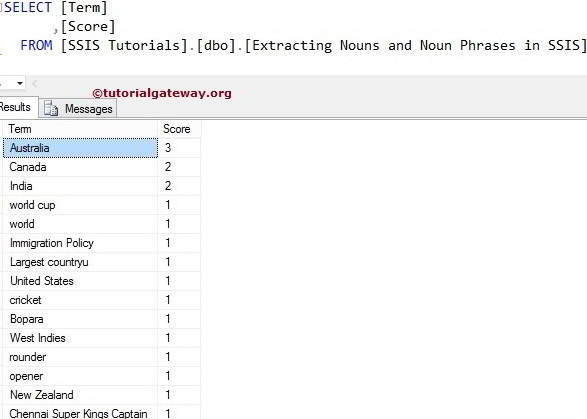
Let’s open the SQL Server Management Studio and check the results
Thank you for Visiting Our Blog
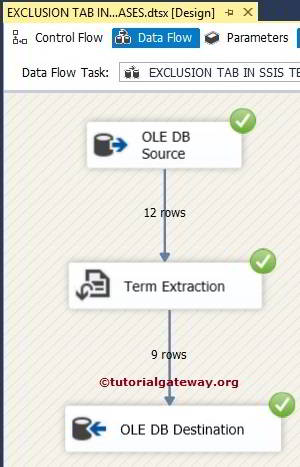
Exclusion Tab in SSIS Term Extraction Transformation
In this article We are going to show you, How to use the Exclusion Tab while extracting the Noun Phrases using SSIS Term Extraction Transformation. Before reading this article, Please refer Term Extraction Transformation in SSIS article for the definition and the functionality of this Transformation and Extract Noun Phrases Using Term Extraction Transformation in SSIS article to understand How to Extract Noun Phrases from the Source Data.
Below screenshot shows our source data
Let us see the Exclusion List as well
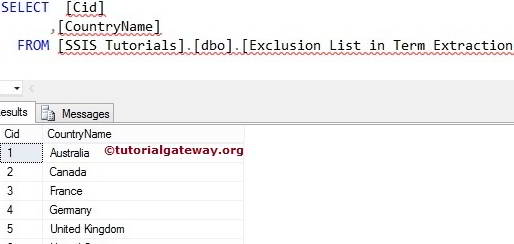
In this example, we are going to display all the Noun Phrases present in the source data except the above mention names.
STEP 1: Open BIDS and Drag and drop the data flow task from the toolbox to control flow and rename it as Exclusion Tab in SSIS Term Extraction Transformation.
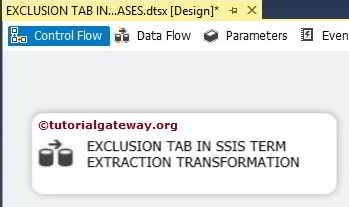
Double click on it and it will open the data flow tab.
STEP 2: Drag and drop OLE DB Source, Term Extraction Transformation and OLE DB Destination from toolbox to data flow region
STEP 3: Double click on OLE DB source in the data flow region will open the connection manager settings and provides space to write our SQL statement.
Here we selected the [SSIS Tutorials] Database as our source database and SQL Command we used in the above screenshot is:
STEP 4: Click on columns tab to verify the columns. In this tab we can uncheck the unwanted columns also.
Drag the OLE DB source output arrow on to the Term Extraction Transformation to perform transformation on the source Data.
STEP 5: Double click on the Term Extraction Transformation will open the Term Extraction Editor to configure it. Within the Term Extraction tab, You simply need to choose the column you want to use for the Term Extraction from the available input columns. We left the output column names to default Term and Score.
Exclusion Tab: In this example we want to exclude the country names (We shown in the earlier) from the Noun Phrases. For this reason, Let us configure OLE DB Connection Managerand exclusion terms.
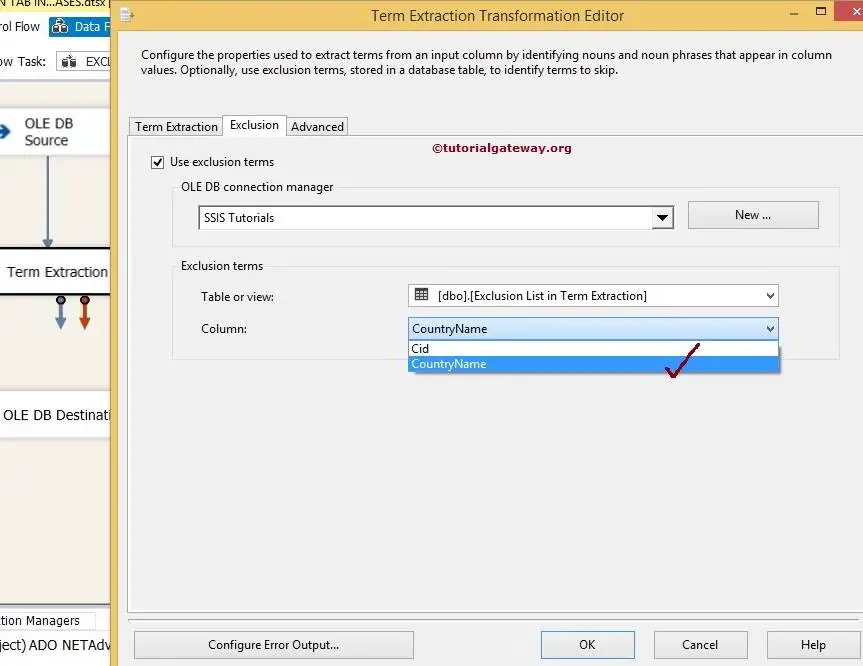
From the above screenshot you can observe that, We selected the [Exclusion List in Term Extraction] table from the [SSIS Tutorials] Database. We selected CountryName from this table because, it holds the exclusion terms such as country names.
STEP 6: Advanced tab of the Term Extraction Transformation Editor Dialog box is very important to select Term Type, Source Type and Frequency Threshold. In this example we are extracting Noun Phrases only so, we selected Noun Phrases as term type and selecting Frequency Threshold as 1. Please refer Extract Nouns Using Term Extraction Transformation in SSIS article to understand, How to Extract Nouns from the Source Data.
From the below screenshot you can see, there is a warning symbol on the Term Extraction Transformation and it is telling that error output is not connected. You can remove the warning symbol by configuring the error output of Term Extraction Transformation. So double-click on the Configure Error Output button will open new window to configure the error output.
The default configuration of a Term Extraction Transformation is to redirect error rows. You can get rid of this warning by connecting the error output or by changing the default behavior to Ignore Failure or Fail Component. Let’s change to Ignore Failure
Click ok to finish configuring the Term Extraction Transformation.
STEP 7: Now we have to provide Server, database and table details of the destination. So double-click on the OLE DB Destination and provide the required information.
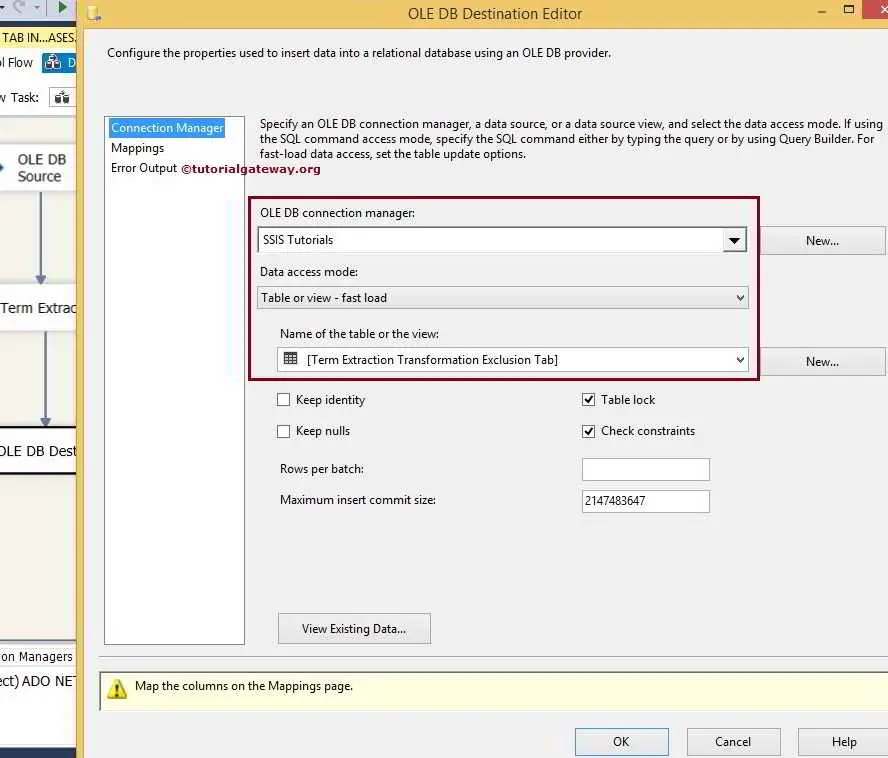
Here we selected [SSIS Tutorials] database as destination data source (localhost as server instance) and [Term Extraction Transformation Exclusion Tab] table as our destination table
STEP 8: Click on Mappings tab to check whether the source columns are exactly mapped to the destination columns. If not, Please assign them to appropriate destination column
Click ok to finish designing our Exclusion Tab in SSIS Term Extraction Transformation package. Let us run the package
If you doesn’t included the Exclusion list then the output will be same as below:
Let’s open the SQL Server Management Studio and check the results after including the Exclusion List in the SSIS Term Extraction Transformation

Thank you for Visiting Our Blog
OLE DB Command Transformation in SSIS
In SQL Server Integration Services, OLE DB Command Transformation is used to run the SQL Statements like INSERT, UPDATE and DELETE Statements in the Data Flow. Please refer Deleting Data Using OLE DB Command Transformation article to understand How to delete data using OLE DB Command Transformation and Updating Data using OLE DB Command Transformation article to understand the Update operations.
NOTE: OLE DB Command Transformation reads one row at a time from the Data flow and then apply the SQL statement on that row. So, the performance will be poor if the number of rows increases. For example, to Update 5 records OLE DB Command Transformation will run 5 times.
Inserting Data Using OLE DB Command Transformation in SSIS 2014 Example
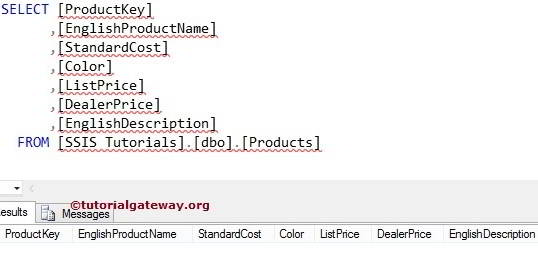
In this example we will show you, How to insert Data into the destination table using OLE DB Command Transformation. Before we start designing the SSIS Package let me show you the Destination Table in [SSIS Tutorials] Database
Drag and drop the Data Flow Task from toolbox to control flow region and rename it as Inserting Data using OLE DB Command Transformation in SSIS 2014.
Double click on it and it will open the data flow tab.
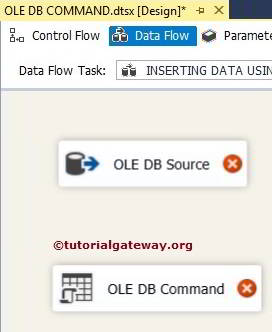
Drag and drop OLE DB Source and OLE DB Command transformation from toolbox to data flow region.
Double click on OLE DB source in the data flow region will open the connection manager settings and allows us to select the required table.
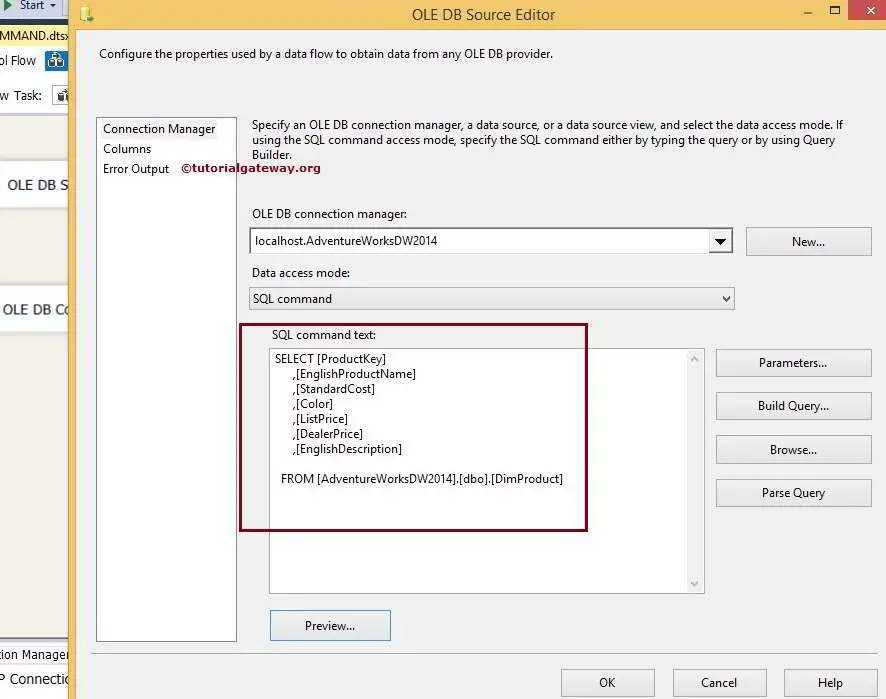
SQL Command we used in the above screenshot is
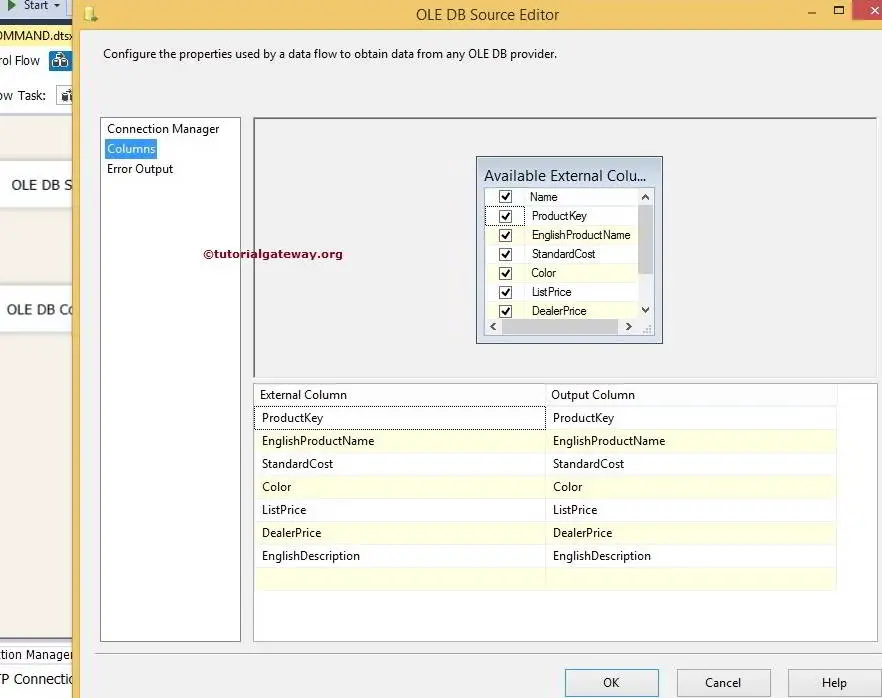
Click on columns tab to verify the columns. In this tab we can uncheck the unwanted columns also.
Drag the OLE DB Source Output arrow on to the OLE DB Command Transformation to perform transformations on the source data.
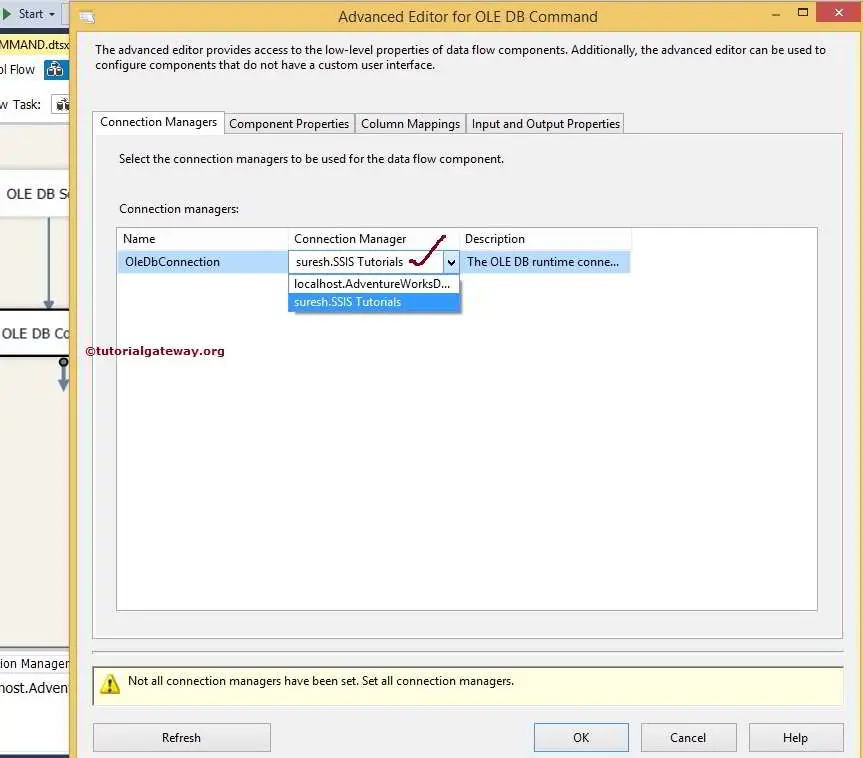
STEP 5: Double click on the OLE DB Command Transformation will open the Advanced Editor for OLE DB Command to configure it.
Within the Connection Managers tab we are selecting the already created OLE DB Connection from the list as shown below. Please refer the SSIS OLE DB Connection Manager article to understand, How to configure the connection manager.
Within the Component Properties we have to write the SQL Statement we have to perform. Please select the SqlCommand propety and click on the browse button (… button)
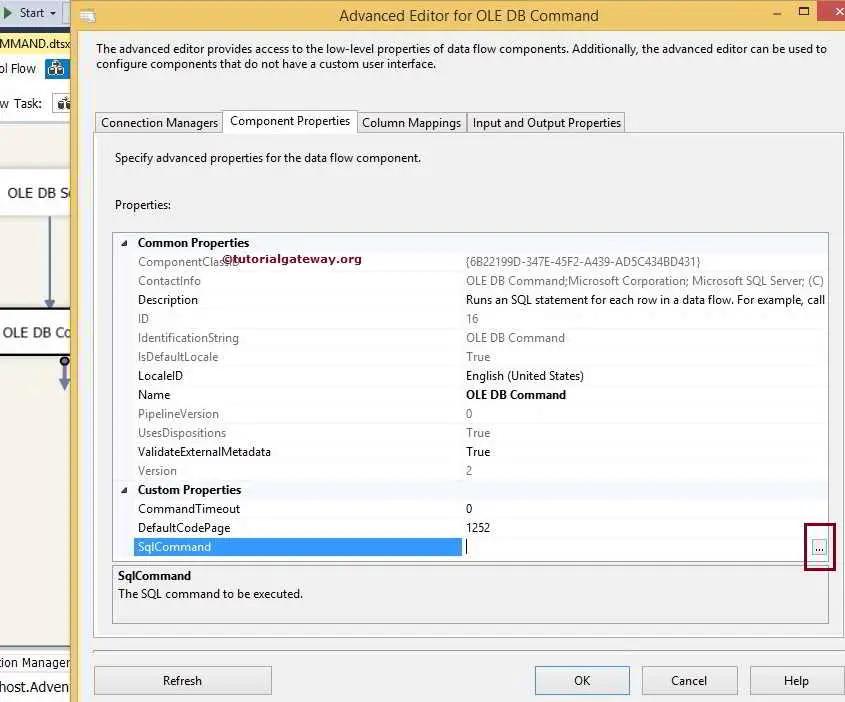
Once you click on the browse button, a String Value Editor window will be opened to write the SQL Statement. In this example, we are inserting the values into the products table.
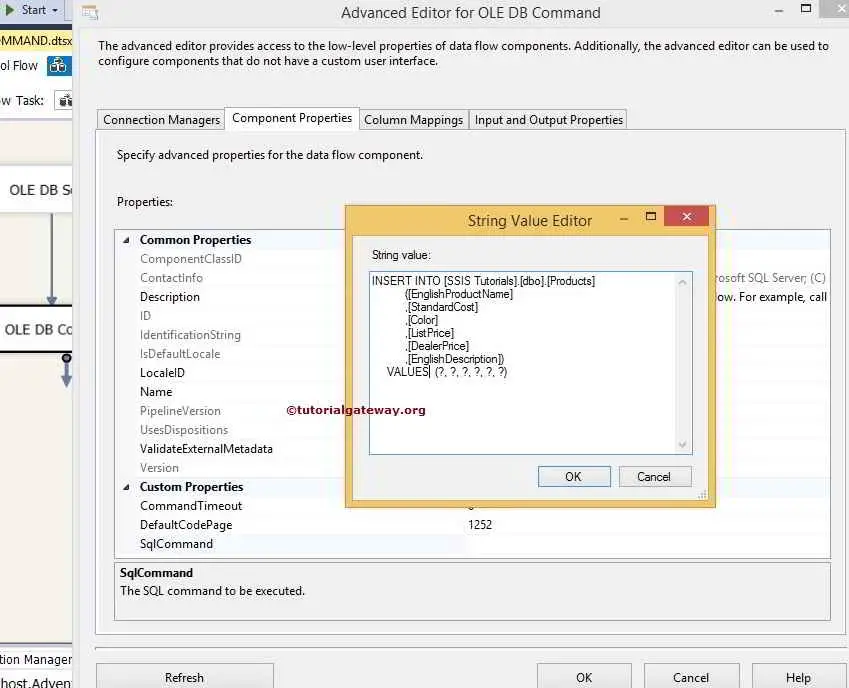
SQL Statement we used in the above screenshot is
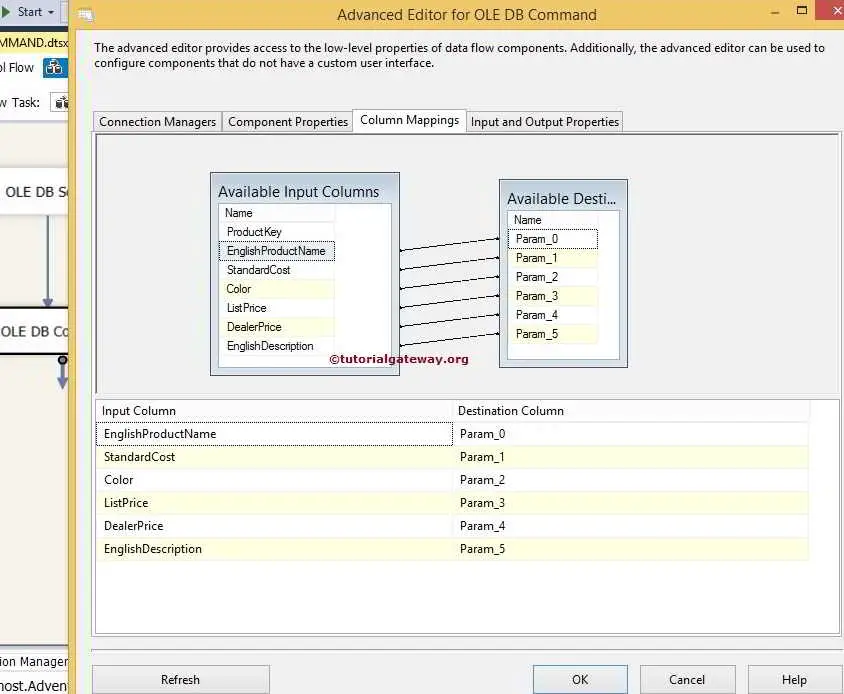
Within the Column Mapping we have to assign the appropriate column name to the parameters.
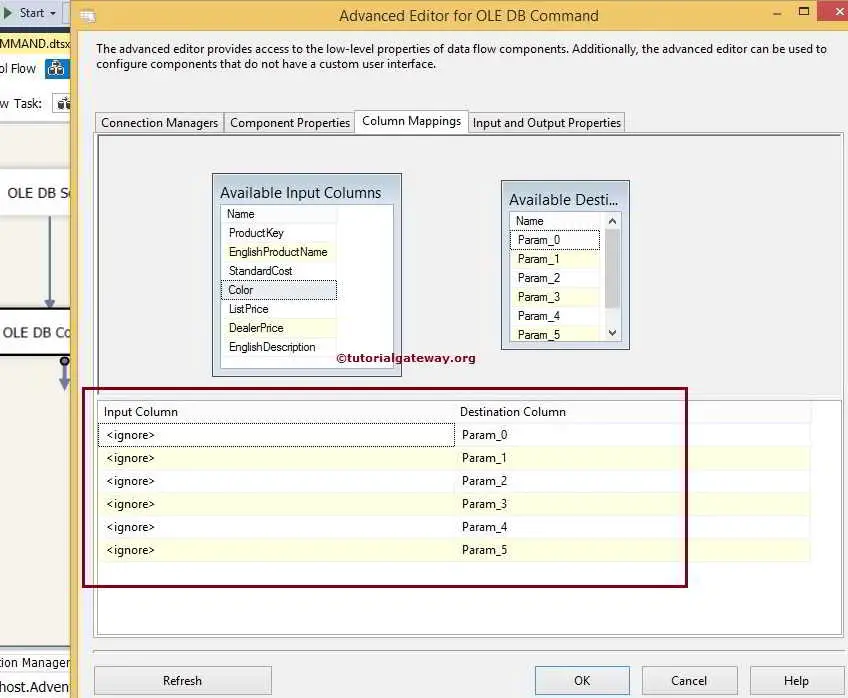
From the above screenshot you can observe that, Param_0 represents first question mark and param_5 represents fifth question mark.
Lets assign the appropriate column names to the parameters.
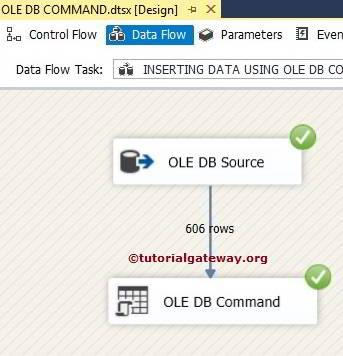
click ok to finish configuring the Inserting Data Using OLE DB Command Transformation In SSIS 2014 package. Let us Run the package
Let us open the SQL Server Management Studio and check the result
Thank You for Visiting Our Blog
Deleting Data Using OLE DB Command Transformation in SSIS
In this article we will show you, How to Delete Data into the destination table using OLE DB Command Transformation. Please refer OLE DB Command Transformation in SSIS article to understand How to insert data using OLE DB Command Transformation and Updating Data using OLE DB Command Transformation article to understand the Update operations.
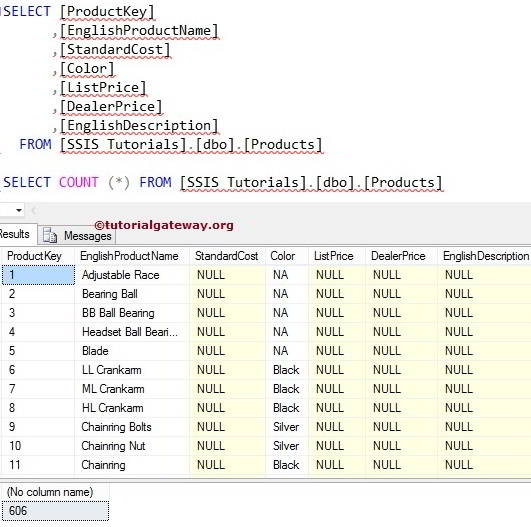
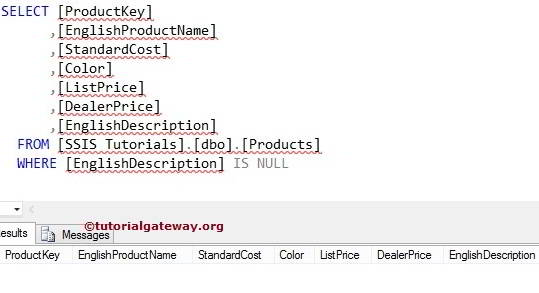
Before we start designing the SSIS Package let me show you the Destination Table in [SSIS Tutorials] Database
If you observe the above Data we have NULL values for the English Description column data. In this example we will delete all the rows with No description using SSIS OLE DB Destination Transformation
Drag and drop the Data Flow Task from toolbox to control flow region and rename it as Deleting Data using OLE DB Command Transformation in SSIS 2014.
Double click on it and it will open the data flow tab.
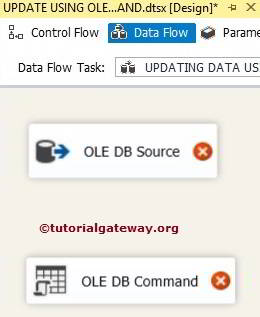
Drag and drop OLE DB Source and OLE DB Command transformation from toolbox to data flow region.
Double click on OLE DB source in the data flow region will open the connection manager settings and allows us to select the required table.
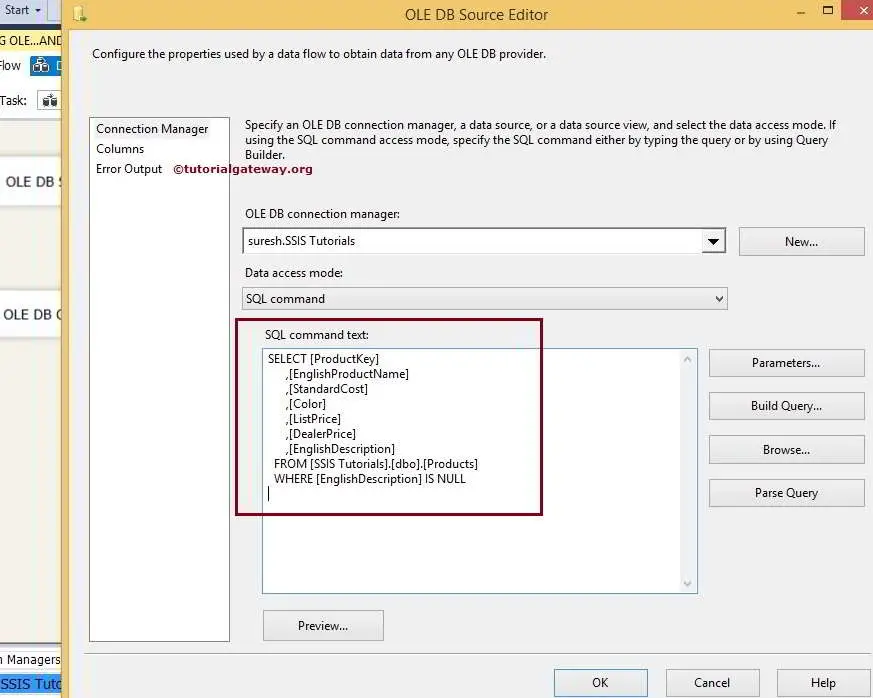
SQL Command we used in the above screenshot is
Click on columns tab to verify the columns. In this tab we can uncheck the unwanted columns also.

Drag the OLE DB Source Output arrow on to the OLE DB Command Transformation to perform transformations on the source data.
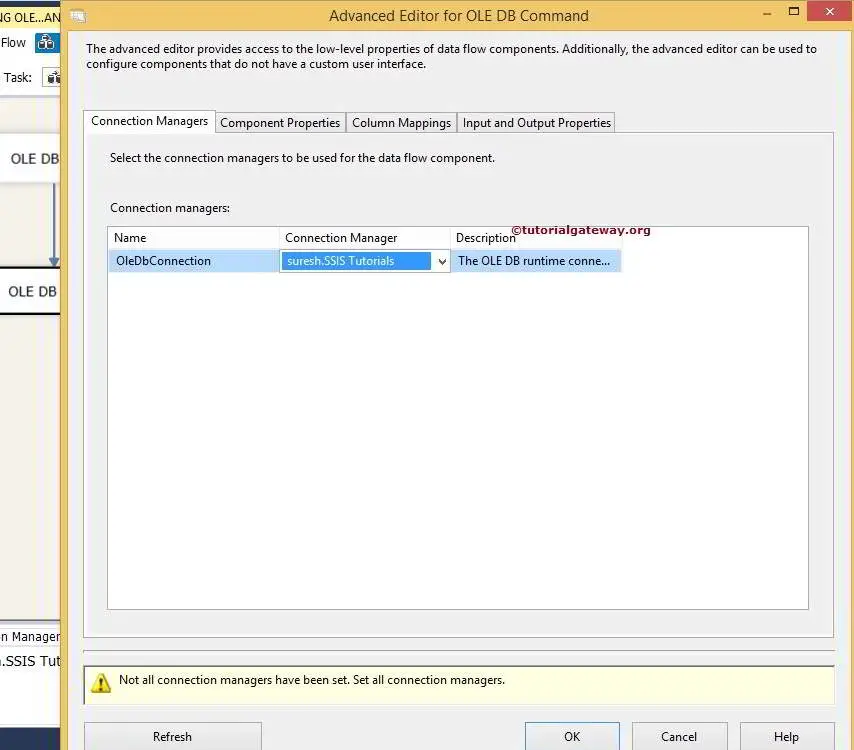
STEP 5: Double click on the OLE DB Command Transformation will open the Advanced Editor for OLE DB Command to configure it.
Within the Connection Managers tab we are selecting the already created OLE DB Connection from the list as shown below. Please refer the SSIS OLE DB Connection Manager article to understand, How to configure the connection manager.
Within the Component Properties we have to write the SQL Statement we have to perform. Please select the SqlCommand property and click on the browse button (… button)
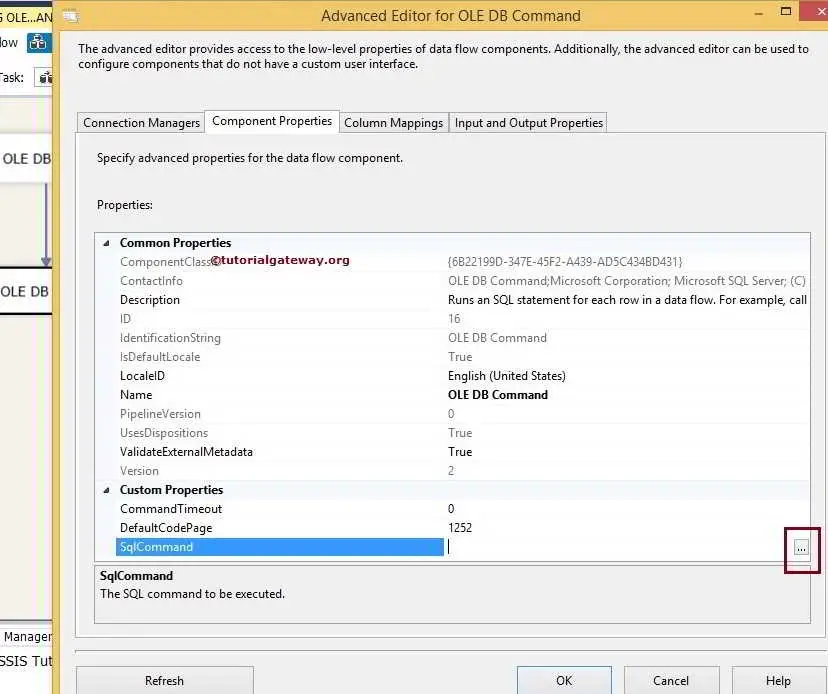
Once you click on the browse button, a String Value Editor window will be opened to write the SQL Statement. In this example, we are deleting the values in the products table.
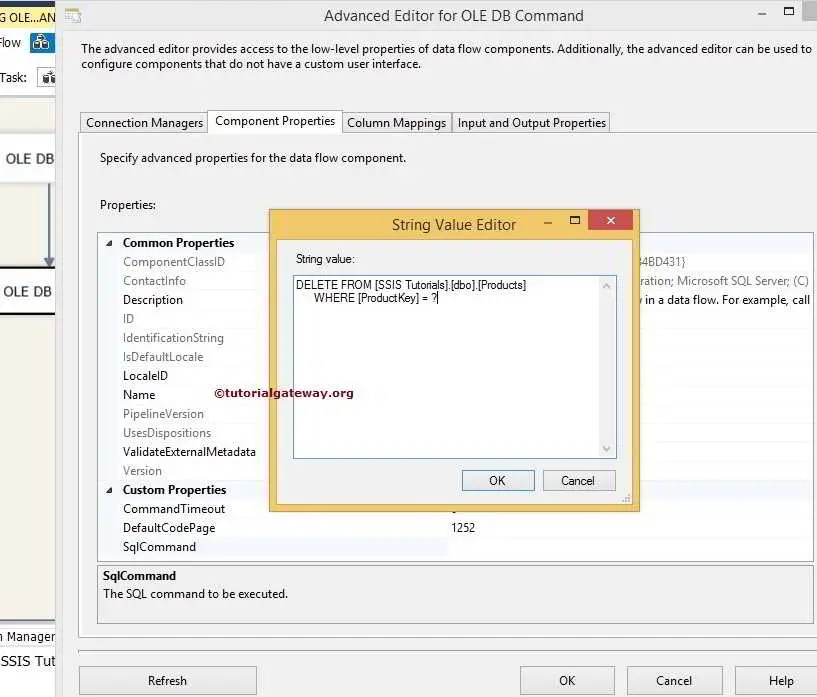
SQL Statement we used in the above screenshot is
Within the Column Mapping we have to assign the appropriate column name to the parameters.

From the above screenshot you can observe that, Param_0 represents first question mark which is [ProductKey] column from source.
click ok to finish configuring the Deleting Data Using OLE DB Command Transformation In SSIS 2014 package. Let us Run the package
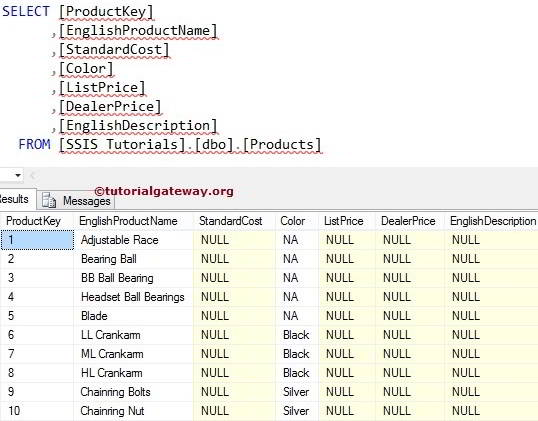
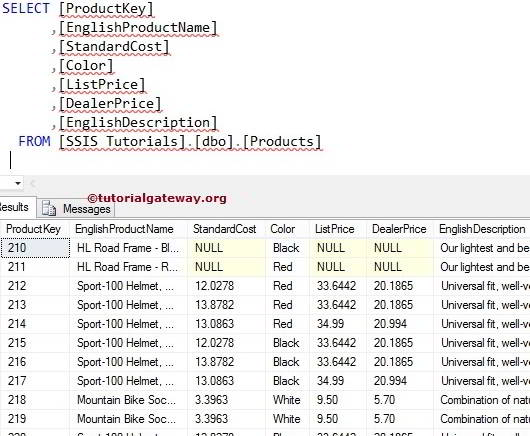
Let us open the SQL Server Management Studio and check whether we successfully deleted the rows with No description or not.
Now let us look at the Final data. If you observe the ProductKey column, it started with 210 instead of 1 because all the rows before that are deleted by the OLE DB Command Transformation
Thank You for Visiting Our Blog
Updating Data Using OLE DB Command Transformation in SSIS
In this article we will show you, How to Update Data into the destination table using OLE DB Command Transformation. Please refer OLE DB Command Transformation in SSIS article to understand How to insert data using OLE DB Command Transformation and Deleting Data using OLE DB Command Transformation article to understand the Delete operations.
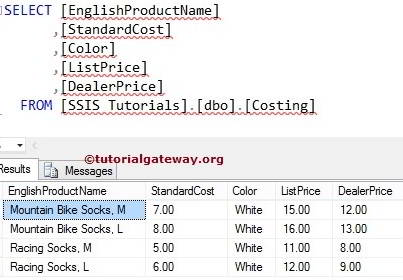
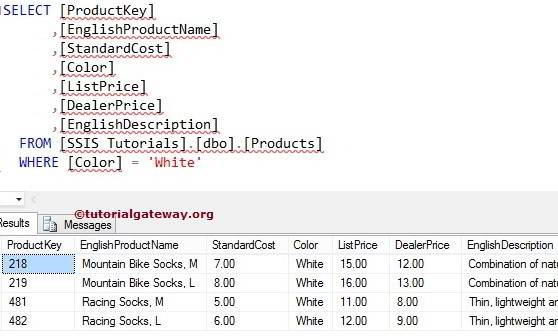
For example, Standard Cost, List Price and Dealer Price for all the white color products has been changed and our task is to update the product table with the changed prices. Before we start designing the SSIS Package let me show you the Table in [SSIS Tutorials] Database
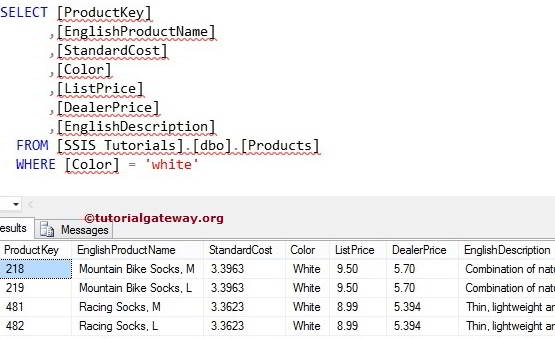
Below screenshot show you the changed price list
Update Data Using SSIS OLE DB Command Transformation
In this example, Our task is to update the old values of the products table in [SSIS Tutorials] Database with the new values in the Costing table.
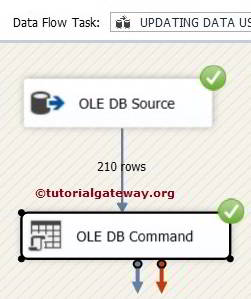
Drag and drop the Data Flow Task from toolbox to control flow region and rename it as Updating Data using OLE DB Command Transformation in SSIS 2014.

Double click on it and it will open the data flow tab.
Drag and drop OLE DB Source and OLE DB Command transformation from toolbox to data flow region.

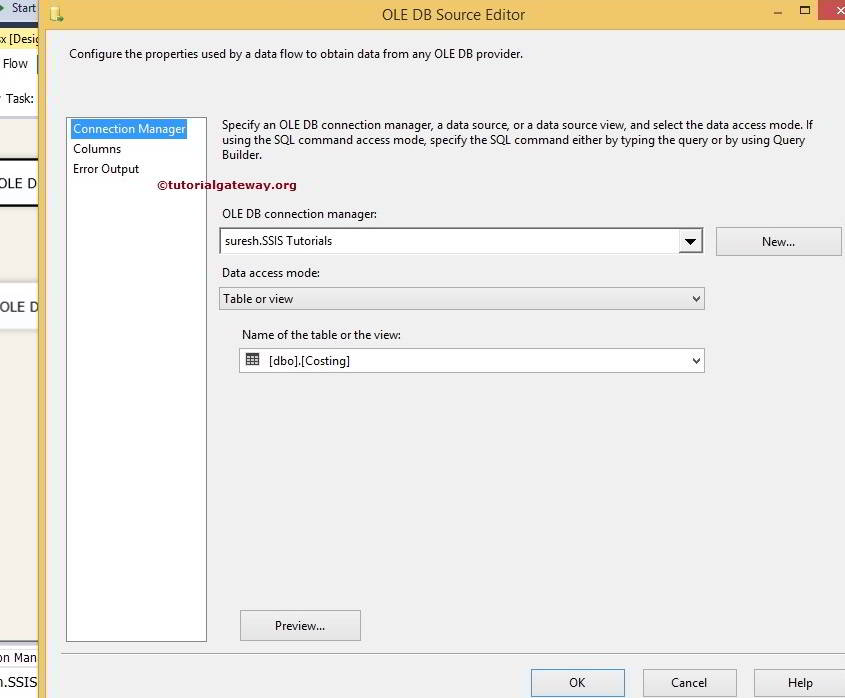
Double click on OLE DB source in the data flow region will open the connection manager settings and allows us to select the required table.
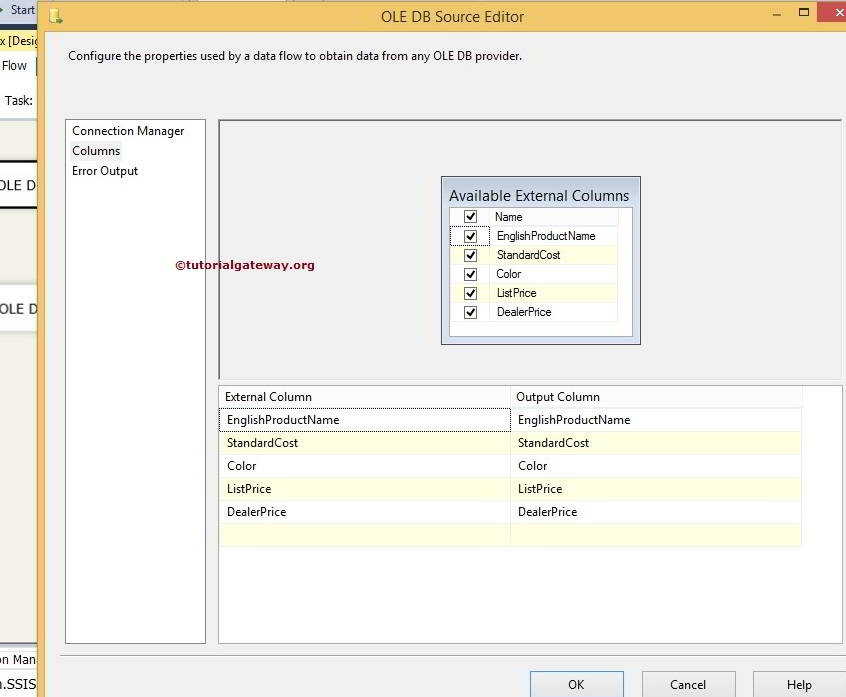
Click on columns tab to verify the columns. In this tab we can uncheck the unwanted columns also.
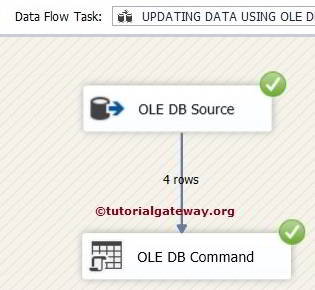
Drag the OLE DB Source Output arrow on to the OLE DB Command Transformation to perform transformations on the source data.
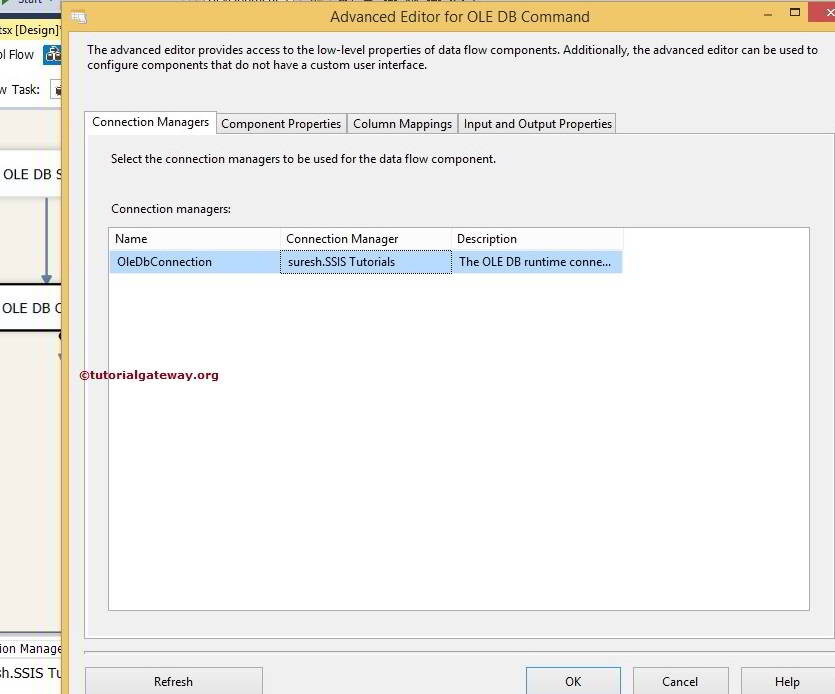
STEP 5: Double click on the OLE DB Command Transformation will open the Advanced Editor for OLE DB Command to configure it.
Within the Connection Managers tab we are selecting the already created OLE DB Connection from the list as shown below. Please refer the SSIS OLE DB Connection Manager article to understand, How to configure the connection manager.
Within the Component Properties we have to write the SQL Statement we have to perform. Please select the SqlCommand propety and click on the browse button (… button)

Once you click on the browse button, a String Value Editor window will be opened to write the SQL Statement. In this example, we are Updating the values in the products table.
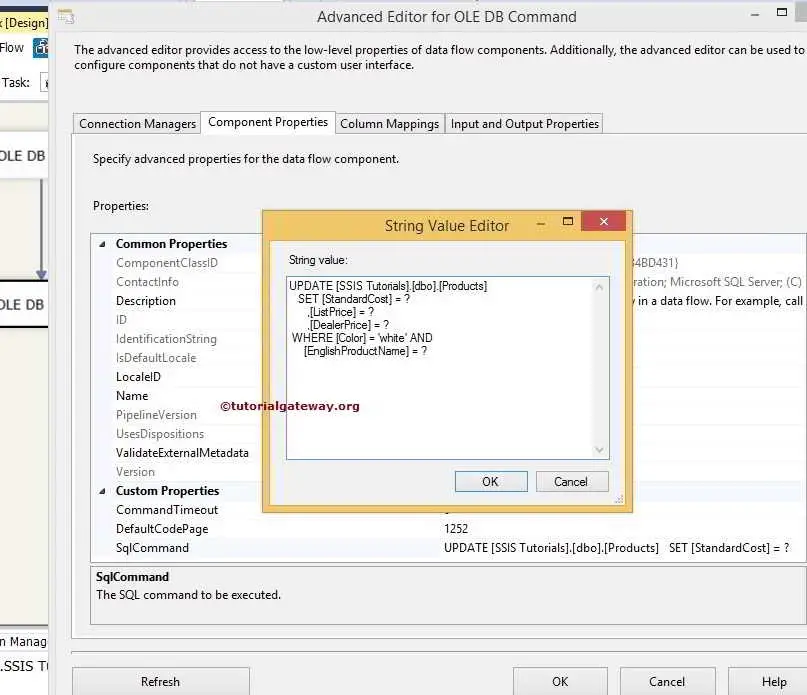
SQL Statement we used in the above screenshot is
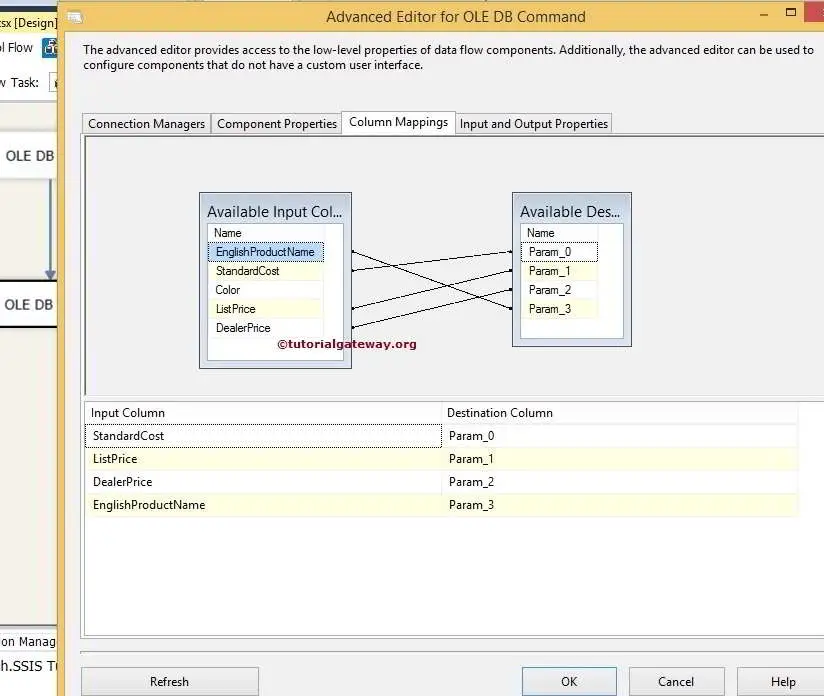
Within the Column Mapping we have to assign the appropriate column name to the parameters.

From the above screenshot you can observe that, Param_0 represents first question mark and param_3 represents fourth question mark.
Lets assign the appropriate column names to the parameters.
click ok to finish configuring the Deleting Data Using OLE DB Command Transformation In SSIS 2014 package. Let us Run the package
Let us open the SQL Server Management Studio and check the result
Thank You for Visiting Our Blog